
Last updated - July 8, 2021
This article is part of WooCommerce Shipping Guide:
If you are running an online store selling physical products, you will definitely need to get into the intricate world of shipping. WooCommerce helps in setting up convenient shipping options to locations across the world. You have to decide on your selling strategy and set up WooCommerce Shipping rates accordingly.
Before starting with the Shipping settings, remember to set up the shipping location from the General settings tab.

Next, you can go to the Shipping tab by navigating through the following path:
WooCommerce → Settings → Shipping

WooCommerce has broadly categorized shipping settings into three sections: Shipping Zones, Shipping Options, and Shipping Classes. Let’s see each in more detail:
WooCommerce Shipping Zones
WooCommerce allows to set up custom shipping zones based on your preferences. Basically, shipping zones are specific geographical locations where you want to ship your products to. You can set different shipping methods and rates for each of the shipping zones that you create.
By default, WooCommerce has a Shipping zone called ‘Rest of the World.’ If a product does not feature in any of the shipping zones you created, it’ll automatically fall into the ‘Rest of the World’ zone.

You can add a new shipping zone by clicking the Add shipping zone button.

This will help you create a new Shipping Zone.
Enter a title for your zone under the field Zone Name.
Now, you can set one or multiple regions in your shipping zone by starting to type the first few letters of your region and then choosing from the drop-down in the column Region(s).

Just under the region field, there is a link that says Limit to specific Zip/Postcodes. Clicking this will display another text field where you can enter wildcards or range of postcodes to limit the range of your shipping zone.

Setting shipping methods
Once the shipping zone is created, you can add shipping methods to it. Click the Add shipping method button

Click Add shipping method button to pop-up a modal window that has three options for shipping methods. These are:
- Flat Rate
- Free Shipping
- Local Pickup
You can choose to apply different shipping methods according to your preference. The shipping methods you choose in a shipping zone will apply only to customer-addresses that are within that specific shipping zone.

Once you set the shipping methods, the shipping zone will look like the screenshot below.

Adding rates to your shipping methods
Now you need to set rates for each shipping method. This can be done from the settings page of that particular shipping method. Hover the cursor around the title and click ‘Edit’. Or, you can simply click the name of the shipping method.

According to your requirements, you can create any number of zones and can set multiple shipping methods for each zone.
Now, let’s see how to set up rates on a shipping method.
Flat Rate shipping works in alignment with Shipping class feature also. We’ll look into more details later in this article.
Let’s first see how to set up flat rate shipping in different scenarios.
The Flat Rate Settings page has a Method Title that describes the shipping method. Your customer can see this title on the front-end of the site. Tax Status determines whether the tax is applied to the shipping amount or not.

Different rate strategies
Cost field is where you set up the rate for shipping.
WooCommerce provides multiple options for setting up flat rate shipping. You can set a simple flat rate (for example, $5), or use the set of available placeholders described below:
- [qty] – based on the number of items. If you want to charge $5 for each item in the cart, you can set the rate as [qty] * 5.
- [cost] – based on the total cost of the order. If you wish to set 15% of the total cost, you can set as [cost] * 0.15
- [fee] – for a percentage-based fee on a minimum shipping rate. If you want to charge 15% of the total cost, and prefers to set a minimum shipping cost of $8, you can set this as [fee percent=”15″ min_fee=”8″]. If you want to charge 10% of the total cost with $15 as the minimum shipping cost, it will be [fee percent=”10″ minimum_fee=”15″]

Local Pickup settings are more simple and straightforward. You can set a Title, Tax Status, and Cost (if required).

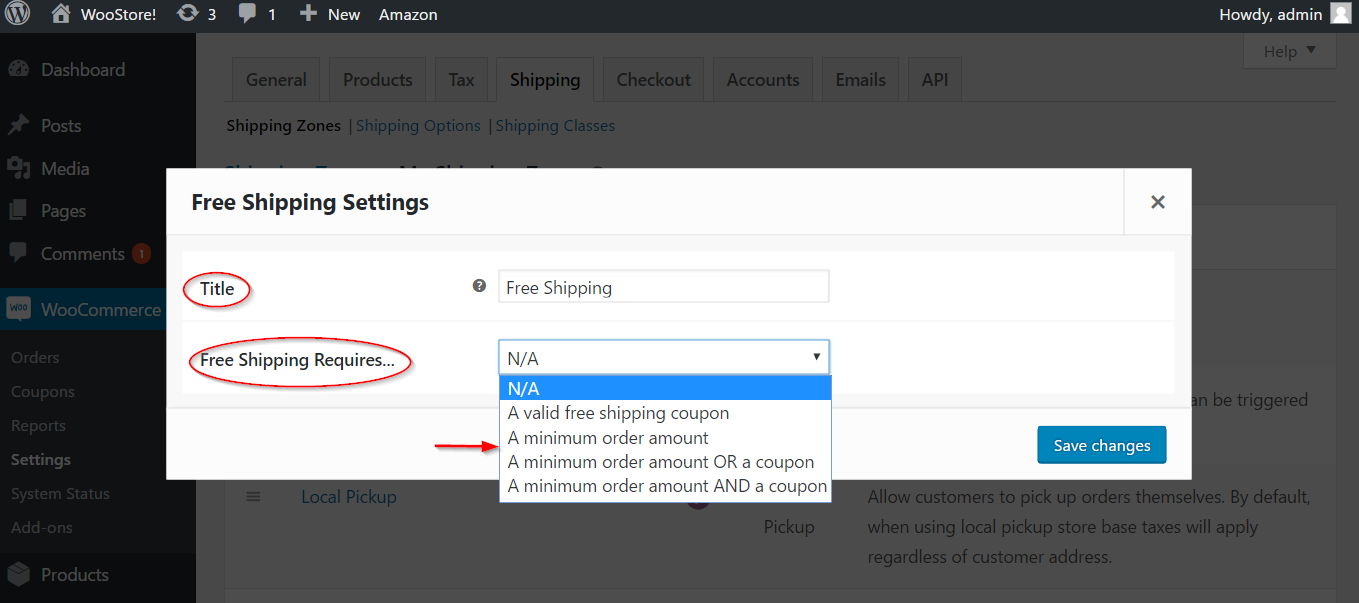
Free Shipping can be configured by updating the title, and setting up any of the following clauses to the customer to claim free shipping: “A valid free shipping coupon,” “A minimum order amount,” “A minimum order amount OR a coupon,” & “A minimum order amount AND a coupon.”
Offering free shipping can be a good promotional strategy for your store.
Shipping Options
Shipping Options tab deals with how shipping calculations are displayed on the front-end of your store. These will have an effect on customer interaction and purchase decisions on your store.
The first part is Calculations, which has a checkbox to enable the shipping calculator on the cart page. This will straightaway give your customer an idea about the estimated shipping costs.
The second checkbox is to hide the shipping costs until an address is entered. This works well for many because the accurate shipping charges will be displayed once the customer enters the address.
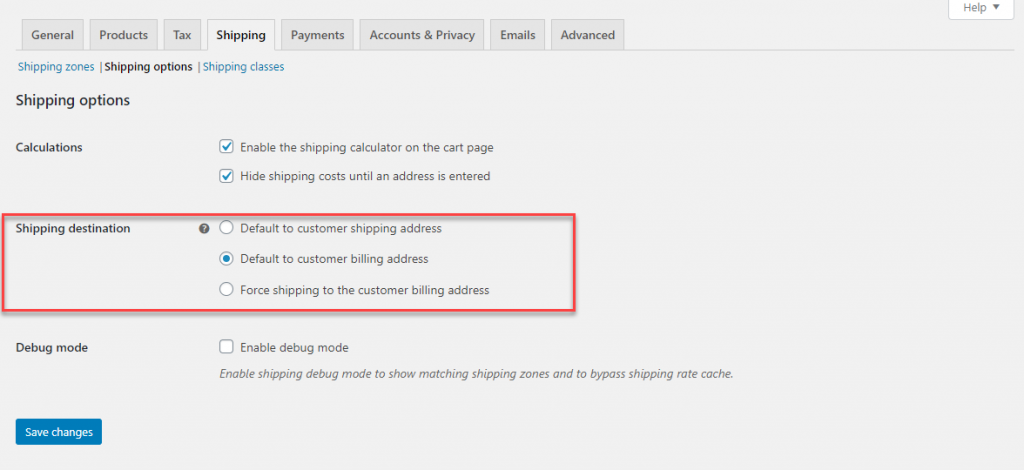
 WooCommerce provides three options to set up the shipping address for customer orders. These are:
- Default to customer shipping address – Customers will have to enter both billing and shipping addresses.
- Default to customer billing address – By default, billing address will be taken as the shipping address. But if customers want to opt for a separate shipping location, they will have an option to do so.
- Force shipping to customer billing address – Customers won’t have an option to enter a separate shipping address. Shipping will be only to the customer’s billing address.
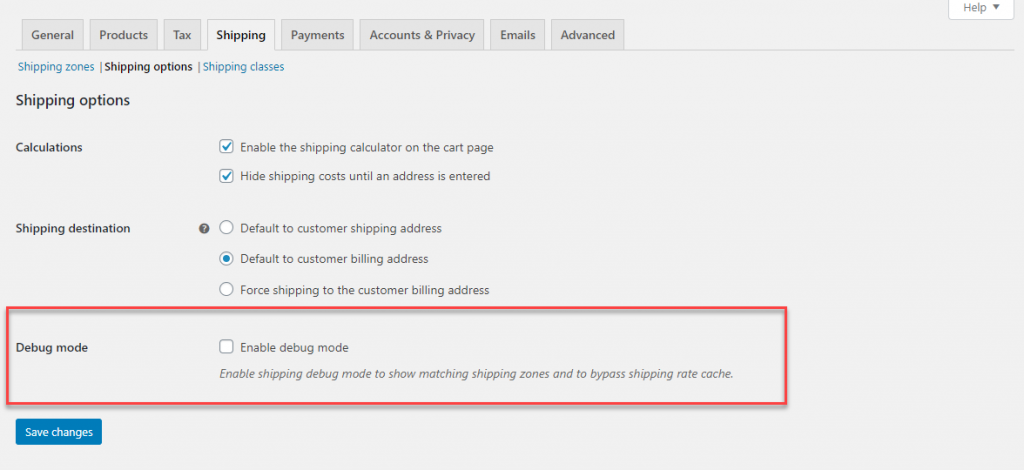
You can also enable Debug mode when required. This will help you find matching shipping zones, and to avoid hassles of cache while displaying shipping rates.
Shipping Classes
Setting up shipping classes are a great way to tackle certain shipping issues. If you are selling a range of products that need different approaches to shipping due to the nature or size of the product, you can make use of this feature in WooCommerce. For example, if you are shipping bulky products or easily breakable products, it’s a good idea to categorize them under different shipping classes.
To create a new shipping class, you need to go to the Shipping Classes tab and click Add Shipping Class button to create a new one.

Once you click Add Shipping Class button, there are three fields that you can edit, along with a column for Product Count. They are:
- Shipping Class Name – A name for your shipping class
- Slug – By default, WooCommerce takes the name you enter for your shipping class as slug, but you can create a different name here
- Description – This will be a text that you can add for your reference.
- Product Count – Indicates the number of products that are added to this shipping class. Once you add a product and link it to this shipping class, it’ll reflect here (further details in the article on product management).

We’ll see an example in the next screenshot. After filling up the text boxes, click Add Shipping Class button followed by Save Shipping Classes button

Once a shipping class is created, it will reflect in the flat rate shipping you have already set. To access this, you need to go to Shipping Zones tab, choose the specific zone that you want to edit, and click Flat Rate from shipping methods column.

Adding shipping class costs
When you open the settings for Flat Rate shipping, you can see a new field is added.

You need to edit the specific cost field to set the shipping cost. You can use the [qty] placeholder to set this.
In the below example we are setting $5 as the additional shipping cost for “Bulky Shipping Class.” This means an additional $5 will be charged for every product shipped from this shipping class.

You can also set an additional fee for products that do not come under any shipping class with No Shipping Class Cost field.

Calculation Type drop-down allows you to set different calculations when shipping charges from multiple shipping classes are considered. These are:
- Per Class: Charge shipping for each shipping class individually.
- Per Order: Charge shipping for the most expensive shipping class.

Click Save changes button after you update all the settings as per your requirement.
We have now covered the basic features of shipping settings. You explore further options once a list of products is added to your store.


")
")
")