In any business, at times you’ll need to refund your customers. With WooCommerce, you can quickly process refunds in two ways: Automatically or Manually.
- Automatic refunds are preferred, and when used, return customer’s money via the payment method used to pay for the order. This all happens via the “Edit Order” page in your WooCommerce admin area.
- To process automatic refunds, your customer must have paid via a compatible payment gateway.
- Manual refunds record the order as refunded in your WooCommerce store, but you’ll still need to return the money manually to your customer.
- In most cases this means accessing your merchant account and returning funds via that interface. This varies depending on the payment gateway used.
Note: Directly changing an order’s status to Cancelled or Refunded will not automatically refund your customer. Be sure to complete the refund process outlined here.
Automatic Refunds
↑ Back to topWhen processing refunds automatically, the order in WooCommerce has its status changed to “Refunded”, and the customer is refunded their money via the same payment method used to pay for the order, all in one process.
Once you’ve processed a refund automatically in WooCommerce, no further steps are necessary. Here are general steps to process an automatic refund via WooCommerce:
- Head to: WooCommerce > Orders.
- Select the order to refund.
- Go to the order summary, and select the Refund button.
- Use the quantity fields next to the product(s) to be refunded in the text box(es) that appear for each line item. The refund amount will automatically be calculated based on the quantities entered. If inventory is not managed, you can also enter the Refund amount for each line item, without adjusting the product quantity.
- Add refund notes, if desired.
- Select “Refund $x.xx via [your payment method]”.
Note: If the full order value is not refunded, the order will not have its status changed to Refunded and the email that is sent to the shopper will refer to a “partial refund.”
How Do I Know the Payment was Refunded?
When the refund has been processed via the payment method used, the payment gateway usually adds an order note indicating the funds have been returned via the payment method.
Look at the Order notes for a “Successfully refunded” message to verify the refund has been processed without issues. If needed, you can log into your account with the payment gateway used for the order and check there as well.

Manual Refunds
↑ Back to topGenerally the only time you’ll need to use the manual refund option is if you’ve taken payment with a payment gateway that doesn’t support automatic refunds, like Cash On Delivery, or Check Payments. When manually refunding an order it is up to you to ensure your customer’s funds are returned outside of WooCommerce!
- Check: Consult the documentation or support of your payment gateway on whether manual refunds are available. You will either need to:
- Log in to your payment method account and process the refund there.
- Transfer the money from your bank account manually.
- Scope: Refunds normally extend to products, taxes, and shipping fees. However, any transaction fees charged by the payment gateway will usually be lost and not refunded.
- WooCommerce: Refunds can be processed through your Orders page. To manually refund an order:
- Go to: WooCommerce > Orders.
- Select the order to refund.
- Go to the order summary, and select “Refund” to start.
- Specify the quantity of the product(s) to be refunded in the text box(es) that appear for each line item. The refund amount will automatically adjust based on the products refunded. If inventory levels are not managed, you can also enter the Refund amount, without adjusting the product quantity.
- Add refund notes, if desired.
- Select “Refund $XX.XX manually”.
Note: If the full order value is not refunded, the order will not have its status changed to “Refunded” and the email sent to the shopper will refer to a “partial refund.”
Items selected for a refund will be noted as refunded. Once the refund has been applied to the order, it will look like this:
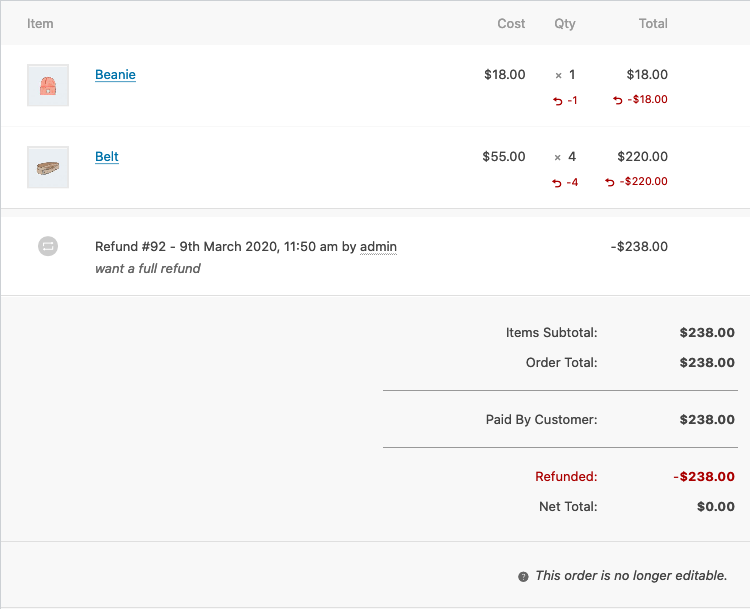
A red “Refunded” line is also added to the “order totals” area
Refund Emails sent to customers
↑ Back to topWhile only one email template is used for “Refunded Order” emails, depending on whether or not you have refunded the full value of the order, the phrasing in the email will differ:
- If the entire order value is not refunded, The email sent to the shopper will refer to a “partial refund.”
- If the entire order value is refunded. The email will state the order has been refunded.
Read more about the different emails that WooCommerce sends at Email Settings.
Refunding Fractions of Product Quantities, to Automate Tax Calculations
↑ Back to topIt is possible to enter the quantity of product to be refunded as a fraction of the whole. This is useful for calculating associated taxes automatically in scenarios where a partial refund is issued.
After the refund is completed, the quantity field will always be rounded back up to the nearest whole number. However, the tax field calculations will not be affected – and will continue reflecting the fraction entered prior to the refund being submitted.
In the example below, £13 of the product’s cost needed to be refunded, along with an equivalent percentage of the taxes. If we type the amount (£13) directly into the Total field, the taxes will not be calculated automatically and we’ll need to work them out manually.
However, by working out what fraction our refund amount is of the total item cost, then entering that in the Qty field, the other tax fields are automatically calculated.
Here’s the calculation: [Refund Amount]/[Total] = [Qty] or for this example 13/39.13 = 0.33222591 – copy-paste the fraction into the Qty field and press the Tab key.
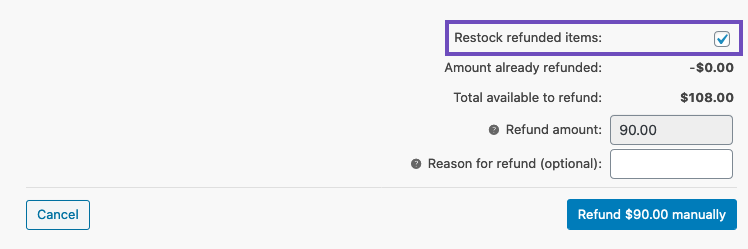
Restocking Products Based on Refunds
↑ Back to topWhen processing a refund, you have the option to restock products by ticking the “Restock refunded items” box:
How do I find out if my payment gateway is refund-compatible?
↑ Back to top- Check the documentation of the payment gateway.
- If it’s a paid extension from WooCommerce.com, purchase it and give it a try! We have a 30-day Money Back Guarantee and can refund you with no hassle.
- Check with the payment gateway provider.
- Ask us.
How do I inform my customers about our refund policy?
↑ Back to topThe best starting point is to create a page describing your policy and how a customer can request a refund.
For points to consider, we have sample refund policy page templates and a helpful reference in our Refund Policy Page Guidelines. You can also review WooCommerce.com’s Refund Policy for inspiration.
The next step is to share your refund policy with customers. There are several ways you might want to make it available to your shoppers:
- Adding the policy link into a menu in your store (many stores do this in their footer menu)
- Adding the policy link to order confirmation emails (More information about how to Customize Shop Emails)
I am a developer. How do I find out if my payment gateway is refund-compatible?
↑ Back to topGo to How to check if your payment gateway supports refunds and look up class constructor class properties.
Questions and Support
↑ Back to topDo you still have questions and need assistance?
This documentation is about the free, core WooCommerce plugin for which support is provided in our community forums on WordPress.org. Searching there you’ll often find that your question has been asked and answered before.
If you haven’t created a WordPress.org account to use the forums, here’s how.
- If you’re looking to extend the core functionality shown here, we recommend reviewing available extensions in the Woo Marketplace.
- Need ongoing advanced support, or a customization built for WooCommerce? Hire a WooExpert agency.
- Are you a developer building your own WooCommerce integration or extension? Check our Developer Resources.
If you weren’t able to find the information you need, please use the feedback thumbs below to let us know! 🙏