Last updated - August 24, 2020
The external appearance of your store depends largely on the theme that you choose. But the right theme provides more than just looks. A good theme provides great control to the store-owner in terms of product presentation and user access. While starting with your store, you can use the simple and powerful WooCommerce Storefront Theme. It is free and quite easy to use and has a lot of options for customization through child themes.
Installing WooCommerce Storefront Theme
You can install WooCommerce Storefront theme just like you do for any other plugin. On the admin panel, go to Appearance → Themes → Add New.
Type ‘storefront’ in the search field, hover the cursor around Storefront and click the Install button.


Once installed, click Activate button.
Alternatively, you can download the latest version of Storefront from wordpress.org and then upload the extracted folder to the themes directory on your server via FTP.
Once this is done, you can go to Appearance → Themes to activate.
Page Templates on Storefront
In addition to the default WooCommerce pages, storefront creates two additional page templates – Homepage and Full width.
The Homepage template is a great way to present your products, as it gives an overview of your products and product categories to visitors as soon as they land in your store. This is the page template used in the Storefront Demo.
Setting this up is quite easy. Create a new page, and add some optional content to display. Next, select ‘Homepage’ from the Templates drop-down in the Page Attributes meta box.


Setting your Homepage
Once you publish this page, you can set this page as your homepage. For this, navigate to Settings → Reading.
On Front Page Displays, check ‘A static page.’ Next, select the newly-created homepage from the ‘Front page’ drop-down.


Click Save Changes button, and the changes are reflected on the front-end.
Your Homepage Display
You new Homepage template is now ready and visible to visitors to your store.
Create a new page for blogs, if you wish to maintain one. A blank page with the title ‘Blog’ would do the trick; just remember to set it as the Posts page.


Once you configure the Homepage, it looks like the below screenshot with multiple sections.


Other than Product Categories and Recent Products, there are also different product clusters on display such as Recommended Products, Fan Favorites, Products on Sale and Best Sellers.
The order of these display elements is similar to the order at the back-end. You can make certain modifications from Products → Categories and then be dragging and dropping categories as you wish.
Go Full Width on cart and checkout
The other page template on Storefront is Full Width – this will let you have the content to span through the entire page without sidebars. This is a preferred option for your cart and checkout pages.
All you have to do is to go to the cart and checkout pages and select ‘Full Width’ from the Template drop-down on Page Attributes section.


Configuring menus
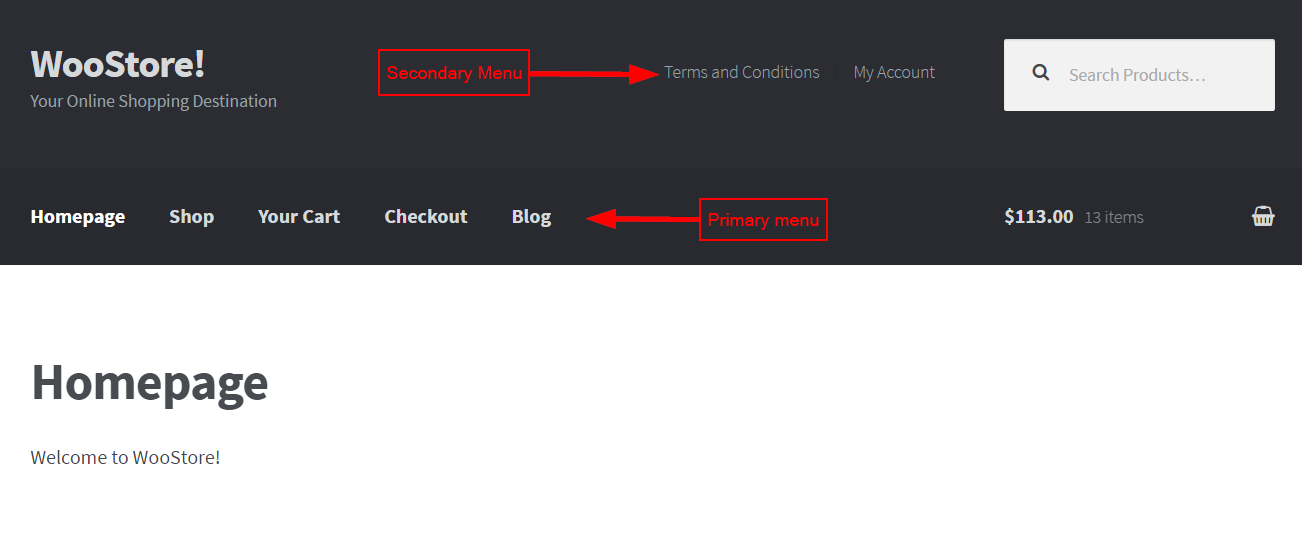
Storefront organizes the menu locations into ‘primary’ and ‘secondary.’ The primary menu appears before the content, just below the site logo. The secondary menu is beside the logo near the search box. By default, WooCommerce displays all your pages as your primary menu, if a specific primary menu is not set. This though, is not applicable to a secondary menu, as it will not display anything until you specifically assign a menu.


Creating a new menu and adding pages to it
Create a new menu by navigating through the admin panel: Appearance → Menus.
Find the section on the left side with the title ‘Pages’. Click View All to get a list of all published pages. Tick the pages you want to appear on the menu and click Add to Menu button. You can rearrange the menu order by simply dragging and dropping the pages. Click the Save Menu button once you’ve added and rearranged all the menu items you want.


Placing Widgets
Storefront allows placing widgets in 3 different areas on the website. Header widgets will be placed just below the site header, above the content. Sidebar widgets will be placed on one of the sides based on your site’s chosen layout. You can also choose four footer widgets and they will be displayed based on your choice.
Perfect WooCommerce Integration with Storefront
As Storefront is created to function exclusively with WooCommerce, you can expect a seamless integration right from the word go.
You can read more about customizing your store’s front-end here.


My current version of storefront does not have a homepage template and all my searches haven’t found one I can upload to my “templates” drop down menu. Where can I find it.
Hi Cindy, you will have to update Storefront to the latest version. Go to Appearance > Customize, and go to Homepage settings. There, you have to choose a static page, and then you can choose the right page from the dropdown. Hope it is clear.