
Last updated - July 8, 2021
Every day you read several websites (including eCommerce stores) are hacked, damaged, exploited! And the reason behind that the users didn’t secure them or they didn’t make a backup WooCommerce to overcome this situation immediately. In this article, we will discuss how to back up a WooCommerce Store for Free.
Often, when creating a new store, we are concerned about which CMS to use, its graphic appearance and the contents to be inserted. The backup is usually one of those things that risks being overshadowed.
I have often come across WooCommerce stores that have been running for some time, whose owners never bothered to make security copies of their store, so that they could be restored in case of problems.
Yet there are many occasions when a rescue copy that allows a website to be restored quickly can be useful. But how? The answer is simple!
You can use plugins to save backups either on the web server that hosts the website or on external cloud storage services or you can choose services that take care of everything completely automatically like Cloudways.
Free WooCommerce Backup Using Cloudways
Let’s see how you can take benefit by using Cloudways managed WooCommerce hosting platform.
Step 1: Login Your Account
First thing first, log in your Cloudways account.

Next, select the target server which you want to take a backup, and then click on it.

Step 2: Setting up Automatic Backups
Under the panel, you can see the sidebar available namely Server Management, here you can see the Backup tab. Click on it.
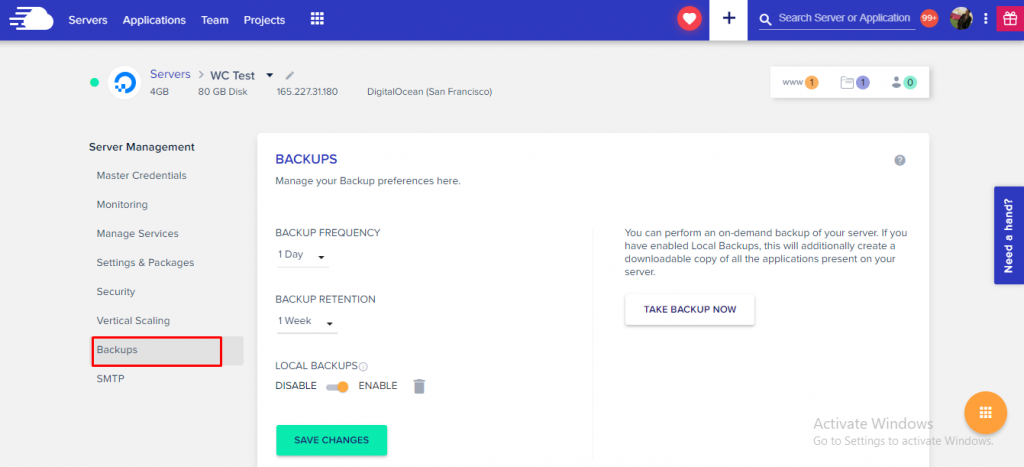
Next, click on backups. Now here you can see three options backup frequency, backup retention, and local backups.
Backup Frequency: Now here you can see the drop-down menu about backup frequency (from 1 to 7 days. Now the 1 our means the backup of your all WooCommerce application will be taken in 1 hour. Same thing if you can add 2 then it’s mean the backup will me take after 2 days. The last one is 7 which means the backup will be taken weekly.
Backup Retention: Here you can set the Backup retention (from 1 week to 4 weeks). This determines how long the backups are stored and are available to use.
Local Backups: Here you can enable or disable. Click on Save Changes once done.

Step 3: Taken Backup Anytime
Here you can take a backup anytime whenever you want. If you have enabled Local Backups, this will additionally create a downloadable copy of all the applications present on your server.

After clicking on the Take Backup Now button, you need to wait a while once the operation will be completed. After complete this setup, you will get the message namely “Backup settings have been saved”.
Restore Your Backup
Once you have completed the backup setup, now you want to restore your backup. To do this go to your Cloudways account > Login > Application. Next, select the application you want to restore.

Under the application management, you see the Restore tab has appeared. Click on it.

Now here you can see the dropdown menu where you have all of your backups.

Next, click on it. Once the restore process starts, the total restore time will depend on the size (files and database) of your application.
After done this, you got the message namely “Your Application has been restored successfully.”
Wrapping Up!
In this article, I have explained to you how you can take a backup of your WooCommerce store by using Cloudways. It is one the best choice for creating backups of WooCommerce store without any hassle. If you have any confusion regarding this article, feel free to ask me via the comments section below.
Meanwhile, sign up for a free trial and try Cloudways now!


")
")
")