WordPress is a free and open source content management system (CMS), based on PHP and MySQL, to create websites and web applications. Many web hosting providers are offering WordPress pre-installed on their servers. If you are using WordPress or planning to use it, then you must be aware of its performance issues.
Redis is a fast, open source, in-memory data structure store, used as a database, cache and message broker.
It’s used to store transient data that has to be accessed quickly. This can include application configuration settings, user session state and frequently accessed data from the database such as recent comments or users.
Redis is often referred to as a “data structure server” rather than a typical relational database management system (RDBMS). It was written in ANSI C with portability in mind.
What is Redis?
Redis is an in-memory data structure store, used as a database and cache. It supports different data structures such as strings, hashes, lists and sets. Redis can serve as a message broker by using its publish/subscribe system to help decouple applications (e.g., WordPress) from each other. In addition to the basic key-value style storage, it also supports scripting in Lua or JavaScript with the Redis Modules framework.
How Redis Works?
Redis is a data structure server that can be used as an alternative to cache. It’s an in-memory database, but it’s much more than that: Redis is a key-value store, database, cache, message broker and full-text search engine. Essentially, Redis can do anything you want with your data.
Redis offers a wide range of features and its main advantage over most other databases is that it runs in memory and is therefore blazingly fast (it can handle 100K+ requests per second). Another great thing about Redis is that it works on every major platform and you can use it both on your local machine or in production environments where you need high availability and scalability
Why use Redis on your WordPress site?
Redis is a key-value store that allows you to store data in the form of a string. This may sound like your WordPress database, but Redis has some key differences.
First, it allows you to cache things like images or scripts. You can configure how long they are cached and how they’re used as well. This makes it ideal for both large and small sites alike because it helps you avoid having to run queries on your database every time something needs to be rendered in the browser.
Second, Redis works faster than MySQL or PostgreSQL because it doesn’t have any locking issues with transactions—you don’t have multiple processes trying to write data at once either (which would cause one process’s write operation to fail). Finally, this means that there isn’t much load on either your server or dashboard when using redis instead of MySQL/PostgreSQL; which keeps everything running smoothly even during high traffic times!
How to Install Redis in CyberPanel?
Step 1 Deploy your Website
The first step is to create a new website via CyberPanel. Navigate to the Websites and click on Create Website. Now select package, owner, domain name, email, php version and create website.
Websites → Create Website


Finally your website is created and you can see your newly created website in List Websites.


Step 2 Install Redis in CyberPanel
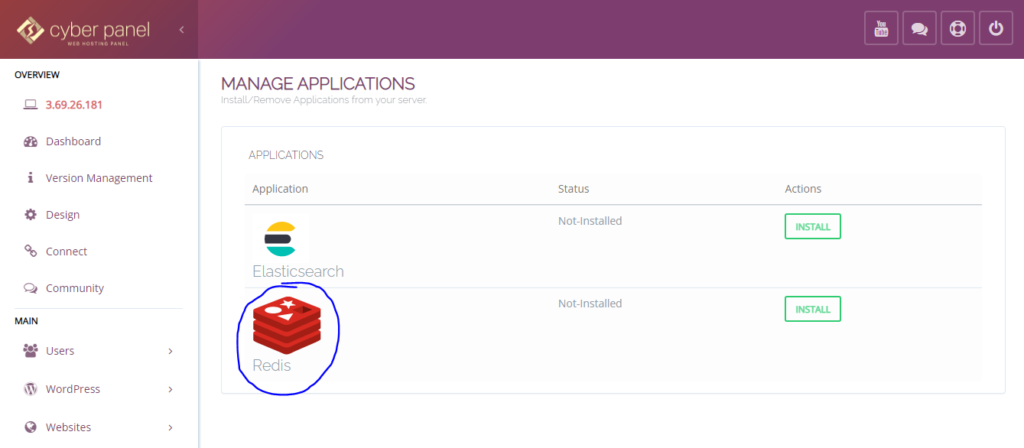
Next step is to install Redis in CyberPanel. To visit the Redis installation page first go to:
Manage Services → Applications.


Then you have to click at the → Redis and click at install button.


How to Install Redis Extension in CyberPanel?
After installing Redis you have to Login in SSH using Bitvise, once you are logged in you can see that New terminal console tab is activated


Now enter a command
yum install php74-redis -y
(After lsphp you have to mention the version of php that you have selected while deploying a site)


After successful installation, restart php with following command
killall lsphp
So, it could read extension configurations.


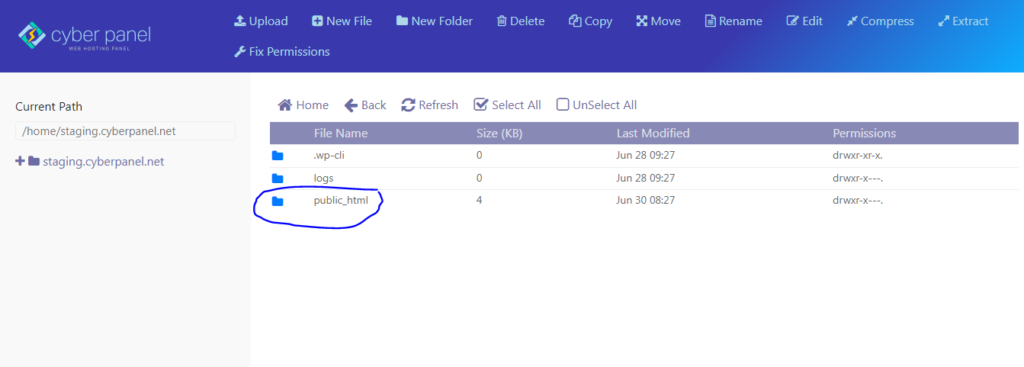
Now, to start sending data to Redis come back to List Websites and open File Manager of the website you have created above,


Double click and open public_html folder


Create New File and name it like redis.php


When you open your file in browser it will be empty for now:


Now open the file with code editor, so that we can add some code inside it:


Paste the following content in this file:


Copy it and paste it using CodeEditor that you have opened above


This command(highlighted) will not run if you haven’t installed the Redis php extension.


Click Save changes. Now your connection has been successfully stored and it is pushing the data in Redis.


If you want to double check it open command console and enter command
redis-cli monitor


Just refresh it and you will see data being sent over here again. So, that’s how you can send your data to Redis.
If something goes wrong you can also clear Redis cache to make sure you don’t get stale data.
What are the best practices of configuring Redis on WordPress?
Redis is a key-value store that is used to store data in the form of a hash table. The data stored in Redis is accessible in real time. It stores both keys and values; the key can be any string, whereas the value can be any type of object. The following are some examples of storing this information:
- User IDs and their last login date
- A list of posts by each author or category they wrote them for (i.e., “the three most recent posts written by John Doe”)
Redis takes advantage of its speed and simplicity by storing frequently accessed data on disk using two different techniques: persistence and memory management.*The first method allows you to set up automatic backups, while the second method ensures that one server doesn’t overload another during peak hours.*
Conclusion
In this article, we have seen how to install Redis on your CyberPanel account. We also explored the best practices for configuring Redis for WordPress.


