Last updated - December 5, 2022
Once in a while, we all have faced trouble sending emails. Is the internet connection down? probably no. Your emails could be reaching spam folder instead of inbox. There are a number of things that could be the issue.
One of the reasons could be the incorrect setup of SMTP. The SMTP(or Simple Mail Transfer Protocol) is an internet standard for email transmission, particularly for sending emails. This is one of most common reasons for not sending emails errors. By properly setting up your WordPress hosting server to use the wp_mail function, this error can be solved.
When it comes to WordPress, PHP uses the wp_mail function to send emails. This function may not work if you are using a third-party hosting service. Hence in such case, you can request your hosting service provider to configure SMTP for your site.
In this article, I’ll discuss three basic methods to configure SMTP on your WordPress site.
- Using Web Host Host cPanel
- Using Third-Party Email Services
- Configuring Postfix as Send Only SMTP Server
1. Using Web Host cPanel
When you are using a third-party hosting service, you are provided with email services to create email addresses with custom domain names.
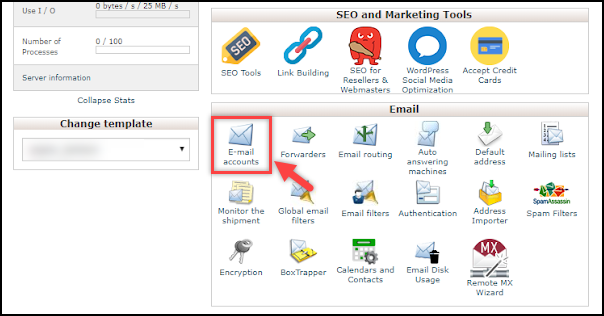
- Login to your web host cPanel and move to Email settings.
- Click on Email Accounts settings, as shown in the sample screenshot below.


- In the Add email account settings, fill the required details like the name(for example, your name for creating custom emails like clark@yourdomain.com), select required domain name from the drop-down (if you have multiple ones), password, and other details. Finally, click Create Account to create your custom email address.
A sample screenshot of the settings is shown below.


- Next, you need to install WP Mail SMTP plugin on your WordPress site. Basically, this plugin reconfigures the wp_mail function to send emails using proper SMTP provider.


Once you have installed and activated the plugin, go to the plugin settings.
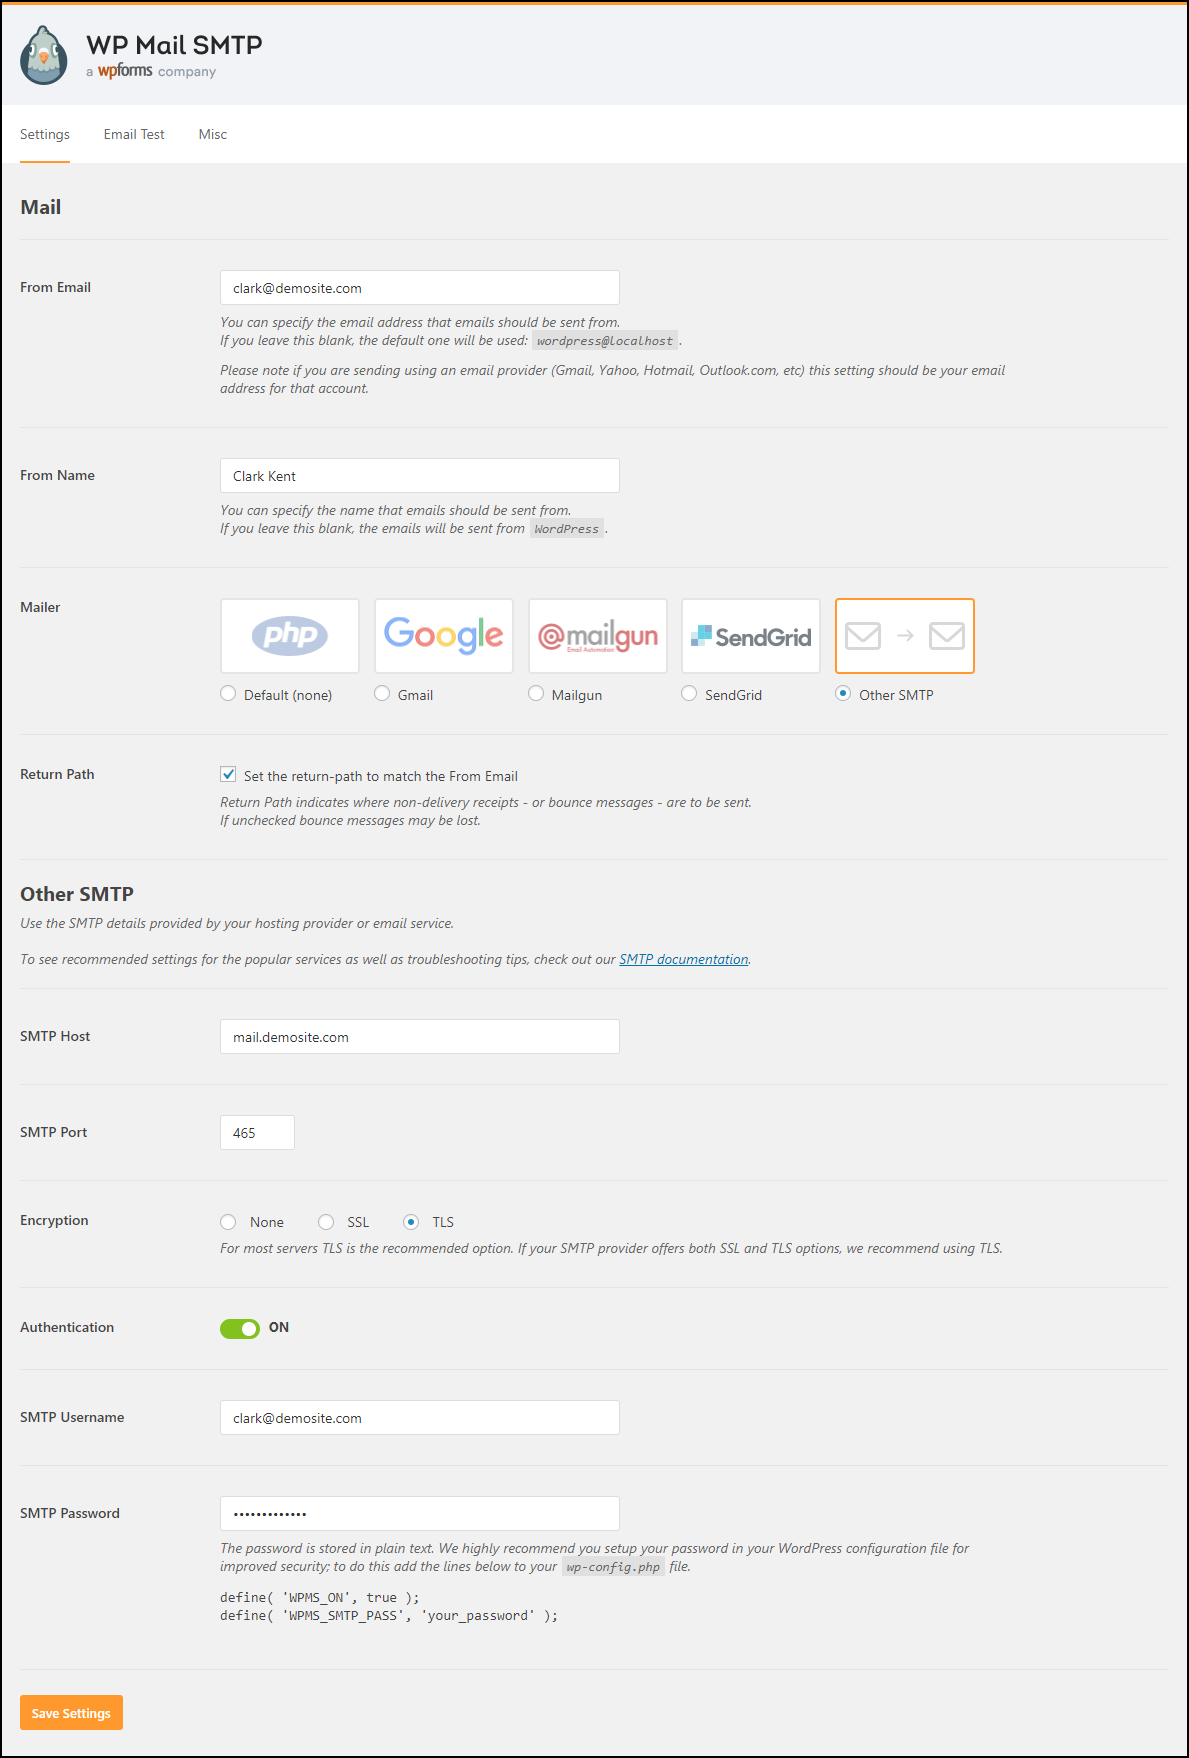
Configure the following settings in the plugin:
1. Enter the newly created email address from the previous step.
2. Enter ‘From Name’. This name is shown in the from-address of the email.
3. Select the desired mailer. For this method, you need to choose Other SMTP option and check the Return Path settings, as shown in the below screenshot.


4. As shown in the screenshot above, once the Other SMTP option is chosen, further settings appear where you need to enter your SMTP Host and SMTP Port number. You can get this information from your hosting service provider. Next, select the encryption option as TLS and switch on the authentication settings. Enter the respective SMTP username and password for the authentication process. Once all the settings are configured, save the settings.
These are recommended settings explained in the plugin setting up article.
For other Mailers settings, refer the following links:
(a) Send WordPress Emails Using Gmail SMTP with WP Mail SMTP.
(b) Send WordPress Emails With Mailgun Using WP Mail SMTP.
(c) Set up WordPress Email Notifications with SendGrid with WP Mail SMTP.
- You can test the sending of emails in the Email Test tab.
A sample screenshot of the settings is shown below.


Enter a valid email address and click Send Email to send the test email.
2. Using Third-Party Email Services
If you wish to do away with the responsibility of maintaining the server, you can opt for a third-party email service. These email services provide hosting service for your website and also handle all configurations related to your email transmission.
Here are the three most popular third-party email services:
1) G Suite (Google Apps for Work)
G Suite is one of the most useful offerings from Google. It is a SaaS-based solution that comprises of Gmail, Calendar, Google+, Hangouts, Drive, Docs, Sheets, Forms, Slides and so on depending on the chosen plan. Although these features are available for free, the G Suite offers services like creating a custom domain name, unlimited storage, and advanced administrative tools.


What makes G Suite more advantageous than others is that the accessibility and control of all your work are simple and secure. The data is synchronized across all servers, hence allowing you to access the data on any device anywhere.
2) Mailgun
Mailgun is another fine email service that has a lot to offer. From sending & receiving emails, inbound routing to email tracking, this email service lists some of the most productive emails functionalities.


3) SendGrid
This email delivery service manages emails that involve shipping notifications, email newsletters, promotional emails to name a few. Although the service is mainly intended for email marketing and campaigns, it also provides email API service for email deliverability.


The integration process is fast and easy. You can define different access restrictions and enable account sharing by specifying access levels. SendGrid also includes different levels of security for email transmission.
These are just some highlights of this service, you can look into more details on the official website.
3. Configuring Postfix as Send Only SMTP Server
In this method, you should install and configure Postfix(an open source mail transfer agent) on your server. A mail transfer agent or MTA is an application used for mail transmission in the form of a client-server application structure.
This method is practical when using cloud servers. If you are using a third-party email service, you do not need to run this email service and could try alternate ways.
Also, an important point to remember is that this method is applicable for Linux servers, which shouldn’t be a problem, considering most of the servers are Linux-based. All you need is a Linux-based server Droplet with sudo privileges and a valid domain name. For a complete step-by-step tutorial read this documentation.
Check out the video below:
Related Video
For more WordPress troubleshooting tips, read this blog article.
And more amazing blog articles, continue exploring LearnWoo!


