Last updated - November 14, 2022
This article is part of Payment Gateway Integration Guide:
- Setting up Core Payment Gateway Options (current article)
- An overview of core payment options in WooCommerce
- Payment Gateway extensions in WooCommerce
- Choosing the right payment gateway
- Setting up free extensions
Setting up payment options is one of the most important aspects of customer interaction when you set up an online store. WooCommerce allows you to define these features at the initial stages of setting up your store itself.
When you first install WooCommerce, you will be able to enable multiple online and offline payment methods.


Later, you will be able to access the payment settings through WooCommerce > Settings > Payments.
All your installed payment gateways will be displayed in this section. You can enable or disable payment gateways using the i/o button next to each payment method. Also, you can sort the order of display by dragging and dropping according to your preference (Installing payment gateways is described in detail below).
Do not forget to click the Save changes button every time you update these settings.


Configuring Payment Gateways
You will find four default options to install payment gateways in the Payments section. These are:
- Direct bank transfer
- Check payments
- Cash on delivery
- PayPal
We can go further into each section in detail by clicking the Set up button, and see the possibilities.
Direct bank transfer
This section allows you to set up a Direct Bank Transfer facility in your store.
At the top, there is a checkbox to enable Direct Bank Transfer. You can enable/disable this option by ticking the checkbox.


Once you have decided to enable Bank Transfer, you need to fill in a few details on this page for the customer.
You can see three fields right below the enable checkbox. These are:
- Title – displayed on the checkout page as a payment gateway option.
- Description – when your customer selects this payment option on the checkout page, the description is displayed.
- Instructions – displayed on the thank you page and the emails that will be sent to customers.
WooCommerce has already put in default content in the first two fields. But you can phrase it according to your liking to give a unique and personalized touch to your store.


The most important section here is Account Details.
You have to enter the details of the account you wish to display on the storefront. The options are:
- Account Name
- Account Number
- Bank Name
- Routing number
- IBAN
- BIC/Swift


Please remember: WooCommerce will not automatically process transactions under this payment gateway. You have to manually check if the transaction is complete and then update the order details to initiate the shipping process.
Once you complete updating all the settings, click the Save changes button.
After you set up this payment option, your customers will be able to see it as a payment option on the Checkout page.


Check Payments
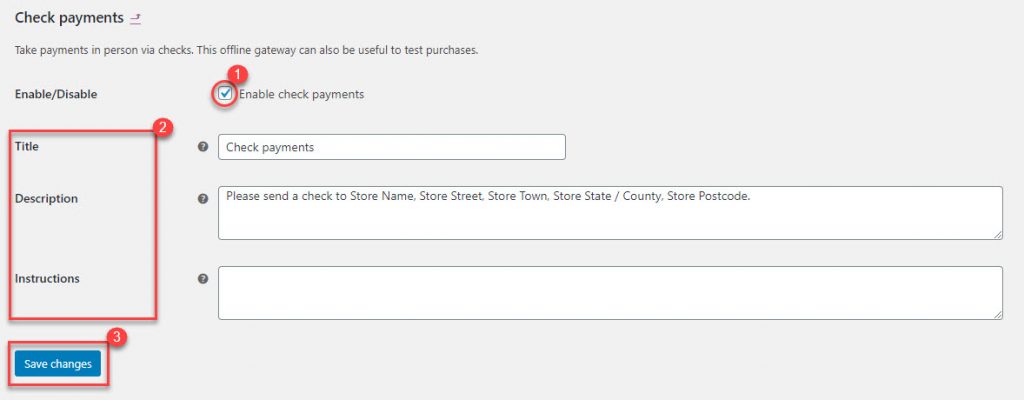
Another payment gateway that you can set up in the early days of building your store is Check Payments.
- You can Enable/Disable Check Payments by ticking the checkbox
- Then edit the Title, Description and Instructions field (similar to what you’ve done in ‘Direct bank transfer’ setup).
- Finally, click the Save changes button.


The Checkout page of your store will look as displayed below, when this payment mode is enabled.


As in the case of Bank Transfer, WooCommerce won’t automatically process Check Payments as well. You have to wait till the check is cleared and then manually process the order to initiate shipping.
Cash on Delivery
The setup for Cash on Delivery is rather similar to Direct bank transfer and Check Payments except for two additional fields.
- Enable/Disable checkbox will decide whether you are activating this payment gateway for your customers.
- Title, Description, and Instructions can be edited in the respective fields.
- Enable this payment mode only for specific shipping methods.
- Accept COD if order is virtual.


Additional options
You can see two additional options in Cash on Delivery that you have not seen in BACS and Check Payment.
One is ‘Enable for shipping methods’. Using this option you can set Cash on Delivery only on certain specific shipping methods.
When you click on the text box, you can see the available shipping methods in a dropdown to choose from. You can choose any specific shipping method for which you want to enable Cash on delivery.
If you have installed other shipping options via plugins, they will also be visible in this drop-down and you can choose accordingly.
Also, remember if you leave this field blank, Cash on Delivery will be applied to all shipping methods.


You can also enable Cash on Delivery for virtual orders, where a service is rendered in person.


Like BACS and Check Payments, you need to manually process the order details for Cash on Delivery as well.
Do not forget to click the Save changes button after updating the settings.
PayPal
PayPal Standard is a preferred payment gateway in WooCommerce, and it is accepted globally.
The set-up for PayPal includes a few simple, straightforward settings along with a set of tricky, advanced settings.
The settings page of PayPal has the following options.
- You can activate PayPal as a payment gateway using the Enable/Disable option.
- Title and Description (content that will be visible in the front-end of your store) can be edited using their respective fields.
- You need to enter the PayPal email address to accept payments.
- There are several Advanced options that you need to set up (will describe in detail below)
- API credentials to process refunds.


The first two options are actually similar to other payment options we have seen above.
PayPal Email field is an important one, where you enter the email account that you have set up to receive payments through PayPal.
If this email id is not correct, you may not be able to receive payments.
Advanced Options
While setting up your store, some of the features in the Advanced Options of PayPal setup can prove to be quite handy.
PayPal Sandbox
WooCommerce provides options for testing and debugging while setting up PayPal.
PayPal Sandbox will help you test your payment gateway so that you can ensure it is functioning properly before you start actively selling through your store.
You need to sign up using a developer account to use this feature of WooCommerce.
Remember to disable PayPal Sandbox once you start selling products through your WooCommerce store. Otherwise, your payment will not get credited properly.
Debug log aids in debugging by making sure that all events are logged into a specific file on a server. This is vital to debug any problems with your store setup.


IPN Email Notifications
IPN or Instant Payment Notification is a messaging service of PayPal that communicates to your store whether the payment has been successful or not.
Enable this to send notifications when you receive an IPN from PayPal
You can enter the Email ID that is assigned to receive payments in the Receiver Email field.
It can be either your primary PayPal Email or an alternate one.
One important aspect here is that the email you enter in the Receiver email field is used to validate IPN requests.
If you are facing issues with IPN, you can enter the PayPal Identity Token in the next field.
You can get the identity token by enabling “Payment Data Transfer” in PayPal (Profile → Profile and Settings → My Selling tools → Website Preferences)
In case you are receiving payments from multiple sources (websites or stores), it is advisable to add a unique prefix in the Invoice Prefix field. This will appear in front of your invoice number and helps PayPal to identify your different websites.


Shipping Details
This section enables WooCommerce to send your customer’s shipping address details to PayPal. This is important if you are using PayPal to print shipping labels. PayPal allows WooCommerce to send only one address and sending billing address in this scenario won’t make much sense.
Enable/Disable this option by ticking the checkbox if you are using PayPal to print shipping labels.


Address Override
This feature deals with PayPal’s address verification. It is best to keep it unticked if you are just beginning to set up your store with WooCommerce.


Payment Action
This setting allows you to choose whether you want to capture payments immediately or authorize.
There is a drop-down from which you can choose ‘Capture’ or ‘Authorize’ according to your preference.


Page style and Image url
Using Page Style, you can set a preferred page style that is already created in PayPal. This will help you with branding aspects of your site.
In the Image url field, you can specify an image that will be displayed as your logo in the PayPal Checkout pages.
Remember, these are optional fields.


API Credentials
If you wish to process refunds through PayPal, you need to enter your PayPal API Credentials. Information on how to create and manage your PayPal credentials is available here.
API Credentials include three fields:
- Username
- Password
- Signature


Once you are done updating the settings, do not forget to click the Save changes button. But if you would like to have a more advanced and customisable checkout on your WooCommerce store, try payment solutions from Fondy.
Read our article on optimizing checkout to get a glimpse of some quality plugins and added functionalities.


