
Last updated - January 16, 2023
Are you looking to start an eCommerce store for your handcrafted jewelry? Or maybe you are a SaaS startup looking to sell your software online, no matter your use case, setting up an eCommerce website can’t get easier than with WordPress.
WordPress is the world’s largest content management system with over 60% of the market share. While it started as a blogging platform, it has evolved into the largest platform for eCommerce websites as well.
WooCommerce, the popular plugin that adds eCommerce functionalities to a WordPress website powers 7% of all eCommerce websites in existence. While the last figure may look low, that 75 belongs to the top 25% of all websites on the internet.
WordPress boasts these numbers for a reason. It is beginner-friendly and its plugin store is packed with extensions to customize and create any kind of website from a personal journal to an eCommerce store in no time.
So, let us set up an eCommerce store for you with WordPress now, shall we?
Step 1 – Domain and Web Hosting
The first step is acquiring a domain name for your website. A domain name is the web address you type into your browser to visit a website.
Picking a relevant domain name is important as it reflects the kind of products you sell, how easy it is for customers to remember it, etcetera. If you own a physical store and are looking to expand online, then you can use the name of your store as your domain name.
Since we are starting from scratch, let’s presume that you don’t have a domain name. Do not worry, we will couple the domain name and web hosting into a single step.
Web hosting is the remote server where your website data is stored and hosted. Obviously, you have to rent it out from some service provider. WordPress works best with Bluehost, the officially recommended hosting service for WordPress.
Bluehost also offers a free domain name in its deals and the packages start as cheap as $2.75 per month.
Go to Bluehost’s website and select a plan.
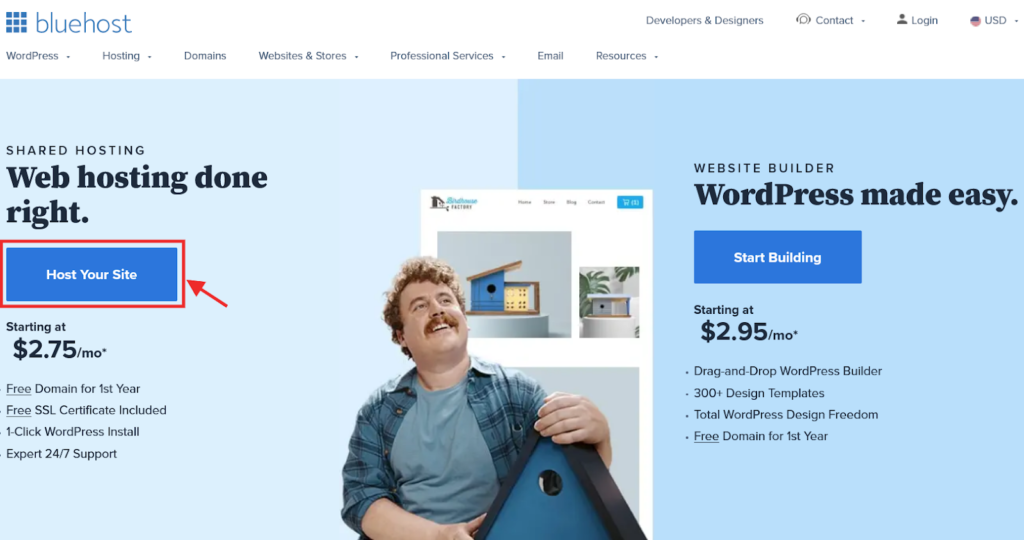
Select the Host Your Site option, which is sufficient for a beginner starting with a small-scale eCommerce store. Bluehost offers plans that are billed annually.
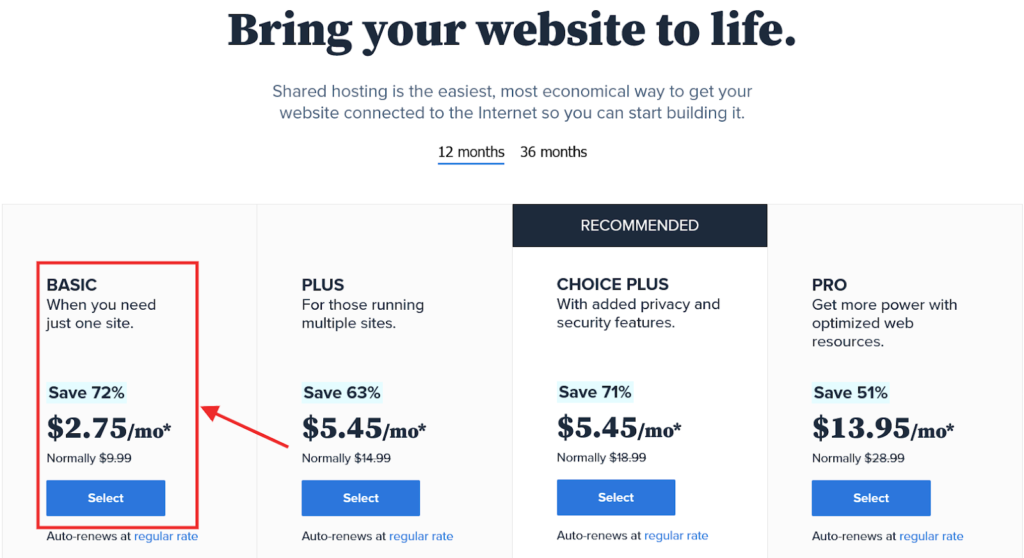
You can pick from either the 12 months or the 36 months plans. Considering running an eCommerce store is a continuous and long-term endeavor, going for any of the 36-month plans is not a bad idea. Make your choice and click Select.
Next is creating a domain name. Bluehost gives one year of free domain hosting with its annual plans so that is an added advantage of using it.
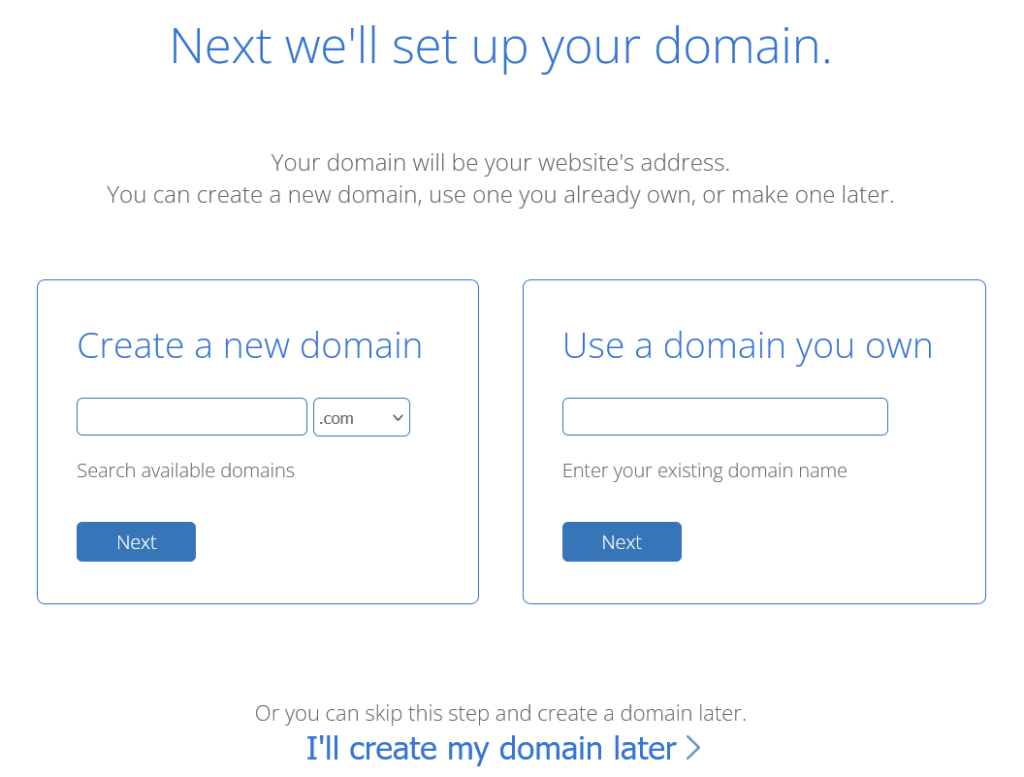
We are going with the assumption that you don’t have a domain, so create a new domain based on availability. Creating a relevant, simple domain name for your eCommerce store will help you in the long run with creating a brand identity and other marketing efforts.
Click Next and move to account creation.
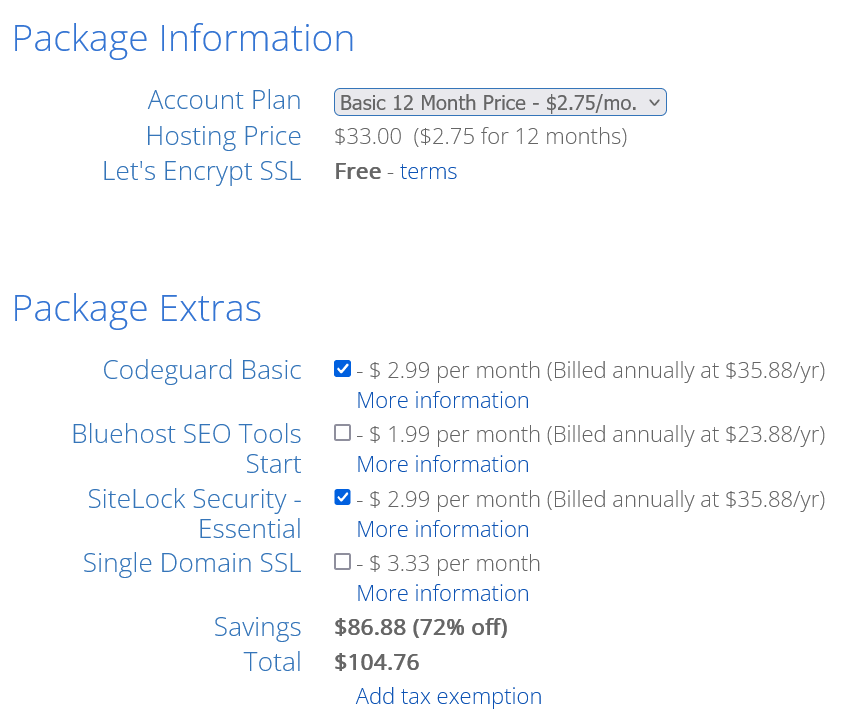
Besides the billing address and payment information, there are additional packages that you can optionally purchase along with the basic Bluehost hosting and SSL encryption. Now pay by choosing one of the payment methods and move to Bluehost installation.
Step 2 – Installing WordPress
You will receive your login credentials for Bluehost at the email address you used for signing up. Install Bluehost and you can install WordPress from there directly.
Click My Sites > Create a Site to start WordPress installation. Next enter the name of your website and login credentials as you had done during the domain creation in Bluehost.
Now the skeleton of your website is ready, time to install the WooCommerce plugin to make your website eCommerce-ready.
Step 3 – Installing WooCommerce
Though there are more plugins for WordPress for creating an eCommerce website, WooCommerce is by far the best of the pick. WooCommerce has native eCommerce capabilities and an extensive pick of compatible plugins to further it according to your needs.
To install WooCommerce, go to your WordPress dashboard, and go to Plugins > Add New to visit the WordPress plugin store.


Enter WooCommerce in the search field and install the plugin.

Now activate and set up WooCommerce. Now use the WooCommerce setup wizard to customize your store.
Step 4 – Setting Up Your Store With WooCommerce
WooCommerce setup wizard is a simple tool that lets you enter the basic information about your store to get you started. Get started with it and WooCommerce wizard sets up four basic pages for your store namely
- Shop – Displays the products in your store.
- Cart – Customers can add products to the cart and alter them later before proceeding to purchase.
- Checkout – The page where payment is done and purchase is made.
- My Account – The page where customers can see their account information, order history, and details.
Next, the WooCommerce setup wizard has a series of forms to add information about your store.
eCommerce Store Location
The first form requires the location information of your store.

Enter the physical address of your store and continue.
Industry
The next form is to pick the industry your store belongs to.

I am picking sample options in these steps to give you an idea, enter the details that reflect your store as you are actually setting up your store.
Product Type
Next, pick the type of products you will be selling from your store. They can be physical items, digital downloads, or subscriptions. You can also choose how the products are available, such as customizable, bundles, and so on.
If you are an accommodation provider, there is an option to list your products as bookings and memberships if you are setting up a hotel or a gym, for example.

Business Details
The next section contains business details.
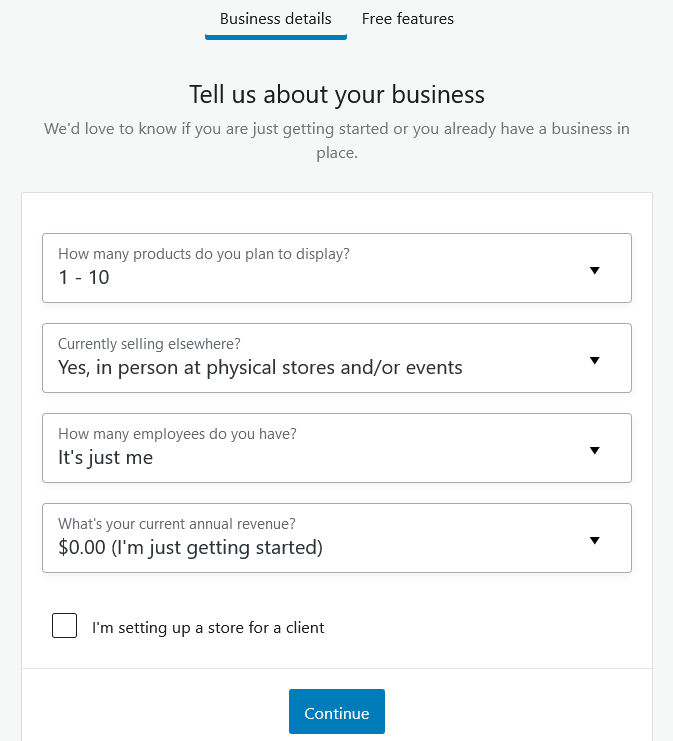
Here you enter the size of your business, other selling outlets you have, and an estimated average annual revenue of your business.
Optionally you can add other business features provided with the WooCommerce installation for free. These extensions add more functionality to your eCommerce website.
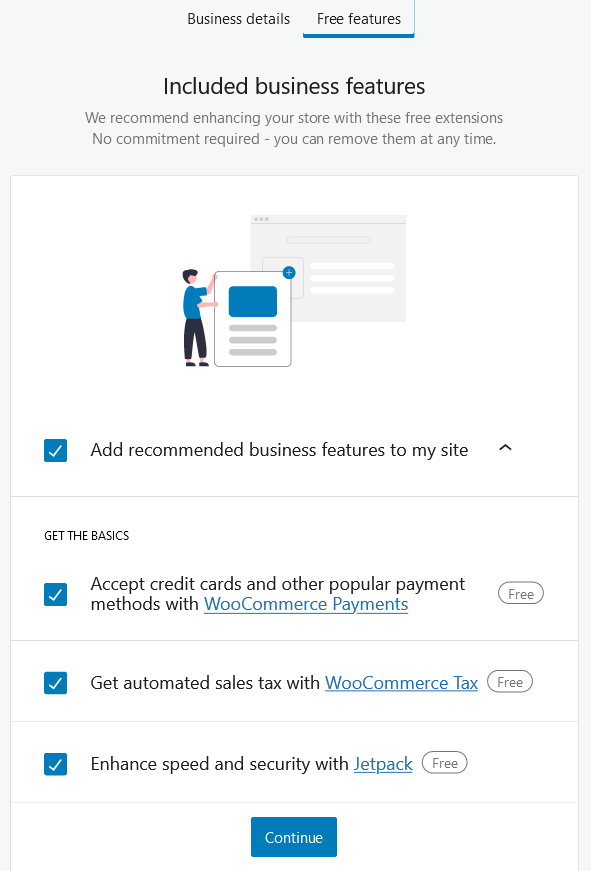
The optional features install WooCommerce payments, taxes, and Jetpack which are compatible with WooCommerce and bring the aforementioned functionalities to your eCommerce store.
Themes
Themes are useful plugins that give you a layout for your website based on the type of store you are setting up. For starters, let’s go with Storefront which is both free and recommended for its versatility.

Now your website is all ready for adding products and other parts of the store to have a functional eCommerce website.
Step 5 – WooCommerce Checklist To Finish Up
WooCommerce now has a checklist for you to set up your store to its full potential. Now let us work through the checklist to finish setting up your store.

We are already done with the store details so let us move to add products. Click Add my Products.
Adding Products
You can add products from a template, manually, from a CSV, or another service.

Add your products and edit their attributes, and stock availability, and move to the next item on the checklist.
Payments
Click Setup payments in the checklist and add WooCommerce payments or Paypal for online payment methods. Or you can also install other payment plugins such as Stripe and Razorpay. WooCommerce also natively provides support to COD and bank transfers.
Setup Tax
Next click Setup taxes. You can use the WooCommerce Tax plugin or Avalara plugins for automatic tax calculation or you can set up taxes manually or skip taxes if your shipping region doesn’t have sales tax.

Shipping

Set up your shipping fare and zones in this section. You can set flat rates, free shipping, or local pickup and create shipping classes for your products based on their attributes and how much that costs you in shipping.
In shipping options, you can enable the shipping calculator on the product page and where the product is to be delivered.
Marketing Tools
In this section, you can enable WooCommerce-built marketing tools for your eCommerce website.

Mailpoet lets you create and conduct email marketing campaigns while Google listing enables you to launch ad campaigns for your products with Google.
Further Personalization
Lastly, there is a section to further customize your store.
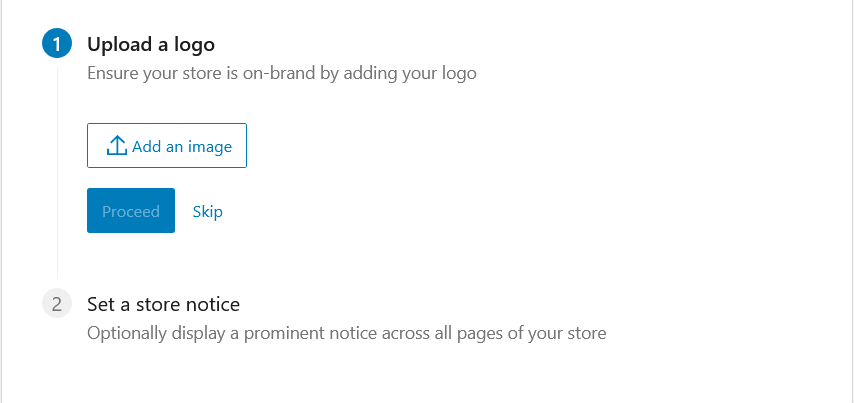
You can add a brand logo to your store and a domain-wide store notice to be displayed on all the pages of your store.
Step 6 – Try Out More Extensions
- WooCommerce compatible extensions add functionality to your eCommerce website extensions for handling bookings, shipping, Google Analytics, integration with Amazon, Walmart, and even more payment methods and marketing tools as you need.
- Optionally add extensions for creating landing pages, survey forms, affiliate programs, SEO tools, popups to capture leads, etc.
This article should help you set up your first eCommerce store using WordPress and WooCommerce. The plugins and tools are relatively straightforward in their setting up and use and with best marketing practices you should be able to grow the sales and scale of your eCommerce store in no time.


")
")
")