
Last updated - December 9, 2022
As you know, your emails are indeed the most important part of reaching out to customers and impacting their thought processes. If you have an online business, you need to send out promotional offers, transactional emails, order updates, etc., in such a way that you can reflect your store’s intentions and goodwill to the customers. So, in this article, we will discuss how to edit the WooCommerce email template.
Why Customize Your WooCommerce Email Templates?
Customizing email templates is the way to have more control over the content and the impact it would be having on your viewers. It’s not only super simple but also a quick way to interact with prospective customers on a personal level. After giving a personal touch you can boost your professionalism with relevant information over default templates.
Benefits of customizing WooCommerce templates
- Be original
- No complexity, quick personalized changes.
- Easy to update
- Precisely align the brand with your color, logo, font, language, coupon codes, etc
- High response rate
- Trust building with the added value to templates
The better you understand the process, the more you will stand out from the competitors. After the efforts of setting up the store, it’s again important to align the email conversation with a suitable theme, or a relevant product to ensure an engaging user experience. For a start, you can customize your site logo, change the header, share offers, promote specific products, add additional links, etc.
How to customize WooCommerce email templates?
You have 3 options to edit email templates.
- Drag and Drop email builder – YayMail
- From the WooCommerce dashboard
- Editing through plugins
We have curated a step-by-step guide demonstrating both. Let’s digest the details.
Method 1: YayMail’s drag-and-drop email builder
Although there are several drag-and-drop page builder options available to help you create a website, producing WooCommerce transactional emails is still viewed as a challenging task. Basic color profiles and text may only be modified in WooCommerce email settings by default. If you want to make any more adjustments, you’ll need to modify the theme code.
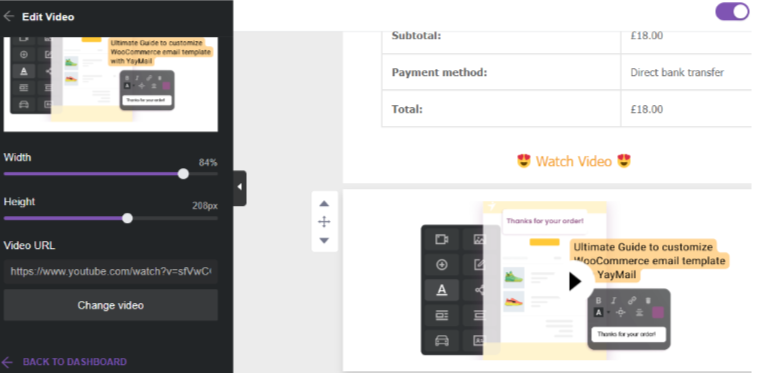
Without writing a single line of code, YayMail – WooCommerce Email Customizer operates in a drag-and-drop manner. Using the drag-and-drop tools, you can quickly add various design components and then change their colors, add columns, dividers, photographs, videos, texts, headers, logos, social media share buttons, etc.
Go to WordPress and first locate YayMail under “Plugins” before clicking “Activate.” Go to WooCommerce > Email Customizer to get started.
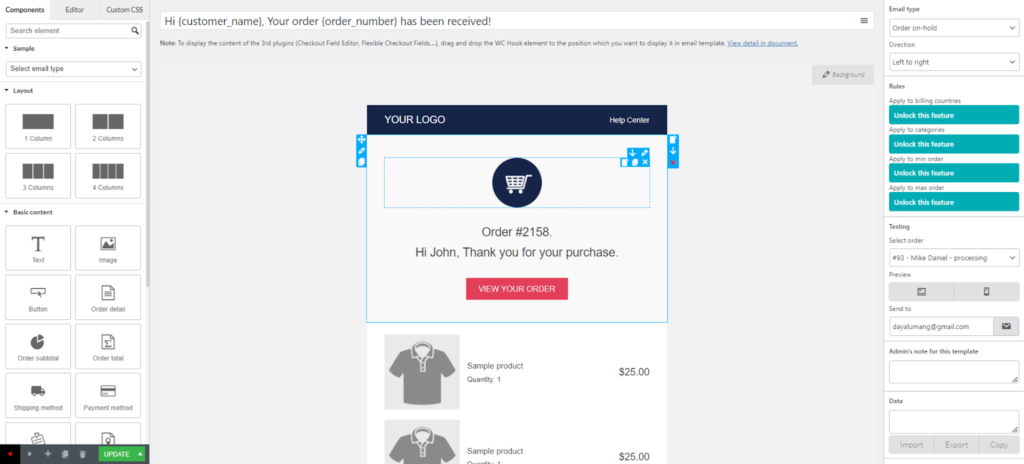
Step 1: Select the email template that needs to be edited
The dropdown menu for selecting and displaying the various WooCommerce Email templates is located on the upper toolbar of the editor screen, to the left.
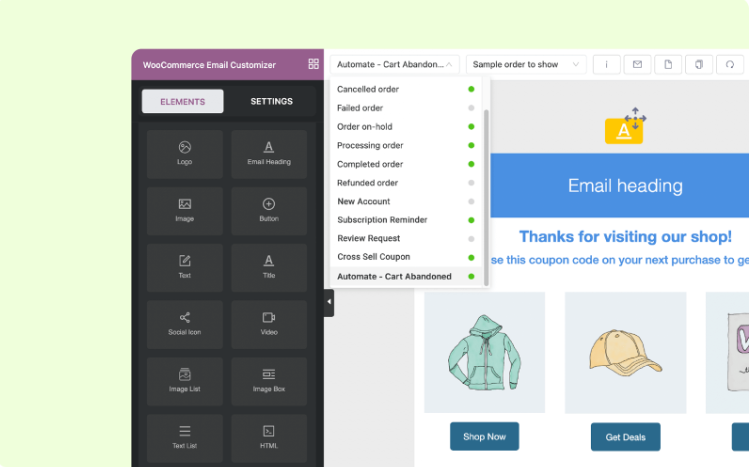
Step 2: Drag and drop items to change their appearance
The elements of designs, which include the following, are displayed when the tab Element is clicked:
- Basic Elements: include buttons, messages, social media symbols, picture lists, image alternatives, image videos, and other elements.
- General Elements: Add white space, separators, columns, etc. to your email templates to make them more interesting.
- WooCommerce Elements: You may have extended elements in this section based on the WooCommerce extensions on your site.
There are several adaptable methods for visualizing each aspect.
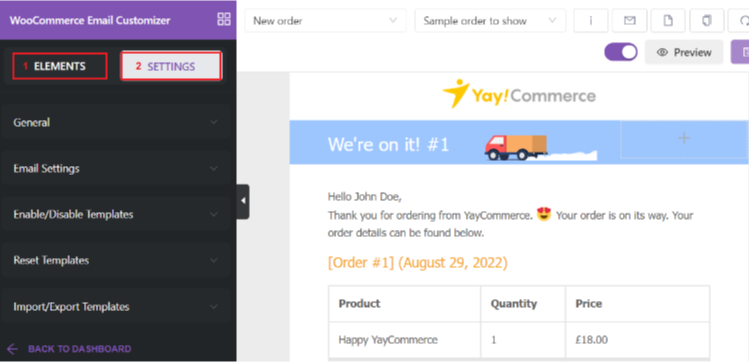
Additionally, you may use the Settings tab in addition to the Element tab. When this tab is opened, the basic and advanced options are displayed, including the ability to apply custom CSS, disable or enable particular email templates, import, and export templates from and to your computer, and more.
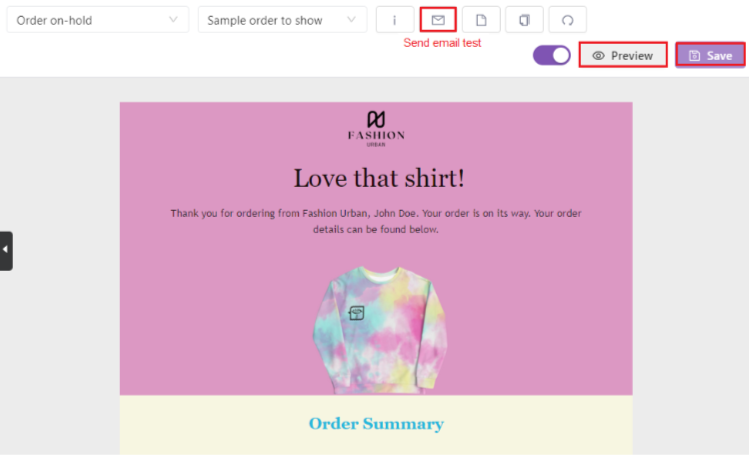
Step 3: Save, view email preview and test-send an email
Why should you update your WooCommerce email template using YayMail?
- YayMail offers more than 50 third-party integrations with WooCommerce.
- YayMail consistently improves features that endure.
- You may use the Free version of YayMail.
- YayMail is a user-friendly interface with a clean and organized layout.
- YayMail crew is available to you round-the-clock.
You may get it for free at https://wordpress.org/plugins/yaymail.
Method 2: From the WooCommerce dashboard
WooCommerce holds various methods to edit your emails. You may change the email content, heading, and subject for every individual transactional email. Another option is to personalize your email templates by customizing footer text, header images, background color, base color, etc.
To make changes to WooCommerce email templates from the dashboard, navigate to WooCommerce> Settings > Emails.
From here, you can edit the Email sender options: “From” name and address. Additionally, you can even edit your header image, footer text, text, background, and colors.
Once you’re ok with the changes, click the button View Template to preview the customized email template.
Customizing WooCommerce email templates
The emails of WooCommerce are a combination of templates so rather than modifying every email, you can make changes in the template itself.
With this modification, you get extra modular control over the editing section. Thus, just copy your liked template file to your theme folder and start editing.
How to edit your transactional emails?
Transactional emails play a pivotal role as you know. Give a seamless experience to your customers by customizing elements like font, language, and color to align with branding platforms like websites.
If your website puts a blue and yellow color scheme, but your transaction email is black, the recipient may get puzzled. So, please remember if a shopper is familiar with your brand and its elements, they will be more likely to delve into being long-term customers. Let’s see how you can manage your transactional email on WordPress.
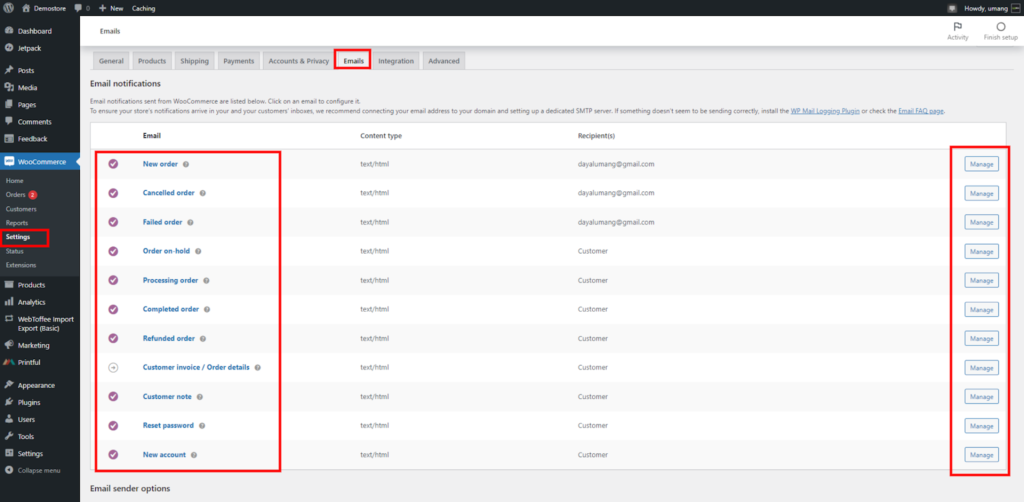
Log into your WordPress dashboard. In the left-hand menu, go to WooCommerce > Settings.
Here, you’ll see various tabs at the top. Go to Emails to view the below templates:
- New Order
- Canceled Order
- Failed Order
- Order On-Hold
- Order Processing (Order details)
- Order Completed (shipped order) Order Refunded
- Customer Invoice (Order information and payment links)
- Customer Note
- Password Reset
- New Account
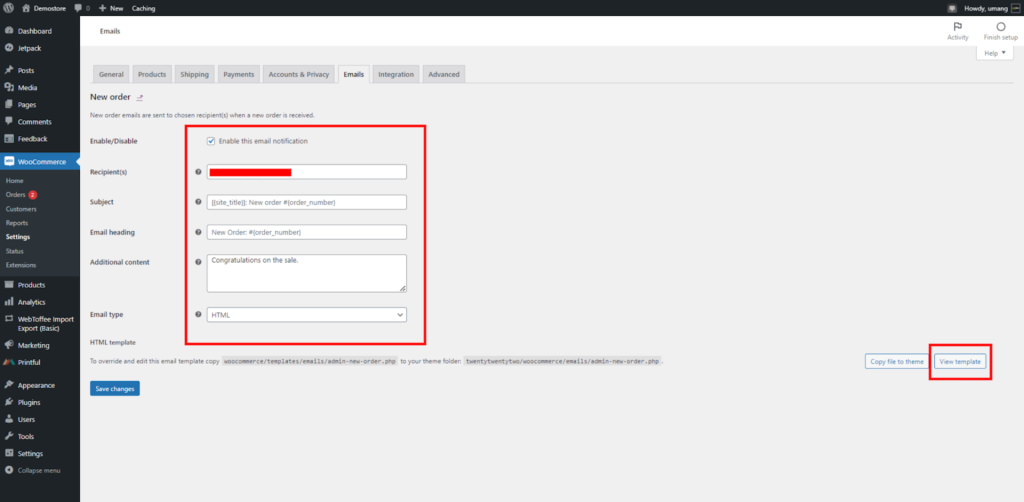
Press the Manage button on the template.
Now, you can edit each email type, subject line, heading, and add content.
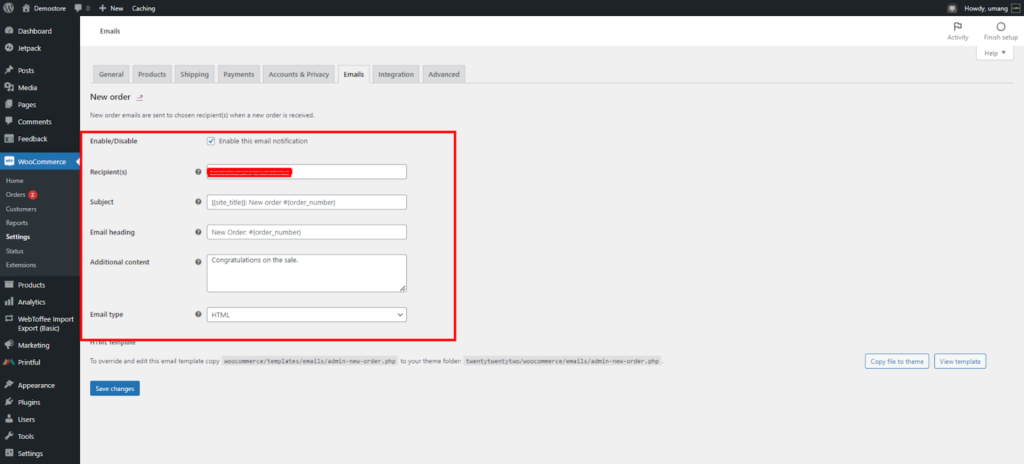
Also,
Use template variables — with the WooCommerce Follow-ups extension — to simply get automatic filled information, such as {customer_name}, {item_names} or {order_shipping_address}. This is how you personalize emails for each recipient for a deeper touch!
Customizing Completed order email in WooCommerce
The Completed Order email is something additional help to customers. Including a dedicated thank you note helps your customers feel appreciated and adds a touch of brand value. This additional content can include return policies, warranty information, etc., relating to the product. Overall, let your customers know the easy process to make the order.
Customizing Designs
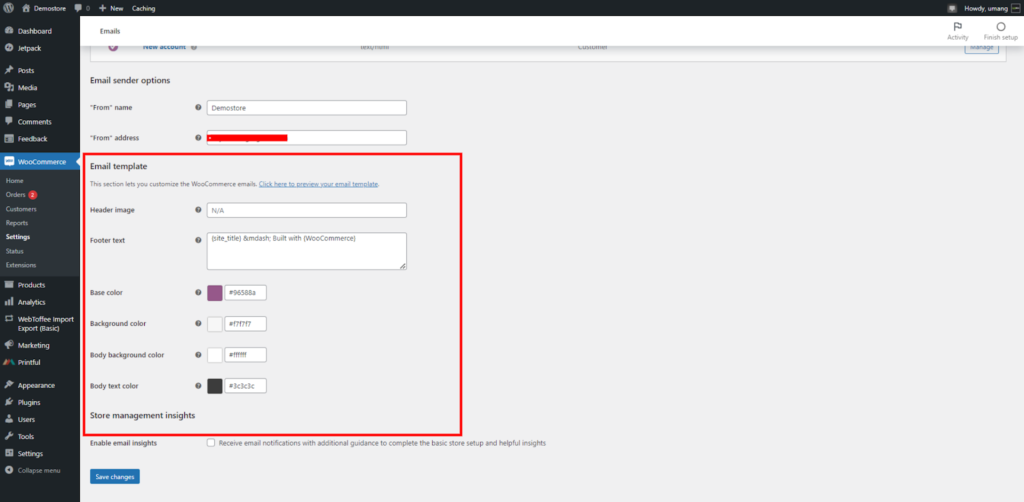
On scrolling down the list of email templates in WooCommerce Settings > Emails, there comes the option of global customization. Here, your applied change will be applicable to all email templates.
What are the options?
- Base color: The color of links, headings, and the background of the titles.
- Email Background color: The color used for the email background.
- Header image: An image coming at the top of all emails i.e. logo or brand identity.
- Body text color: The color used for all written email content.
- Footer text: Content addressed at the bottom of emails i.e. website link, contact information.
- Body background color: The color of the content background.
How To Add Product-Specific Info
If your store is selling a variety of products you can consider adding specific information in customer emails. To implement this go to your WordPress panel > Products > All Products > Click the Edit option for the product you want to include information. Now, scroll down and go to Product Data then click Advanced. You will see an empty box titled Purchase Note.
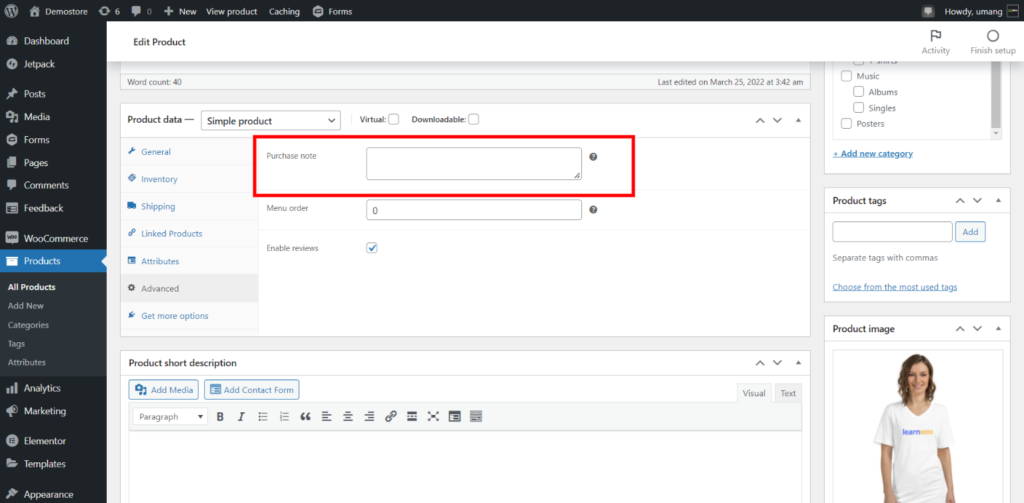
You can use this to include information such as PDF links to product specifications and instructions or include a coupon discount for your next purchase. Your target here is to keep your customers informed about every product in your store.
How To Edit Custom Templates In WooCommerce
If you have a decent knowledge of PHP and can work with codes, then WooCommerce provides you a tool to customize transactional email templates as per your requirements.

To start you can go to WooCommerce > Settings > Emails. Click on the email that you want to customize and then on the extreme right and click the Manage option. On the page, there is a note that informs you which PHP template is used in that email.
This aims to provide you with more control in customizing these email templates. If you want to make changes to your email header you can edit the email-header.php file. Similarly, for changes in customer invoices, you can edit the customer-invoice.php file.
Let’s see how you can change the color of any links in the emails.
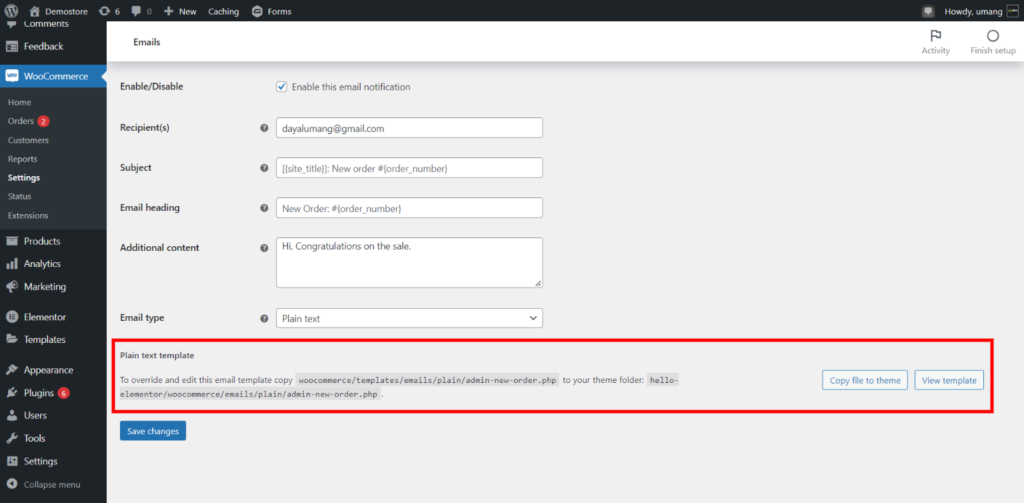
Copy file to theme in this case “woocommerce/templates/emails/plain/admin-new-order.php”. Now, find the link class in this copied file and edit the existing code to change the color of the link.
Method 3: How to edit WooCommerce Email templates using plugins
Another effective method to edit WooCommerce email templates is getting dedicated plugins. Out of various options, you need to figure out the most suitable according to your WooCommerce theme.
List of Plugins that can be used to edit email templates
- Email Template Customizer for WooCommerce
- Decorator WooCommerce Email Customizer
- Kadence WooCommerce Email Designer
- Email Templates
- MailChimp
- Jilt
- YayMail
How to edit email templates with the Email Template Customizer plugin
Let’s see how you can integrate this plugin into your WooCommerce store and use it to customize your email templates.
Install the plugin, go to Plugins > Add New on your WP Admin Dashboard
Search for Email Template Customizer for WooCommerce, use the search bar on the top right of the screen. Click Install and then Activate.
Go to the Email Templates option on the dashboard sidebar and choose among these options: default, specific, or new to edit an email template. Here, you can start editing by clicking under the Default Template type.
Using the Email Customizer’s Email Template builder
You can easily integrate this plugin with page builders like Elementor, which provides a user-friendly interface and customize options for any existing or new element or layout.
For example,
- Add a header image with one column layout
- Add an image with the Image component lying under the Components click on the left sidebar.
- Select the relevant image and here is the new header image for your email templates.
- Add social media logos, icons, buttons, look of the content, typography, etc.
Considering the importance of how to edit the WooCommerce email template, you get 3 options that are from the WooCommerce dashboard and editing through plugins. All these plugins have their own interface and unique features that you can explore. If you have any doubts you can simply leave a comment below.
Related Video
Further reading
- 7 Key Reasons Why You Should Focus On Email Marketing
- 12 Important Things to Include In Your eCommerce Email Footer
- How to Cross-sell and Upsell your WooCommerce Products via Email Marketing
- 7 Reasons and Fixes for WordPress WooCommerce Emails Going to Spam Folder
- Explained: WordPress Themes vs Elementor Template Kits


")
")
")