
Last updated - July 8, 2021
Where do I start?
Installing WooCommerce is pretty straightforward if you already have WordPress hosting.
You need to make sure the server requirements are met to enable the smooth functioning of the plugin.
On a side note, if you have not installed WordPress, refer this article.
Next, you can proceed to install the WooCommerce plugin.
But first, you need to login to your WordPress admin panel.

The WordPress admin panel on the left side has several options. You can go the plugin install page by navigating through the following path:
Plugins → Add New

Click Add New to open a page with the title ‘Add Plugins.’
Type ‘woocommerce’ in the search field and hit Enter.

In the search results, you can see WooCommerce on top.
Click Install Now button.

I have installed WooCommerce, what next?
If you are familiar with WordPress plugins, you already know that there is one more step before the plugin is ready to use.
You have to activate the plugin.
You can click the Activate button, once the installation process is complete (The Install Now button automatically changes to Activate).
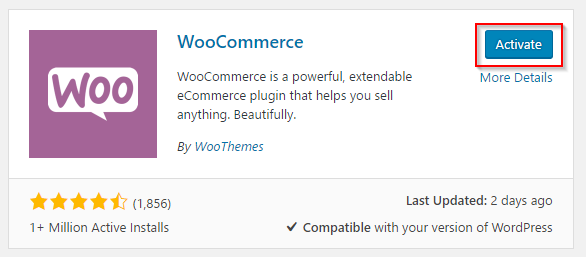
You will be redirected to the Installed Plugins page with a message ‘Plugin Activated.’
Your Woocommerce installation is now complete.
You can see WooCommerce on the WP admin panel as well.

You can now get on to Creating Pages section.
You can also watch the below video tutorial for a better understanding.
Also, If you are confused about choosing the right eCommerce platform, here is a detailed comparison of Shopify vs WooCommerce.


")
")
")