
Last updated - May 12, 2023
When a customer completes the checkout process a specific order is generated. These orders can be accessed through the WooCommerce dashboard by the admin and the Shop manager. Every order contains a unique Order ID that differentiates it from other orders. In this article, we will discuss how to manage orders on WooCommerce.
What is order status?
Order status is an indicator of the state of the order in your WooCommerce store. It helps to catch the attention of the store owner when an action is required. The journey of an order starts from ‘Pending payment’ status and ends with the ‘Completed’ status. Here are a few order statuses that you need to know.
- Pending Payment: An order shows a pending payment status when the order was received but the payment is still not initiated. You can also term these as ‘awaiting payment’ or ‘unpaid orders’.
- Failed: When the payment is failed you will see this order status. Sometimes when an order requires authorization to complete the payment; it will display a pending until verified status until authorized.
- Processing: When the payment is made but the order is waiting for fulfillment it will show a Processing status.
- Completed: When the order is successfully fulfilled and requires no additional steps, it will be in Completed status..
- On Hold: When the stock is reduced and the payment is due.
- Canceled: When the order is canceled by the customer or the store admin.
- Refunded: When the order amount is refunded by the admin to the customer.
- Authentication Required: This status is displayed when the order requires the customer to authenticate the transaction. If the customer is from the European region the SCA guidelines must be followed.
SCA or Strong Customer AUthentication was established in Europe; it suggests how European customers authenticate online transactions. The card payment should be 3D secure and the payments should follow a guideline so that it is not declined by the customer’s bank. For detailed information on SCA, you can read this article.
How to View and Manage Multiple Orders?
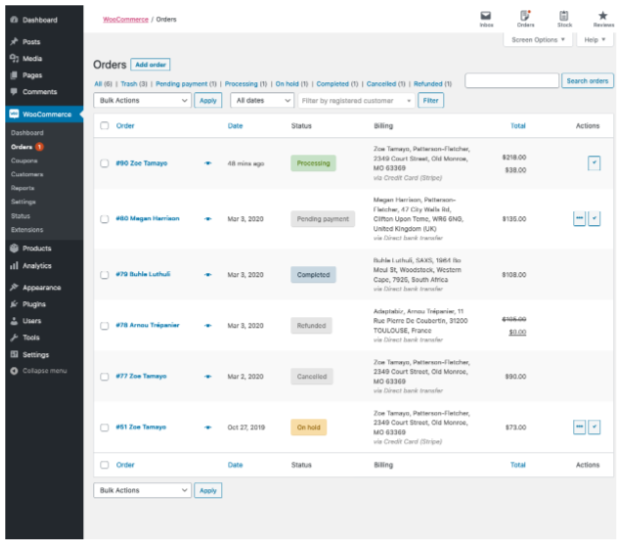
When your WooCommerce store starts receiving orders, your Order page will fill up with multiple orders. You can manage these orders by accessing WooCommerce > Orders.
When you visit the order page you will see several details in each row. You can edit the available rows and display additional options if necessary.
Here are the default order page options.
Order: This row displays the order number along with the customer name.
Date: The exact date when the order was processed.
Status: This row will display the status of the order.
Billing: Complete billing address and name of the customer will be displayed in this row.
Total: The exact amount that was charged for the product.
Action: If any further action is required, it will be displayed here.
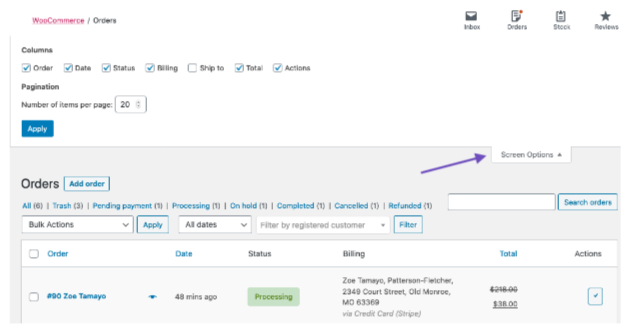
To change or add additional display options on the order page you can go to the top right corner and click the Screen Options button. Select which column you want to display, then click the ‘Apply’ button. You can even change the number of orders displayed on one page.
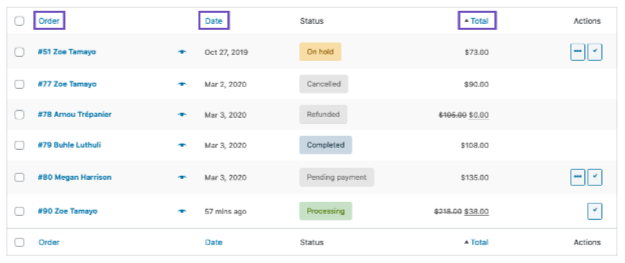
How to Filter orders and rearrange them?
You can use these filters to change your order arrangement.
- You can Filter orders by date.
- Filter by registered customers.
- Order type.
You can arrange the orders in a particular order (ascending or descending) by clicking these titles – order number, date, or total.
You can customize any single order manually by clicking its order number or customer name. We will discuss the single order page in a separate section later in this article.
Searching and Finding Orders
You can search for orders using the search box at the top right corner. Type an order number or customer name and it will show a single order or a list matching the typed value.
Previewing Customer Orders
You can click the Preview Eye icon to view detailed information related to the order which contains order number, billing details, order status, mode of payment, shipping information, item ordered, and customize option for order status. You can further click the Edit button to change these details.
Order Status is Color Descriptive
- Grey color could mean that the order is canceled by the customer, successfully refunded, or the payment is pending due to misconfiguration of the payment URL or any other plugin-related technical issues.
- Blue color signifies the order was successfully completed without any issue.
- Red color shows a failed order as the payment window expired or was manually cancelled by the customer.
- Orange color signifies that the order is still on hold. This generally refers to the fact that you need to manually confirm bank transfers or cheque payments.
- Green color shows that the order is still processing and the store owner manually needs to change the status as completed.
Order Actions
When you hover over an order status, it will showcase the notes made for that particular order.
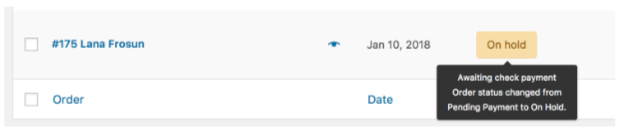
The end shortcut buttons indicate that the order is still Processing or Completed.
Detailed View of Single Orders and How to Edit?
You can click the order name or the customer name to open a single order page, where you can view the detailed information for the order and also use the editing options.
Viewing Order Details on the Single Order Page
In the order details panel, you can view the following information related to the product.
- The Order Number
- Payment related details
- Date and time when the order was executed
- Status of the order.
Customer-related details
- Username and email of the customer
- Profile link
- Other customer purchases made in the past
- Shipping and billing information
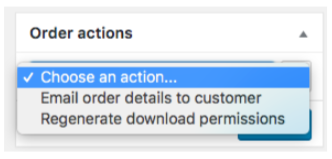
On the single order page, you can do the following changes.
- Modify the order status for items and edit product, price, taxes, etc.
- Reduce your stock or restore it for order completion.
- Regenerate download permissions or manually email order details to the customer.
- Modify product variations by removing or inserting meta.
- If you know a coupon code you can apply it to the order for an additional discount.
- You can also add a fee to the order.
Editing Order Details
You can change or modify all these details from the single order page.
- You can change the date and time of the order by using the dropdown and selecting an appropriate date and time.
- Modify the status by simply choosing the right order status from the dropdown.
- You can even change the customer by selecting the current customer and then searching for a new customer to assign.
- To change billing and shipping details, click the pencil icon to change any information.
- Under Billing address, you can change or load a billing address of the customer from their profile.
- Change the phone number or email address.
- Modify payment method or related details.
- Under the shipping tab, you can change the shipping address by loading it from the customer’s profile.
- Edit customer-provided notes for the order.
When you have made these changes you can click the Update button.
Order note types
There are 2 types of Order Notes. Private Note and Note to Customer.
Private Note: Is used to add information related to the item, which will be only displayed to the store manager.
Note to Customer: You can use this field to enter any type of product-related information and notify the customer.
Modify Order Notes
The order notes on the single order works as a communication bridge between the store owner and the customer. You can communicate with the customer as the customer is automatically notified about these changes.
You can use Order Notes to store event details or stock level, payment status, add order-related notes for the customer, debugging notes for payment gateway, add tracking number, etc.
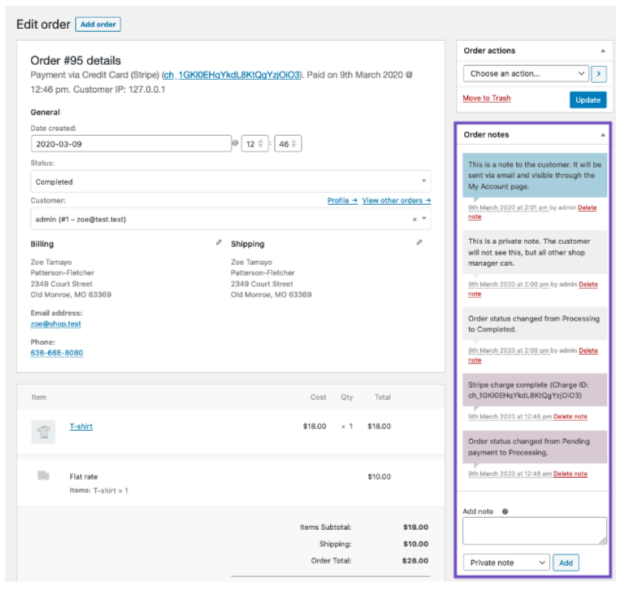
To add an order note, you can use the text area to add any information. Now, from the dropdown, select if it is a Private note or Note to the customer. Click the Add button once done. The note will be added and the customer will be notified automatically.
Different emails triggered by order status changes
When you change the order status from the single order page, your customers will receive automatic emails regarding these changes if the order notes is set to Note to Customer.
Furthermore, you can manage emails triggered by order status changes by navigating to WooCommerce > Settings > Emails.
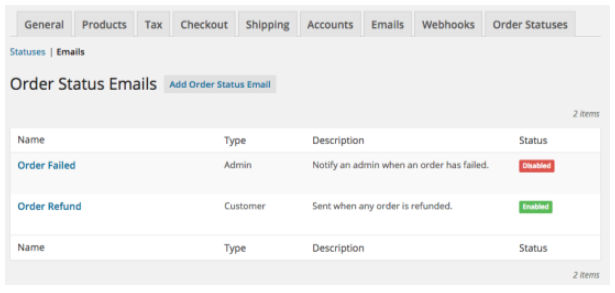
Let’s learn more about different emails that are triggered based on order status changes.
- New Order: The email is sent to the store owner to notify them about a new order.
- Canceled Order: The email is sent to the store administrator to notify them about a canceled order.
- Failed Order: A failed order notification is sent to the store admin.
- Order On-Hold: An email is sent to the customer including all the details if their order is on hold.
- Order Processing: A notification is sent to the customer after payment completion, it will contain the whole order details.
- Order Completed: An order completion mail is triggered and sent to customers when their order has been shipped.
- Order Refunded: When an order is refunded an email will be sent to the customer.
- Customer Invoice: The customer receives an email containing order information and payment-related links.
- Customer Note: A notification will be sent to the customer as soon as it is added to the Order notes.
To make custom changes to these emails you can click the Manage button corresponding to any email template and change the heading, content, type, etc.
Editing or adding order items
The single order page allows you to edit order items. You can navigate to the Items section and click the pencil icon. This option allows you to edit the ordered product, add tax, or shipping and recalculate the price.
Similarly, you can click the Add Items button to add a new product from your online store.
How to Add Custom Meta Fields
To add custom information for an order you can open the single order page then click the Add Meta button. As displayed above, this option will open 2 additional dialog boxes that will allow you to enter the name and value for an order. You can use the Meta Field option to give additional information related to the order.
Manually Adding an Order
From the WooCommerce > Order page you can click the Add Order button and manually add all the relevant fields such as the product from your store, billing address, customer information, payment method, etc.
Paying For an Order
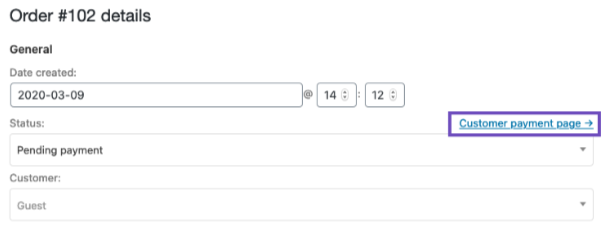
To make the payment for a particular order you can access the single order page by navigating from the WordPress admin panel. Click the Customer payment page hyperlink as displayed above. This hyperlink will redirect you to a new page where you can select from the available payment options and pay for the order.
Removing customer personal data
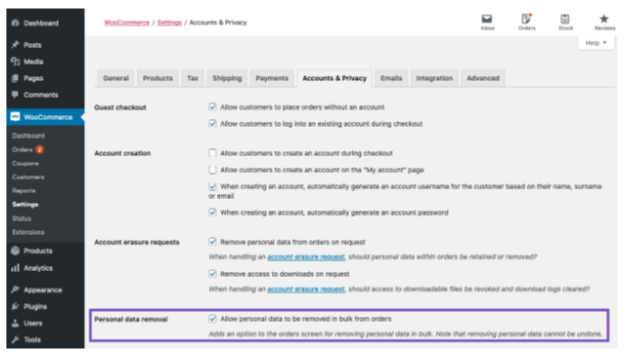
When an order is refunded the customer data is saved in the WooCommerce database and customers may request you to delete their online data to save themselves from identity theft or online fraud. The data that can be removed from WooCommerce includes the name of the customer, their address, contact information, and tracking and VAT IDs.
To remove customer personal data you can open the WP panel then navigate to the Tools Section > click the Erase Personal Data option.
This option will display all the customers that are registered on your website. You can select single or multiple customer data that you want to remove. When it’s done you can send an erase confirmation mail to the customer.
Plugins To Manage WooCommerce Orders
- Order Tracking – WordPress Status Tracking Plugin
- Category Order and Taxonomy Terms Order
- Advanced Order Export For WooCommerce
- Sequential Order Number for WooCommerce
- Order Delivery Date for WooCommerce
- Order Export & Order Import for WooCommerce
- WC Cancel Order
- YITH WooCommerce Order & Shipment Tracking
- Woo Manage Fraud Orders
- Orders Tracking for WooCommerce
For a detailed guide on WooCommerce order plugins, you can refer to this article.
Read this guide and learn how to manage orders on WooCommerce. If you need any additional help you can write to us or leave a comment below.
Further reading
- A Detailed Guide on WordPress & WooCommerce User Role Editor
- How to Set Up and Customize your WooCommerce Product Page
- WooCommerce Tutorial – Set Up an Online Store from Scratch 2022…
- Important Things You Must Consider Before Changing WordPress Themes
- How to Test WooCommerce Checkout and Payments
- How to Back Up WooCommerce Database


")
")
")