
Last updated - May 17, 2023
Images play an important role in any website. For an eCommerce store, images are more significant that it could play a crucial role in purchase decisions. As a store owner, you will have to ensure that the product images are of good quality, and are able to convey the features of the product. WooCommerce, in the latest updates, has improved the image settings. These settings will give you more control over how images are displayed on different WooCommerce supporting themes. In this article, we will look further into how to resize images in WooCommerce without the hassles of complicated procedures.
Image settings in WooCommerce
The theme that you use plays a big part in displaying images on your website. And, you would want images to look good when you install a new theme that supports WooCommerce. From version 3.3, WooCommerce has made solid improvements in this department so that this is achieved. That means there are some changes from the way WooCommerce used to handle product images conventionally.
The image cropping settings are quite different after these updates. You will be able to define the width and height of the product images. Also, there will be a preview that will help you understand how the images are going to look in the frontend. And the themes that are compatible with WooCommerce will have more control over image settings. This means you will be able to customize the image size and appearance extensively from your theme settings.
Image control for themes
In the older versions of WooCommerce, there used to be problems when theme developers used the update-option to make changes in the database. When any updates were made to the theme, it used to revert the image settings configured by store owners. With the latest updates, theme developers can use add_theme_support function to define image sizes. When images are declared in this manner, it won’t get overridden by other settings changes, and also the image settings in the WooCommerce admin panel will be hidden.
Resize Images in WooCommerce
Generally, you will be able to make changes to your image dimensions from the WooCommerce Customizer.
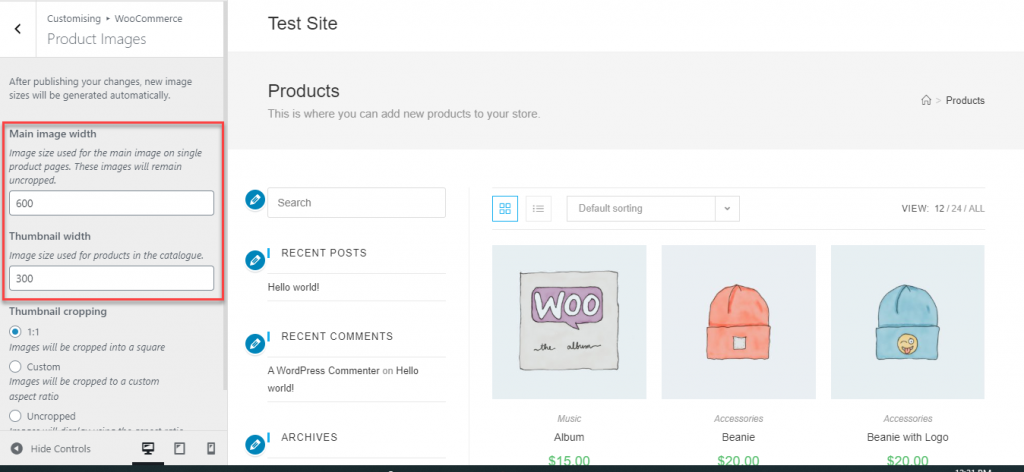
On your WordPress admin panel, go to Appearance > Customise > WooCommerce > Product Images.
For some themes here you will see an option to define the width of the main product image as well as the thumbnail.
However, if the theme is defining the image sizes using the function add_theme_support, you won’t be able to control this feature. In the Customizer, this section will be hidden.
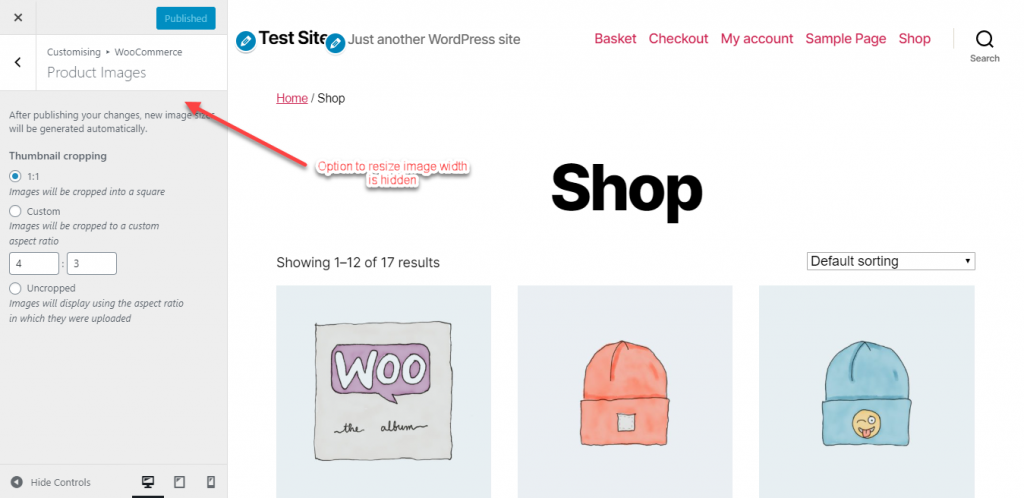
However, you will still find the option for Thumbnail cropping. You can crop your product image thumbnails in three ways.
- 1:1 – This will be square cropping. The thumbnails of your product images will be cropped in square shape.
- Custom – In this option, you will be able to define an aspect ratio that you prefer.
- Uncropped – There will be no uniformity for the image thumbnails under this option. Thumbnails will be in the aspect ratio with which they were uploaded.
When you make changes to these settings, you will see a live preview on the right screen. This will help you get a clear idea on how these image sizes will look before you publish them. Only after you click the Publish button, these changes will be live and visible to customers.
Customizing image sizes using hooks
Image sizes are defined in WooCommerce using the following options:
woocommerce_single– This displays the full product image the way it was uploaded. The default width here is 600 pixels.woocommerce_thumbnail– The image grid is cropped to a square shape here, with default size of 600 pixels. And, the store owner will be able to customize the aspect ratio.woocommerce_gallery_thumbnail– Again square cropped, but with 100×100 pixels default aspect ratio. For image gallery.
Recommended for store owners with coding knowledge, there are options to control image thumbnail sizes using hooks.
You can use the wc_get_image_size function to get the image size definitions and to modify them.
For example, you can use the below code to change the dimensions of your thumbnails to 300×300 pixels.
add_filter( 'woocommerce_get_image_size_gallery_thumbnail', function( $size ) {

return array(

'width' => 150,

'height' => 150,

'crop' => 0,

);

} );
Please remember to regenerate thumbnails to make the changes effective to your existing images. For more options like this, please refer to this WooCommerce documentation.
Automatic thumbnail resizing
WooCommerce also provides automatic thumbnail resizing now. Earlier, thumbnails used to not resize automatically, when product images were changed. In such cases, you had to use a plugin like Regenerate Thumbnails to update the changes to thumbnails. From version 3.3 and above, WooCommerce has started offering on-the-fly and background thumbnail resizing.
When you make changes to your product image settings, WooCommerce will start a process to resize images in the background. In addition, there will be an on-the-fly resize for the frontend, when the process is going on, or is unable to complete for some reason. This will ensure that your customers will have a great experience on your store irrespective of the background processes that are going on. This also ensures the preview option while using the Customizer, where you can see the results of different image dimensions.
Optimizing product images in WooCommerce
It is important to optimize product images that you use in WooCommerce to ensure that the customers are able to clearly see product features without impacting site speed. There are several strategies that you can adopt to ensure the product images that you use are optimized. Here are some ways you can optimize product images.
Preparing product images to upload
You can also resize product images before uploading them to WooCommerce using tools like Photoshop, GIMP, etc. When you upload a high resolution image, the browser will have to load the original image and then one that fits to your site’s width. This will impact the page loading speed and significantly affect the customer experience on your store. It is a good idea to find out the suitable image display size for your website. You can use Inspect option of the browser to find the Experts also recommend to keep the product image file size below 100KB.
Now, another aspect that makes a difference is the file format. JPEG is preferred for product images as these images generally use a lot of color and you want to them to appear realistic. PNG sometimes is more useful for compression without losing quality, but it is recommended for screenshots and images with transparent backgrounds.
You can use one of the above-mentioned tools to reduce the file size without losing quality.
Refer to our article to understand the process of resizing images without losing quality.
Use an image compressor
Another common strategy that several store owners use to optimize product images is to run them through an image compressor tool. These tools will remove non essential data from your images, so that it becomes lighter. Color profiles, camera details, etc., are examples of information that compressor tools remove from an image.
Here is a quick look at some of the popular image compression tools that you can use for WooCommerce.
Smush
This plugin will help optimize the images that you use on your WooCommerce store. It will compress and resize images for your store, and also enables features like lazy loading. Smush creates lossless compression for your images, where the quality of images is not affected when unnecessary details are removed from images. It also helps in bulk optimizing your images, where you can optimize up to 50 images at a time.

EWWW Image Optimizer
This is another popular option you can use to optimize images on your WooCommerce store. It will help you save storage space, bandwidth and also ensures faster page load speeds for your online store. You can use it to optimize images before adding them to your store, and also for your existing product images. It ensures that all your images are in a suitable file format and also help you choose the compression options. Moreover, it is compatible with a lot of other WordPress plugins and will optimize images added by those as well.
EWWW Image Optimizer will ensure that images uploaded to your WooCommerce store are optimized and scaled to fit. It also provides lazy loading and bulk optimize options.
Tiny PNG
This is another option that you can try to compress product images on your store. It uses lossy compression strategies to reduce the file size of your PNG images. Overall, this can help in reducing the file size and loading pages faster.
Jetpack’s Content Delivery Network
Now, if you don’t want to use one of these external tools, you can use the free Site Accelerator option of Jetpack to compress and resize images. It is an image optimization service that ensures that images are not loaded from your servers.
Hopefully, this article has helped you understand how to resize product images effectively for your WooCommerce store. Leave a comment if you have a query.


")
")
")
Hey Sujith,
just fast: this article safed me … the first (that I found), which tells that some themes use add_theme_support and disable the woocommerce image size adjustment in WP.
Thanks buddy. If you’ll need some SEO expertise, feel free to ask me.
All the best and stay healthy,
Chris
Hey Chris, Thanks a lot for the feedback 🙂
Hi,
I hope to find you in good health. I am reaching you to make an offer that can benefit both of us. I propose to publish a guest post article on your amazing website. The article will surely be of your readers’ interest and will be free of cost without compromising quality.
To proceed with this offer, I will first send over some relevant and interesting topic ideas, you can then choose the topic ideas that you think would be best to write on for your website. Eventually, I’ll provide the article and would expect you to give me a backlink inside the article’s main body.
Please let me know if I can proceed with the first step to this?
Looking forward.
Have a great day!
Regards,
Ashlie Lopez
Hi Ashlie, Please send an email to info@learnwoo.com with your topic suggestions.