
Last updated - July 8, 2021
When you are trying to set up an online store using WooCommerce, shipping might be one of your concerns. WooCommerce allows you to have a comprehensive shipping strategy on your WooCommerce store. In this article, we will discuss how you can set up WooCommerce shipping methods and shipping charges on your WooCommerce store.
In the core settings of WooCommerce, you can create multiple shipping zones on your store according to the geographical locations you are selling to. For each of these shipping zones you can configure shipping methods as well. Then you can set prices for each of your shipping methods based on your store strategies.
In addition, you can extend the shipping functionalities on your store by using premium plugins. There are several shipping plugins that will help you integrate services of popular shipping carriers. We will provide a few options that you can try out at the end of this article.
Watch the video below, or read on…
Shipping locations
Before setting up the shipping methods, you need to set the shipping locations. For this, go to WooCommerce > Settings > General.
Here, there is an option to choose the shipping location. Under Shipping locations field, you will have 4 options:
- Ship to all countries you sell to
- Ship to all countries
- Ship to specific countries only
- Disable shipping and shipping calculations
You can also choose the Default customer location. When a customer adds a product to cart on your store, they will see the shipping methods and rate based on these settings. The options are:
- No location by default
- Shop base address
- Geolocate
- Geolocate (with page caching support)
For example, with geolocate settings, the location of the customer will be determined based on their IP address and accordingly the shipping methods and rates will be displayed.
Setting up shipping zones
The first step in configuring shipping settings on your WooCommerce store would be setting up shipping zones. Shipping zones are geographical locations where specific shipping methods and rates would apply. For each shipping zone, you can add a set of shipping methods and rates.
First, go to WooCommerce > Settings > Shipping.
You will see an option to add a shipping zone.
You will also find a default shipping zone, which covers all other locations that are not covered in your shipping zones.
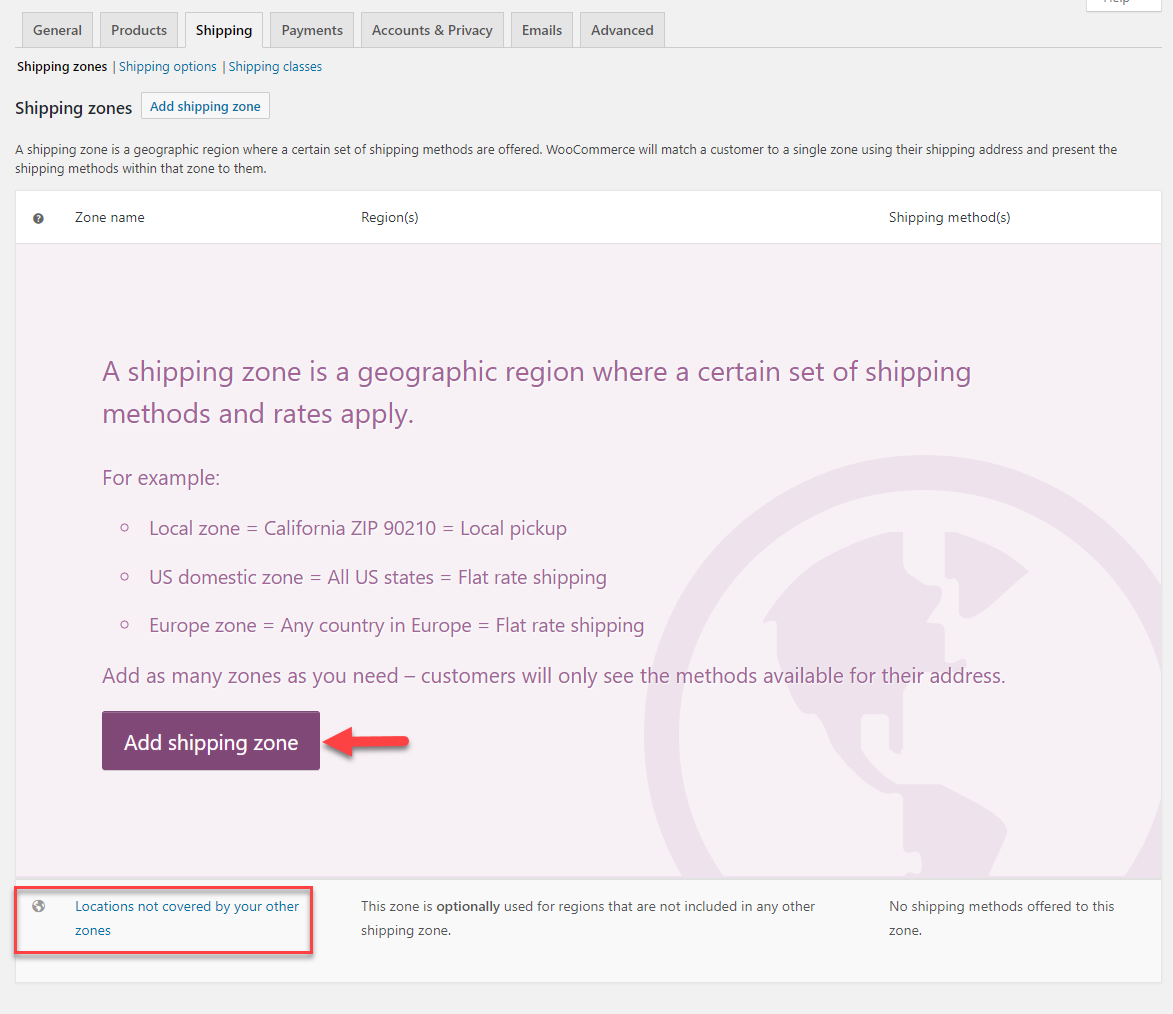
Now, let’s see how to create a new shipping zone on your store. When you click the Add shipping zone button, a new screen is displayed.
Here you can configure the shipping zone.
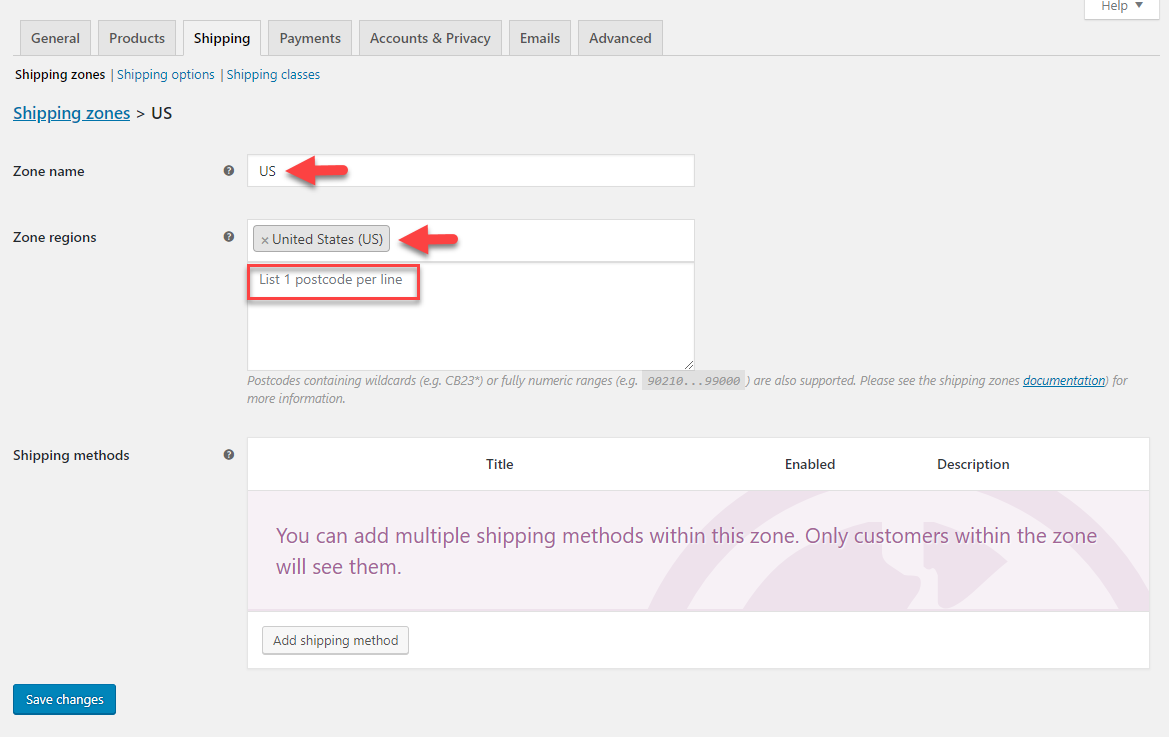
Enter a name for the zone and choose the regions that come under that zone.
For example, we will create a zone for the entire United States. The zone name is added as ‘US’, and then select United States from the Zone regions drop-down.
You can also specify zip codes so that the zone will be applicable only for customers from that particular area. Here you can simply enter zip codes or specify a numeric range or even postcodes with wildcards.
Set up WooCommerce Shipping Methods
After configuring the regions included under the shipping zone, you can add shipping methods to the zone. By default, WooCommerce offers three shipping methods – free shipping, flat rate and local pickup.
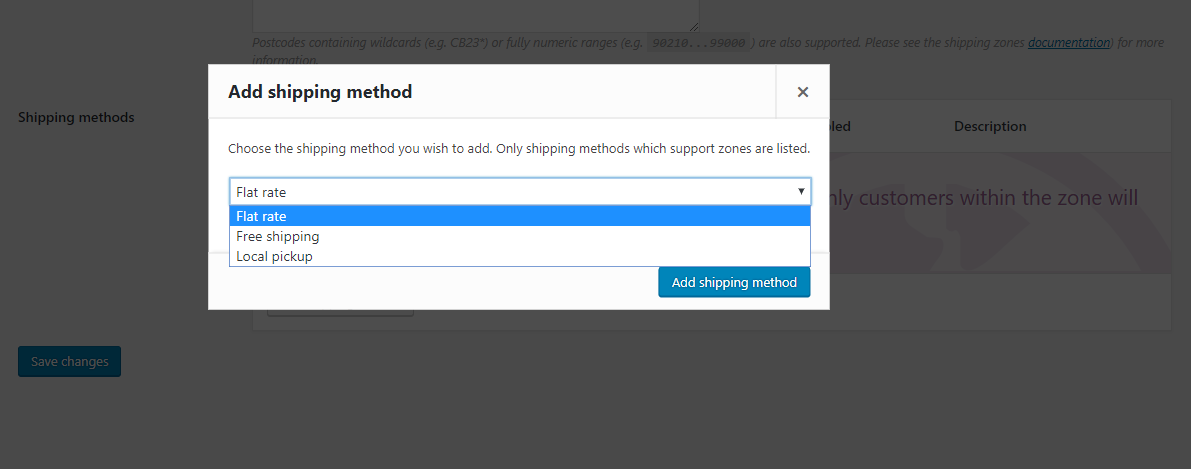
When you click the Add shipping method button, a modal window will be displayed where you can add shipping methods. After adding the method to the zone, you can configure it further to add rates fro another screen.
Simply choose the required methods from the drop-down.
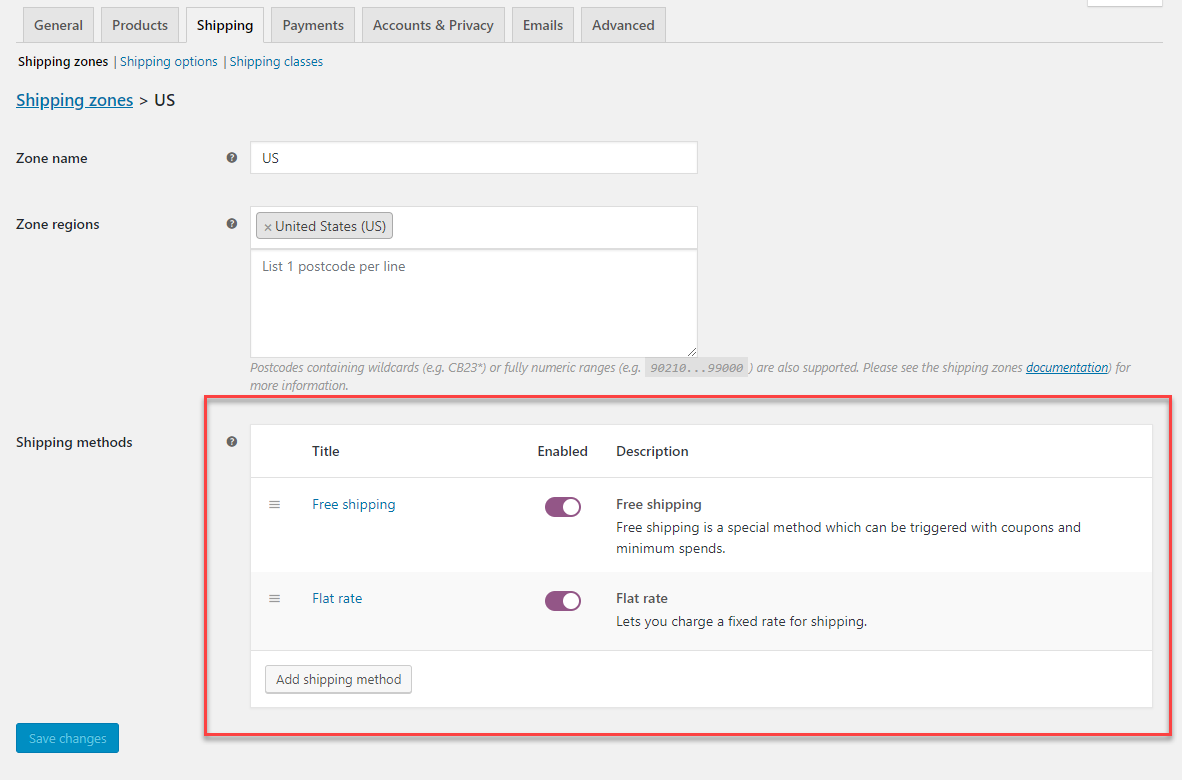
Once you add the required shipping methods to the zone, you will see them enabled under the shipping zone. You can see the title and description of the shipping method along with a button to enable or disable the method. You can configure each of these methods to add rates and other conditions by clicking the Edit option that will be visible when you hover the cursor around the title.
When you click the Edit option of a shipping method, a new modal window will be displayed with options to configure.
Let’s see how to configure each of these shipping methods.
Setting up Flat rate
When you click the Edit option, you will see the modal window with options. Here you can change the method title, and also set up the tax status (whether shipping is taxable or not). You can specify a Cost for the shipping method here. According to the requirement, you can specify a flat rate or a variable value depending on the number of products in the Cart.

For setting up costs, there are certain placeholders available.
- [qty] – denotes the number of products in the cart
- [fee] – you can add an additional fee to the shipping cost. There are two more options for this.
- percent – based on the total order value, you can set a percentage as shipping charges.
- min_fee – a minimum cost that would be charged; can be combined with percent.
Examples
20 + ( 3 * [qty] )– A base shipping cost of $20 plus $3 for each item in the cart.30 + [fee percent="5" min_fee="2"]– A base shipping cost of $30 and adding 5% of the order total, which is at least $2.
Setting up free shipping
On the modal window for Free shipping, you can enter a name and a condition for customers to avail free shipping on your store. The available conditions are:
- A valid free shipping coupon
- A minimum order amount
- A valid free shipping coupon OR a minimum order amount
- A valid free shipping coupon AND a minimum order amount
Now when a customer adds a product to Cart on your store, they will be able to see the available shipping options.
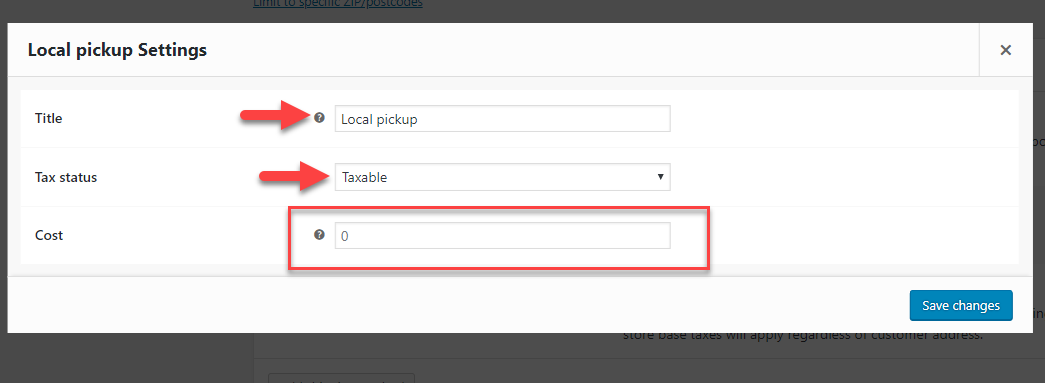
Setting up Local Pickup
On the modal window, you can enter a name and tax status for local pickup option. Here, you can also add an optional charge for customers to avail local pickup.
Rates on the Cart page
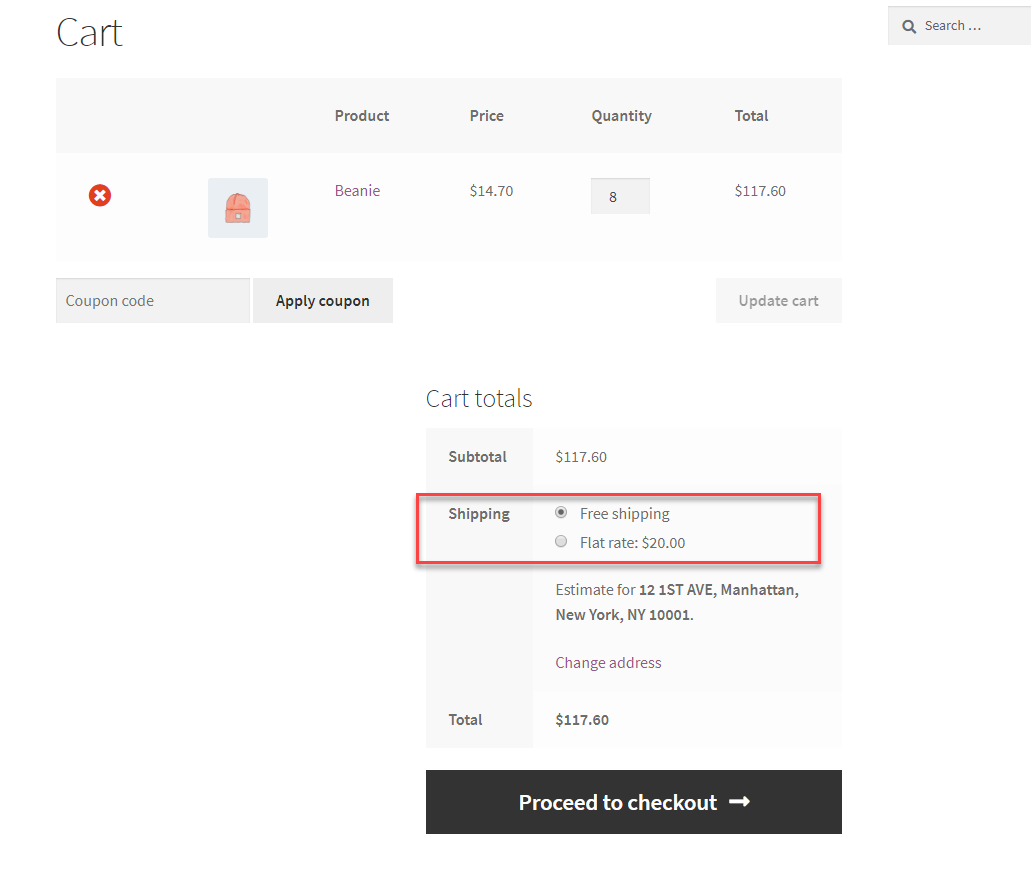
For this example, we will set a flat shipping rate of $20, and offer free shipping for orders above $100 for all United States customers (Shipping zone US set above).
Now let’s see what happens when a customer adds a product to Cart on your store. For customers with US address, the flat rate of $20 will be shown for all orders below $100.

For orders above $100, free shipping will be enabled.
I hope you got a basic idea of how to set up shipping methods and rates on your WooCommerce store. For more information, check out our WooCommerce shipping guide.
You can also find a range of premium shipping plugins that will help you integrate rates and services of popular shipping carriers here.
If you prefer understanding with a video tutorial, you can watch the below video.


")
")
")
Being a Shipping expert myself, I can vouch for the fact that this is a superb piece written by the Learnwoo team. However, based on my own experience, I would like to point out a few more factors that are important for toying around with shipping solutions or for choosing among the ready made solutions in the market.
A serious business ships it’s goods on a daily basis and on a variety of factors. Jonathan exports apples to countries all over the world. Yet he has different shipping options for different countries and also based on the quality of apples that he sends.
The highest quality go with premium service
The middle ones go with Standard service
The lowest quality can go Free Shipping
Apart from that he ships to Europe with a heavy shipping price as their quality standards are high and so the delivery has to be quicker. Similarly he has various other combinations for his shipping.
To fulfil everything for him, it is important that a solution should be able to show certain services based on zones, postcodes, shipping class, weight of shipments, price of shipments, etc. Moreover, the solution should allow him to adjust the shipping cost as and when required. Finally, he should not lose sight of his apples for even an instant as this is hardwork for one full season. Such flexibility can be found in solutions like WooCommerce Shipping calculator from StorePep or UPS, FedEx solutions from PluginHive along with some other premium plugins as well.
Hence free solutions are always a big addition to your Shipping repertoire, but a premium solution cannot be matched when it comes to quality of the solution itself.
Hi Anindo, Thanks a lot for sharing these insights.