
Last updated - January 4, 2019
The advantage of the current technological landscape is that website owners have a lot of flexibility to define their business model. You can easily incorporate eCommerce functionality on your WordPress site with the help of WooCommerce. However, there might be several cases where you don’t want the complete functionality of a shopping cart. You may have only a single product to sell, or you want to accept payment for some service that you offer. Accepting donations on your site too doesn’t require the eCommerce functionality most of the times. For all these cases, you may want to integrate a simple payment option to your WordPress site. Here, we are going to review a plugin that offers WordPress Square Integration – WP Easy Pay for WordPress.
Find a special discount on this plugin for LearnWoo readers!
When do you need to accept payments on your WordPress site?
There are several cases where you would want to accept payment on your WordPress site, but you don’t want to make it a shopping site. Here is a quick look at some of them:
- You have a single product that you want to sell on your website.
- Yours is a non-profit organization that works for public interest and would like to accept donations on the WordPress site.
- You are offering a service like counselling or training students, for which you want to accept payments on your site.
- Accept payments for appointments like hair styling or grooming services.
For these cases, and maybe more unique scenarios, you can simply integrate a payment option to your WordPress site. Then your site visitors can easily make a payment on your WordPress site.
Square – a great payment option
Square is a San Francisco based financial services company that helps you accept payments. It is a great platform to accept payments online and offline. When you start an account with Square, you will get a free magstripe reader, which will help you accept payments from customers at POS location. And, you can accept credit card payments online from all the major credit card companies. At present, the services of Square is available only in the US, UK, Australia, Canada and Japan. So if you are based at any of these countries, you can start a Square account. Now, with the help of the plugin we are going to discuss, you can integrate your Square account on your WordPress site.
Before getting into the nuances of the plugin, let’s take a quick look at the features of Square that separates it from other payment platforms.
Why Square?
- Gives you a great option to accept payments both online and offline.
- Free option for individuals to accept payments for appointments.
- Offers a transparent pricing pattern, where you have to pay based on the number of transactions.
- Fast deposits on your account within 1-2 business days, or even instantly for an additional 1%.
- Complete PCI Compliance and Chargeback protection for hassle free transactions.
- Provides insights to improve your earnings
- Offers loans to help with your infrastructure development.
- Great customer support over phone, email or social media.
Managing WordPress Square integration
The plugin we are discussing today has multiple options to help you with WordPress Square integration. We will first take a look at the free option.
WP Easy Pay – With Square
This plugin helps you integrate Square payment option on your website. You can easily accept payments or donations online with the help of it. Let’s take a look at the features of the free plugin.
Feature highlights – Free plugin
The free plugin offers you the basic functionalities which would be good for a small website.
- It helps you accept simple payments or donations on your site.
- You can specify the text on the payment button.
- Option to specify the amount to be paid by the user.
- Option to let your users choose the amount in case of donations.
- Receive email notifications when a payment is made on your site.
Requirements
You need to have the following requirements to be able to accept payments using this plugin:
- PHP version 5.5 or above
- WordPress version 4.4 or above
- An account with Square
- A valid SSL certificate
How can you get it up and running?
The installation and configuration of this plugin is pretty simple. You can download the plugin from the WordPress repository. Once you install and activate the plugin, you will find the WPEP settings screen on your WordPress navigation panel.

Now, on the WordPress navigation panel, go to WPEP Settings > WPEP Settings. Here you need to enter the Square API keys.

Then, navigate to WPEP Settings > Button.
Here, you will find the shortcode, which help you place the button on your website. There is a field to specify the email to which the notifications will be sent. With a radio button, you can select between Simple Payment and Donation. Let’s select Simple Payment first.
Now, you will see two more options here. One, to select a text for the button, and another field to specify the amount to be paid.
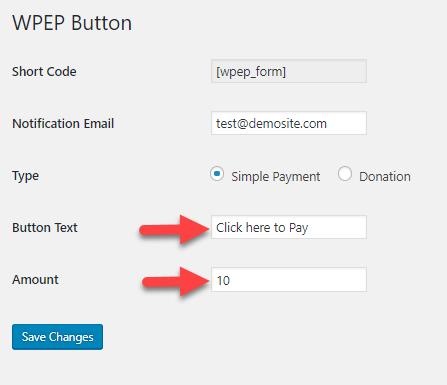
On the front end of your site, this will look like the below screenshot.

Now, let’s see what will happen if we choose donation here. In addition to the above fields, you will find two more fields. One is a text field to enter the organization name. The other is a checkbox that allows your users to specify the amount they want to donate.

And, on the front end your site will look like this:

WP Easy Pay for Square
The premium version of the plugin adds a range of useful features.
Additional features of the premium plugin
The premium version has all the features of the free plugin along with the following additional features.
- Multiple buttons for payment
- View order history from WordPress dashboard
- Payment Popup
- Form Customization
- Button Customization
- Subscription and Recurring Payments (available only for Professional and Business plans)
How the premium version works?
First of all, you need to purchase the plugin from the API Experts site.
The plugin is available with three different pricing plans. A Starter version at $49 per year, a Professional version at $99, and a Business version at $249 per year.
Special offer for LearnWoo readers!
LearnWoo readers can avail a special offer of 20% discount on this plugin (valid till 31st July, 2018). You can find more details about the offer in the Deals section of LearnWoo.
How to configure the premium version?
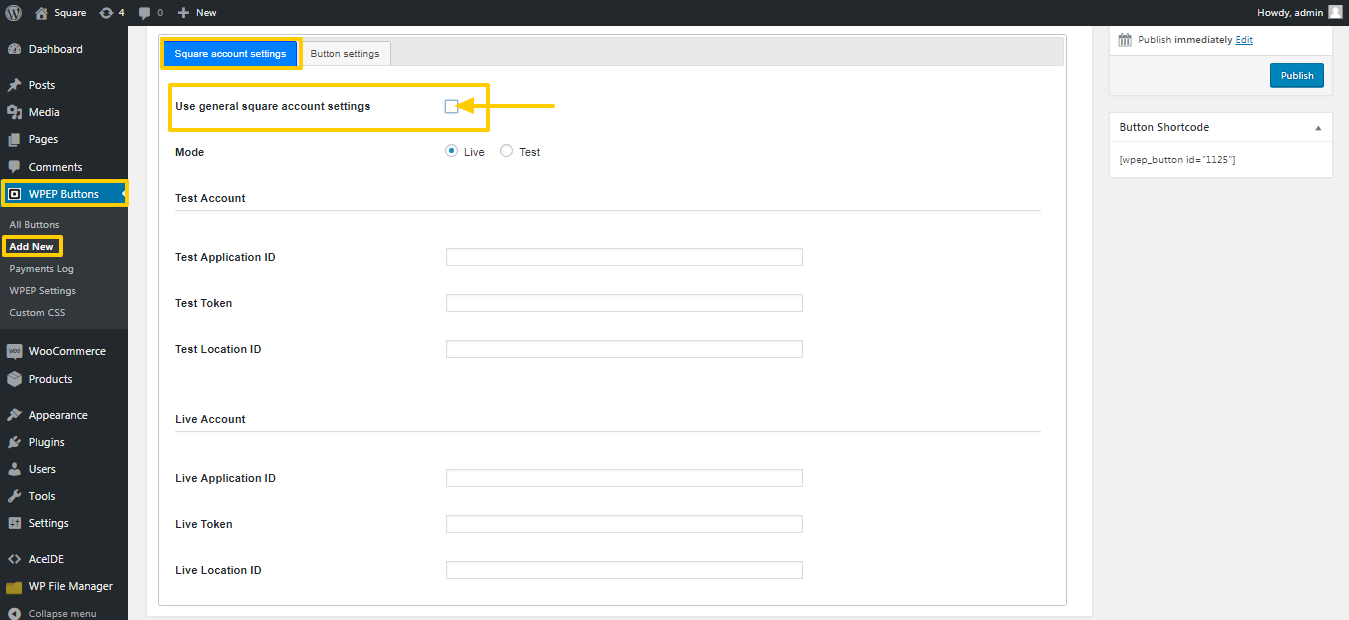
The user interface is slightly different when you work with the premium version. On the WordPress navigation panel, you will recognize the plugin as WPEP Buttons.
To enter the Square API keys, you need to navigate to WPEP Buttons > WPEP Settings.

You can create multiple buttons with the premium version. You need to click WPEP Buttons > Add New to create a new button. And you can choose, whether to use the General Square account details or specific for each. There is a checkbox, which you can tick if you want to use the general account details.

If the checkbox is left unticked, you will have to enter separate account details including API key for each button. This will override the general settings.
Under the Button settings tab, there are more options than the free version.
The first one that you will notice will be the checkbox for the popup.

On the frontend, the popup will look like the below screenshot:

Multiple buttons
Now, there are three options in a drop-down for Button Type.
These are:
- Simple Payment
- Donation
- Subscription
For simple payment, you can choose the amount and button text, same as the free version.

When you select donation, as seen earlier, there will be options to add organization name, as well as an option to allow users to choose the amount.

If you choose subscription, you will have an option to accept payments on a recurring basis. In addition to button text and amount, you will find two more options here. These are subscription cycle and subscription length. You can choose from day, week, month or year. For each again you can choose the term from one to six. For example, every 1 week, or every 3 months, and so on. You can also specify the subscription length (1 to 24 cycles), or choose ‘Never expire’.
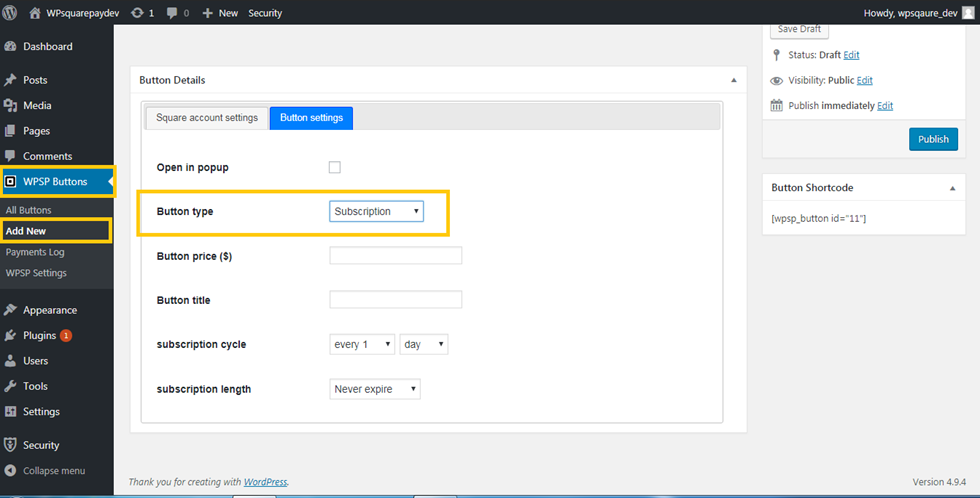
Please remember, Subscription option is only with Professional and Business plans.
Displaying the payment button on your page or post
You can choose to display the button on any page or post on your site, with the help of the shortcode.

Viewing payment details on the backend
You can view the subscription status on the backend. Under Payments Log, you can view all payment details.

Here, you can also change the subscription status, if required. Basically, there are three statuses – Active, On hold and Cancelled. All submissions will be ‘Active’ by default. You can change the status of an ‘On hold’ subscription to ‘Active’. However, you won’t be able to revive ‘Cancelled’ ones.
If a particular subscription was renewed, you will be able to view the Renewal History as well.
In fact, the plugin offers a shortcode to display this renewal history to concerned users as well.
You can use the shortcode [wpep_subscriptions] to allow users to view payment details.
Users can renew their subscriptions as long as there are renewal cycles left.

What we think about the plugin?
As there are only limited options to set a payment interface on your WordPress site with Square, this one really stands out. Configuring this plugin is quite easy, and it gives you the flexibility to adapt to different models. Based on the requirement, you can choose to use simple payment, donation or subscription. The subscription option, especially, can be a very handy feature. As it will ensure recurring revenue on your site, and you have the control to define the terms for it. The plugin also has modern features, which allows customers to define the amount for their donations.
Conclusion
For website owners who wish to accept payments on their site without incorporating a shopping cart, this plugin is a great solution. Moreover, Square is quickly rising as a preferred payment platform in the countries that it operates. In the WordPress ecosystem, there are only very few solutions that help you integrate Square and WordPress. Hope this review has given you a great idea on the usefulness of this plugin. Let us know if you have a query regarding this plugin and its features.
Visit LearnWoo deals to avail 20% discount while purchasing this plugin.


")
")
")