
Last updated - February 24, 2020
In this article, we will discuss webhooks and how to create a webhook in WooCommerce.
What are Webhooks?
You must have seen webhooks reflecting in the settings of your apps and thought what is the exact use of this option? Webhooks are one way that apps can forward automated messages or instructions to other apps. It is a direct way your online account can communicate with each other and get updates accordingly. This method is also very cost-effective for your online store, and the pricing of WooCommerce can be within your estimated budget.
There will come various situations when webhooks will help you to drive data automatically from one app to the other. Webhooks are automated messages forwarded from the app once an activity happens. They have a message or payloads which are sent to specific URL, substantially to the apps contact number or address.
Why create it on WooCommerce
WooCommerce is a system that secures new orders, and all the required order related information with the respective labels. It provides ease to the website owner to track and be aware regarding the list of orders. The list may contain unpaid orders and paid ones, pending orders and shipped ones. This system also store the instruction provided by customer, shipping details and much more.
“It is a feasible option to get help from webhook with WooCommerce activities, like, devise webhooks to be used each time a commodity is added in the shopping cart,” says Mathew Kastler, Head of Research Department at King Essay.
In short, webhooks are actually the modifier that can force the built-in plugin of WooCommerce to perform according to the desire of developer. Hence, if you are talented, educated and a well-experienced PHP developer, you can easily create the webhook. Despite, it allows you to get the customer’s data, monitor their activities and promptly take actions through your custom codes.
The most essential benefit of creating a webhook is that WooCommerce can store and display the information on the screens (website owner and client) according to the wish of developer. In such regards, various unrequired and additional information won’t display to any user.
How to create it?

To create a Webhook in WooCommerce, you need to login to your WooCommerce shop as administrator. Go to WooCommerce > Settings, then go to the API tab. The newer versions rename this tab name as “Advanced”. Click the “Webhooks” link in the sub-menu over this page. Here you will find an empty list of webhooks.
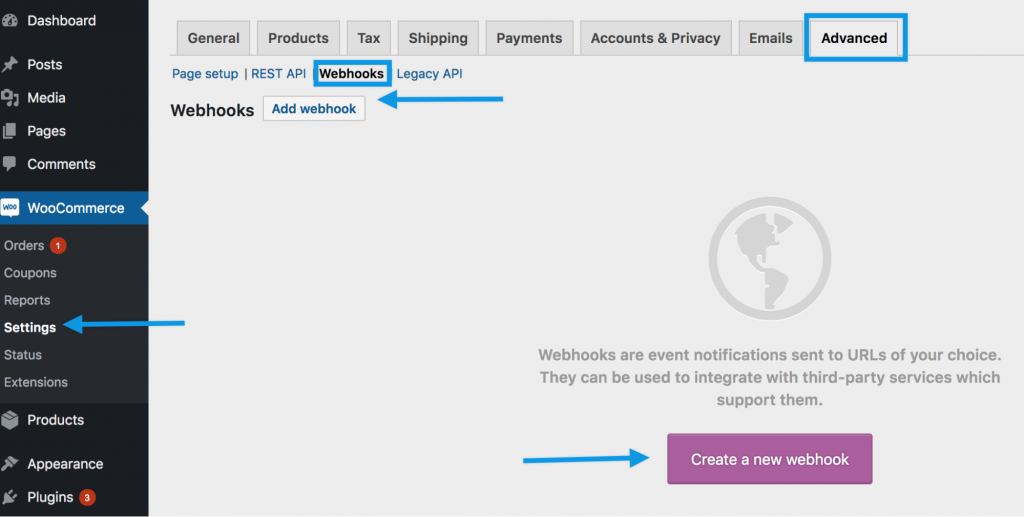
To begin the process, click on “Add webhook”. The webhook is added, after which the fields of settings will be reflected. Below we have discussed the setting fields for your reference.
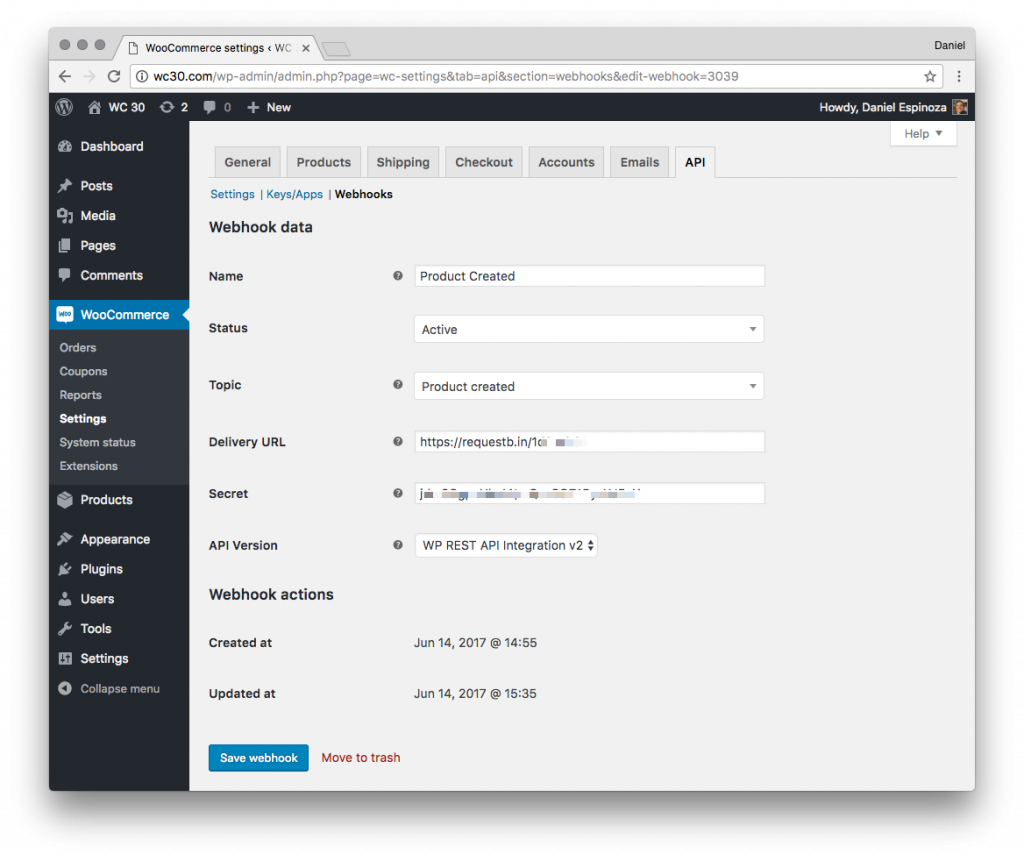
Name: This is a field only for administrators of the store. It can be set as per your need which you find most suiting for the Webhook or you can set as per date and time of creation.
Status: Set the status to Active (delivered), Paused (not delivered) or Disabled (delivery failure)
Topic: This action will push the Webhook to fire. WooCommerce replenishes 12 actions and two custom actions. The two custom actions are Action and Custom.
Action: In case Action is defined as the Topic, an additional setting field name Action Event will be displayed. This field will consist of the WordPress hook, which will fire the Webhook. As an example, if the site has a customer plugin with the line:
do_action ( ‘after_order_exported’);
Then we need to set the action event to ‘after_order_exported’ to fire the hook at a suitable time.
Custom: In case Customer is set as the Topic, an additional setting field as Custom Topic will be displayed. This field will consist of the name of a Custom Topic that has been added using the below filter:
woocommerce_webhook_topic_hooks
Delivery URL: This is the URL where the Webhook payload will be delivered.
Secret: The secret field generates a hash for the body of Webhook. That hash is further provided in the request headers. Webhook can be authorized on the receiving part by using this hash.
API Version: Out of three API versions, choose one. If you don’t have any specific condition, leave this as “WP Rest API Integration V2”.
Save Webhook: When you save the Webhook with the Active Status for the first time, a ping is delivered to the delivery URL.
Webhook WooCommerce Test
Here you must remember as we start the testing process, that webhook delivery occurs at the backend. Therefore first a webhook will be queued, and then the job is processed, after which you can check the delivery of it.
To check, you have the option of delivering the webhook payload instantly by using the below snippet:
apply_filter (‘WooCommerce_webhook_deliver_async’, ‘_return_false’);
To make the process easy for you, use the default async pattern. Also, the webhook will use the topic “Order Updated.”
When a new or existing Webhook is activated for the first time, WooCommerce will promptly deliver a ping request using a unique webhook ID. This is done to test if the delivery URL is working properly at activation time. In case the request is declined, the webhook cannot be activated and will be disabled. “The first thing you need to learn which will help in testing webhook is to trigger it,” says John Parker, Manager of IT department at Academist Help. By the side, another important thing is the Topic that has to be rather straightforward in steps.
Update Order: get an order, and then update the address using the edit order admin page; thus the order is updated.
Create Customer: using the customer role, create a new user
Restore Product: Restore the product after trashing it. If required, you can change the number of products displayed per page.
Below are the steps to test a Webhook:
- Visit Premium Jackets to apply a test.
- It is good to note down the URL you are creating for checking. You may also keep this browser tab open for future use.
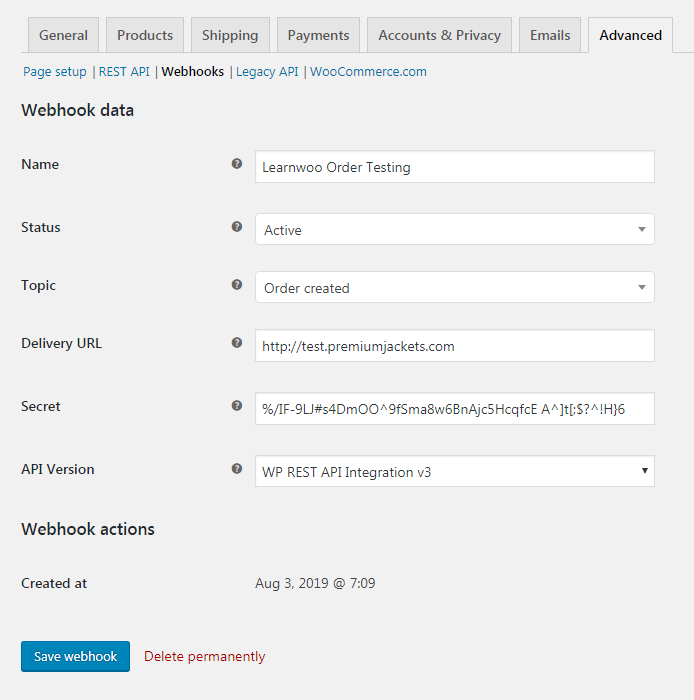
- Get back to Woo-Commerce and add a new webhook. Paste this testing URL, you created (point # 2), in the field of Delivery URL.
- Fill out the other fields of webhook and then select an option from the field of Topic. In our case, we are choosing an option “Order Updated.” Make sure that the value of Status field should be set to “Active” before you click the save button at the bottom of the page.
5. Continue with the steps required to set off the webhook. As in this case, to test “Order Updated,” go to the table of orders and update the order status from processing to complete. Then click “Update.”
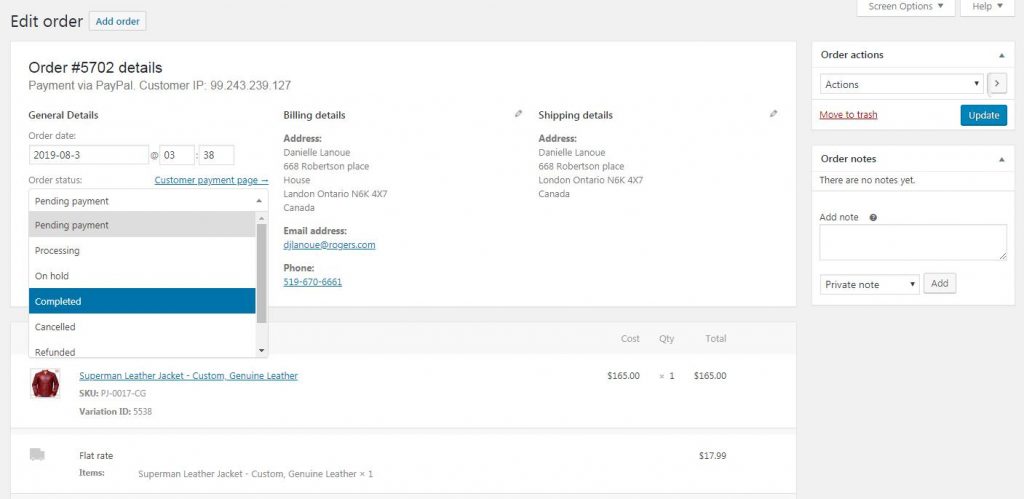
6. As it was guided you earlier, the Webhooks are delivered at the backend, so refresh your Edit Order page after a minute, to generate the queued event.
7. Open the saved URL mentioned in point # 2. Now refresh the page. Check the details of the request which was delivered together with the payload data.
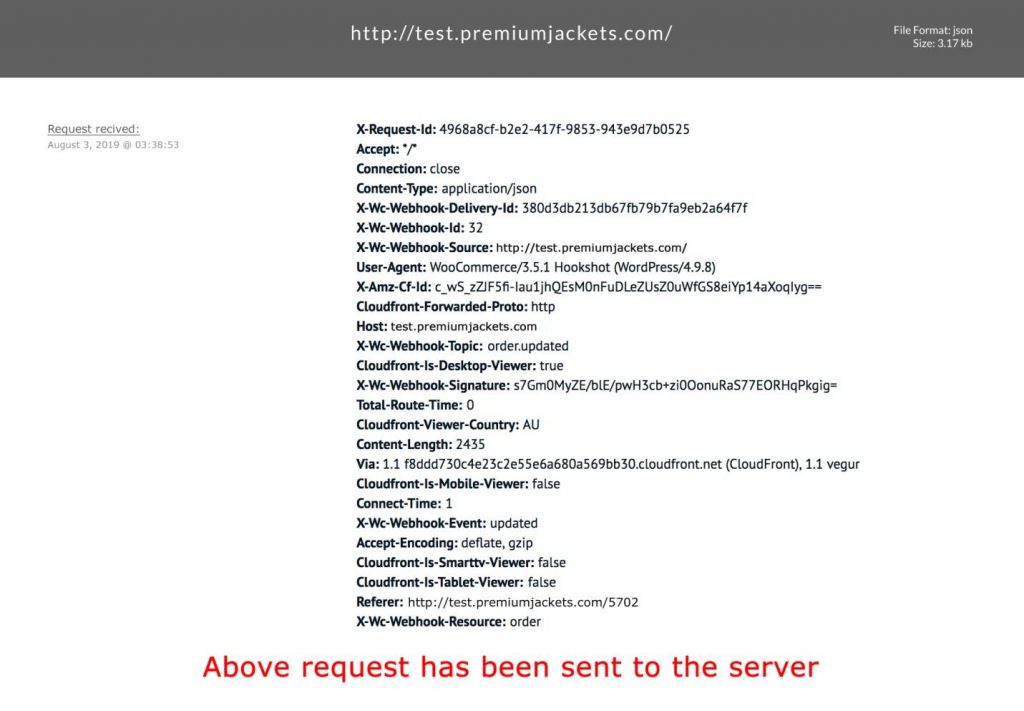
The mentioned above URL is related to a private company which is used to test this Woo-Commerce webhook integration. Therefore, the data and the changes occurred successfully could only be seen by the website administrator or the one having administrative rights. This URL is not for checking purpose. The company allows us to capture the screenshots only for briefing the testing steps to viewers.


")
")
")