")
Have you ever wanted to add your own custom links to your WordPress menu but weren’t sure where to start? Well, you’ve come to the right place. Adding custom links to your WordPress navigation menu is actually really simple once you know how.
In just a few easy steps, you’ll be linking custom links to your favorite pages, posts, external sites, or whatever else you want. Why clutter up your sidebar with a bunch of links when you can feature them prominently in your menu bar?
This step-by-step guide will show you exactly how to add custom links to your WordPress menu. No coding is required! Just log into your WordPress dashboard and follow along. Before you know it, you’ll have a fully customized menu with links to all your important pages and content.
Why Add Custom Links to Your WordPress Navigation Menu?

Adding custom links to your WordPress navigation menu allows you to direct visitors to important pages or external websites. It’s a quick way to improve user experience on your site.
More Traffic to Key Content
Send readers directly to your most important content like lead magnets, sales pages, or resources. This makes it easy for them to find what they need, which keeps them on your site longer.
Promote External Links
Want to direct people to your social media profiles or other websites? Custom links are perfect for that. Just add the URL and anchor text, and you’ve built a shortcut to those external sites right in your main menu.
Organize Menu Items Logically
As your site grows, your menu can start to feel cluttered. Custom links allow you to group similar items together under one menu item. For example, you might have all your resource content under “Resources” with separate links for ebooks, courses, downloads, and tools.
Flexibility and Control
Custom links empower you with more control over your site navigation. You can name the links whatever you like, and send visitors wherever you want them to go. And since you’re building the links yourself, you have the flexibility to change or remove them at any time.
In the end, adding custom links to your WordPress menu is an easy way to create a better experience for your visitors and guide them to the content or resources that matter the most.
Adding a Custom Link in 3 Simple Steps
Adding a custom link to your WordPress menu only takes a few quick steps. Custom links allow you to direct visitors to any URL of your choosing.
Step 1: Navigate to Menus

First, log in to your WordPress admin dashboard and click on the Appearance tab. Next, select Menus from the options. This will display your current menu setup.
Step 2: Add a New Link

Click the Custom Link button under the “Add menu items” section. This will open a small window where you can enter the details of your new link.
Give your link a name, like “Contact” or “About Us.” Then enter the full URL you want the link to point to in the URL field. For example, https://www.learnwoo.com/contact.
Step 3: Save the Menu
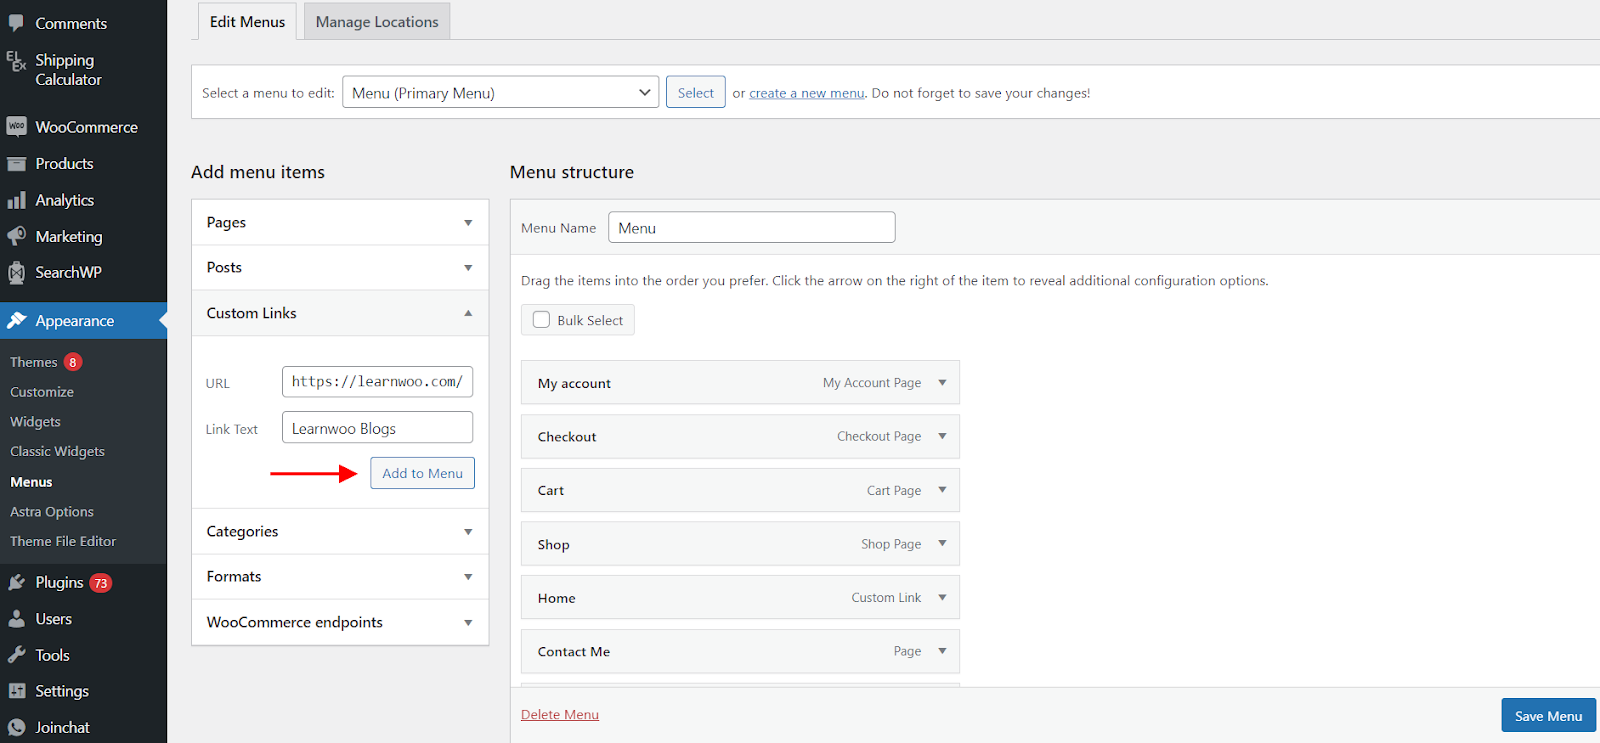
Finally, click the Add to Menu button to save your new custom link. It will now appear in your menu structure on the right side of the page. Drag and drop it into the position you want it to appear in your live menu. For example, if you want the menu to be displayed before the “About” menu, you may drag and drop it in that position.
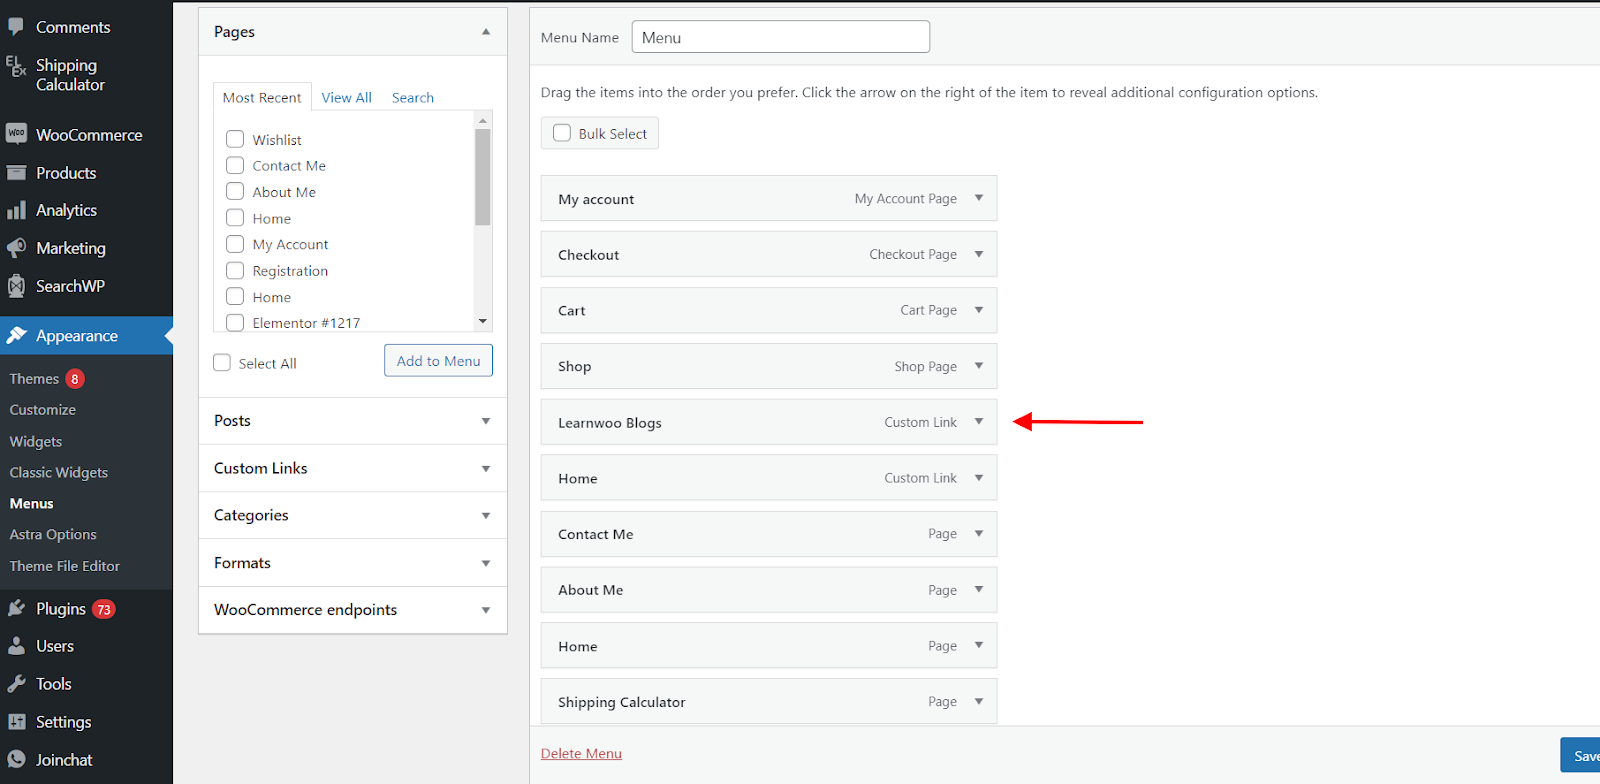
Once you’re satisfied with the placement, click the Save Menu button at the bottom of the page. Your custom link will now appear in your site’s navigation menu, directing visitors to the page of your choosing.
By following these three simple steps, you can add as many custom links to your WordPress menu as you like. Custom links provide an easy way to guide your visitors to important pages or external websites.
Best Practices While Adding Custom Links
When adding custom links to your WordPress menu, there are a few best practices to keep in mind. Following these guidelines will help ensure your custom links are optimized, user-friendly, and mobile-responsive.
Choose a Descriptive Link Text
The text you choose for your custom link should clearly convey where the link will redirect the visitors to. Rather than using “Click here” or the URL as the link text, use a descriptive phrase like “Our Products” or “Contact Us”. This helps users know what to expect if they click the link.
Double Check the URL
Be sure to test the URL you enter for your custom link before saving the menu. Enter the whole URL including the starting http:// or https://. Typos or incorrect URLs frustrate visitors and reflect poorly on your site’s professionalism.
Consider Link Targets

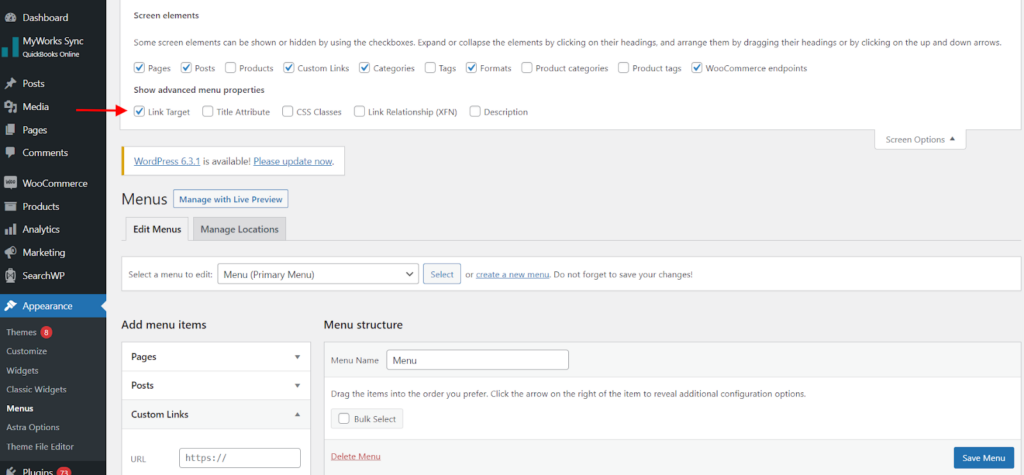
By default, custom links will open in the same window. You can choose to have the link open in a new tab by selecting Open link in a new tab under the respective menu. If this option is not visible, click on the Screen Options drop-down at the top of the page and enable Link Target.
This allows visitors to easily navigate back to your site. Consider the user experience you want to provide when determining link targets.
Check Mobile Responsiveness
Once you add the custom link to your menu, view your site on a mobile device to ensure the link displays properly and takes visitors to the intended destination. If the link does not function well on mobile, you may need to make adjustments to the link text, URL, or other attributes.
Review and Test Regularly
Custom links can become “broken” over time if the destination URL changes or is no longer valid. Perform regular checks of your custom links by clicking each one to make sure visitors are taken to the right place. Fix or remove any broken links immediately to avoid frustration among clients and bounce rates.
Following these useful tips will help you add custom links to your WordPress menu with confidence, knowing your visitors will have the best user experience possible.
Troubleshooting Common Custom Link Issues
Sometimes custom links in your WordPress menu don’t work as expected. Before you panic, try troubleshooting a few common issues first.
Incorrect URL
Double-check that you entered the correct URL for your custom link. Even a small typo can lead to a broken link. Go back to the page or site you want to link to and copy the full URL directly. Paste it into the URL field for your custom link menu item.
Page Moved or Deleted
If the page you were linking to was moved or deleted, your custom link won’t work. You’ll need to find the new URL for that content and update your link. If the page was permanently removed, you should delete the custom link from your menu.
Permissions Problem
In some cases, your WordPress login may not have permission to access the page you’re trying to link to. This often happens with links to pages on other websites or platforms. Unfortunately, in this scenario you won’t be able to fix the link — you’ll need to remove it from your menu.
Cache Needs Refreshing
Your WordPress cache may be out of date and preventing your new custom link from working properly. You can refresh your cache in a few ways:
- Go to WordPress Dashboard > Settings > Autoptimize and enable/disable the options under the “JS, CSS & HTML” tab depending on your requirements. Once you are done click Save Changes and Empty Cache.

- If you have W3 Total Cache installed, go to Performance > Dashboard and click Empty All Caches.

- Ask your web host to refresh your WordPress cache.
After refreshing the cache, check your custom link again. It should now be working as expected. If it’s still broken, revisit the other troubleshooting tips. With a few quick checks, you’ll have your custom link up and running again in no time!
For all our visual learners, we have created a YouTube Shorts video on the same topic. This one-minute video will walk you through the process mentioned above in simple steps.
How to Quickly Add Custom Links to your WordPress Navigation Menu? #shorts
Conclusion
So there you have it, a quick and easy way to add custom links to your WordPress menu. You can now direct your site visitors to any page or post on your site, or an external webpage.
Custom links are a great way to highlight your most important content, social media profiles, or affiliate offers. The possibilities are endless! Play around with different link types and locations in your menu to see what works best for your site and audience.
If you get stuck or have any other questions about customizing your WordPress site, leave a comment below. We’re happy to help you out.
We hope this post has helped you add custom links to your WordPress navigation menu!


")
")
")