
Google Shopping offers a great option for businesses to reach customers through search and other properties like YouTube, Google Maps, etc. It can improve the overall purchase experience for your customers, and as a result, offer better conversions for your store. The main advantage of using Google’s services is that you will have a solution suitable for the size and scope of your business. If you already have a WooCommerce store with a set of products, you can easily sync them with Google Merchant Center with the help of a plugin. In this article, we will discuss how to list your WooCommerce products on Google Shopping.
Advantages of choosing Google Shopping

When you decide to showcase your products through Google Shopping, you will get to present them to potential customers across different properties. These include Google Search, Google Maps, YouTube, Google Assistant, Google Images, etc. Moreover, there are different solutions that you can make use of to get your product details through to your customers. These include:
- Different advertising solutions – Google offers different advertising solutions to help you reach potential customers more effectively. There are Search Campaigns, Smart Shopping Campaigns, Shopping Campaigns with Partners, etc.
- Great insights – With solutions like Google Analytics, you will be able to easily gain actionable insights on your business performance, and customer behavior.
- Easy product management – You might want to showcase your products through different Google surfaces. This becomes easy with solutions like Google Merchant Center that helps you add product and business data to Google, and then make it available for different surfaces. Similarly, Google My Business will help you display open hours and directions to your store in Search and Maps.
- Payment and storage options – In addition, you will be able to use solutions like Google Pay helps in providing a smooth checkout experience for your customers. Also, Google has integrated data solutions for better retail management.
An overview on Google Merchant Center
Google Merchant Center is a tool that will help you upload products to Google and make it available for different services of Google including Google Shopping. Here are some of the advantages of using Google Merchant Center to upload product information to Google.

- Detailed product information will be provided to customers when they search on a Google property.
- You can be assured that the most recent information about your products is offered to customers.
- Gives you more choices in terms of promoting through free and paid channels.
- Gather insights on your business performance.
- Improve product visibility globally with multi-country feeds.
- Promotional programs to enhance visibility of your products.
- Find more opportunities suitable for your product data.
Basic steps to get started with Google Merchant Center
One of the basic requirements to start an account on Google Merchant Center is to have a Google account. If you don’t have one, you will have to create one before going through the following steps.
Sign up to Google Merchant Center
You need to provide details about your business, where it is registered, etc. At this stage, you can also determine how users will checkout from your store (website, local store or Google). You can also provide information on third party platforms you are using, and also your email preferences.
Choose the checkout process
Google Merchant Center will ask you to specify how you want to provide checkout options to customers. If the checkout will be through your own website, you can set up free listings that are available across different locations around the world. For US merchants with physical stores, they can feature their products on free local listings, for which the checkout will be through the respective store. There is also an option to Checkout on Google for merchants in the US and France.
Familiarize yourself with the interface of Merchant Center
Understand how to manage products, and also ways to check performance and growth.
Verify and claim your website
You have to verify and claim your website to be able to submit product data to Google Merchant Center. This will authorize your ownership and also create a link between your website and the Merchant Center account.
Submit product data
Once your website is verified and claimed, you can submit product data. The product data should be submitted as a feed that has all the information on your products assigned to a particular attribute. There are primary feeds that contain the main data of the product, and also supplemental feeds that can be used to add extra information. Google supports different file formats such as XML, TSV, TXT, etc., for the feed. In order to upload a feed, you can use any of the available options, such as direct upload, FTP/SFTP, Schedule Fetch, Google Cloud storage, or Content API. It is advisable to have a clear understanding of the product data specifications by Google.
How to easily list WooCommerce products on Google Shopping?
Now, if you have a WooCommerce store, how will you manage to list the products on Google Shopping. If you have only very few products on your store, you can create a product feed manually and upload it. However, for a large inventory, you will need an automated solution to create the feed. Moreover, if you are able to maintain scheduled updates, then you don’t have any hassles while updating product information on your store.
We will demonstrate how you can easily create a product feed using the ELEX WooCommerce Google Shopping Plugin (Google Product Feed).
Install and activate the plugin – You can purchase the plugin, install and activate it. You will be able to access the plugin settings through a new section on the WordPress admin panel as ELEX Google Shopping Feed.
Create a product feed
On the admin panel, go to ELEX Google Shopping Feed > Create Feed to start with a new feed. You can specify a name and description for the project, and also the country of sale. Here there are options to specify a file format (CSV, XML and TSV), and also the refresh schedule. You can enable the ‘include variations’ option if you want to include product variations in the feed.

Map category
In the next step, you can map your store categories with the appropriate Google category. Start typing in the field, and select one from the displayed options.

If you don’t want to map specific products with Google categories, click the Map Products option and select accordingly.
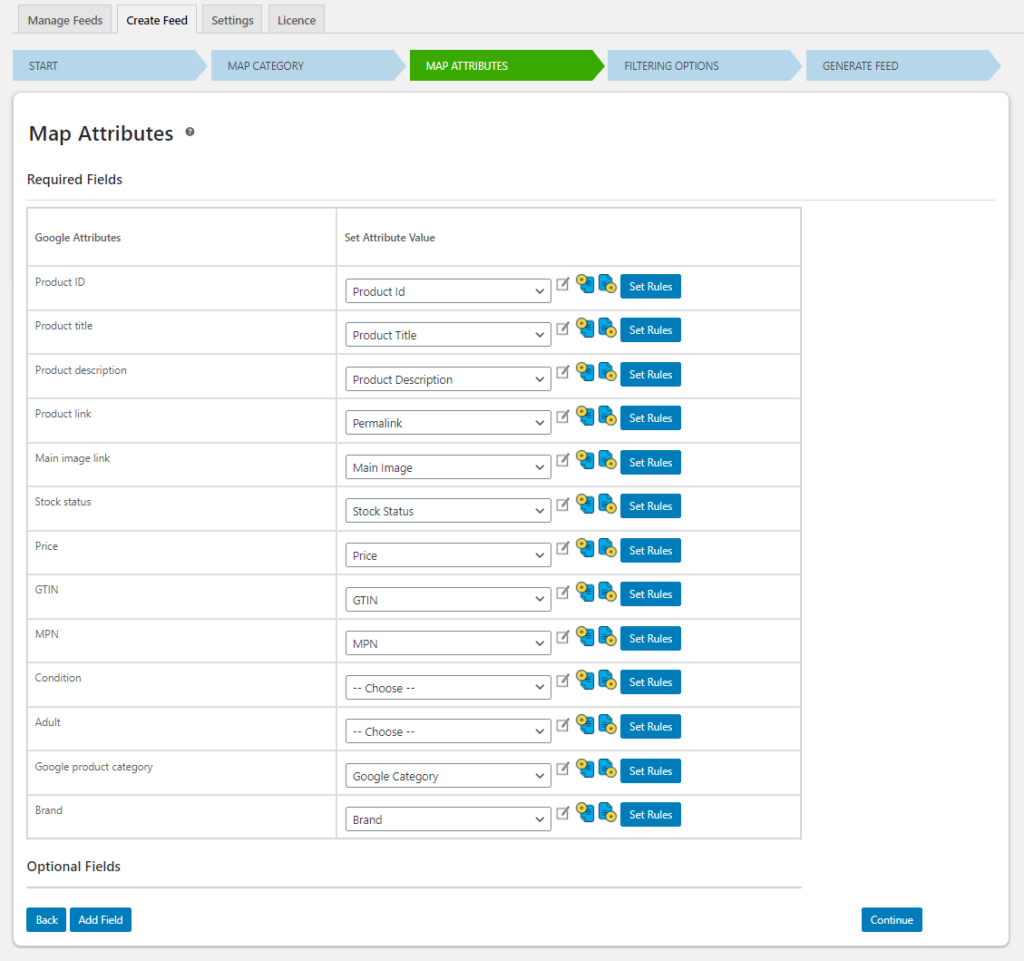
Map attributes
The plugin offers a list of required Google attributes and map them to the relevant product properties specified in your WooCommerce store. You can modify these by adding text values, appending and prepending values, and also by setting rules. You can check if the mapping is correct and also manually map if any fields are not automatically populated. At the end of the required fields section, you will find a button to add optional fields as well. It is advisable to map as many attributes for better visibility of your products.
Filtering products
The plugin offers filtering options so that you will be able to include specific products in the feed. For this, you can specify conditions to include products based on their stock quantity, or the number of items sold. You can also easily create a feed by including only Featured products from your store. On this page, you can also specify products to be excluded from the feed. Once, you have specified all the required parameters, click the Generate Feed button.

Feed generated successfully
Once the feed is generated, you can view it, or manage all the feeds on a dedicated page.
Manage feed
In the manage feed section, you can view and manage all your feeds. Here there are options to download, edit, delete, pause schedule, etc. You will also find the url of the feed hosted on your website. You can use this url when you want to specify an update schedule on Google Merchant Center.

Submitting product feed to Google Merchant Center
Once the WooCommerce product feed is ready, you can upload it to Google Merchant Center. Go to your Merchant Center dashboard, and go to Products > Feeds, and click the ‘+’ icon.

Next, you can provide basic information like Country and Language, and also specify the destinations you want to display your product listings. Click the Continue button.

In the next step, you can specify a name for your feed, and also choose how to connect the feed with Merchant Center. Since we have already created a feed with all your WooCommerce products, you can choose Upload or Scheduled fetch. If you choose the Upload option, you can upload the product feed file in the next step.

If you are choosing ‘Scheduled Fetch’ as the file upload option, you need to specify the fetch frequency and time, along with the file url. Once all the details are added, you can click the Create Feed button to complete the process.
This is how you can upload your products to Google Merchant Center to be available for shopping campaigns. Now, based on the campaigns that you set up, Google will display your products to customers when they search with relevant keywords.
We hope this article has given you a clear idea about listing WooCommerce products on Google Shopping. Please share with us your valuable suggestions or experiences with Google Shopping in the comments section below.


")
")
")