
Last updated - November 10, 2023
Integrating social media share buttons on your WooCommerce product pages will help you get more visitors to your website and improve the visibility and search ranking of your products.
The majority of people’s online time is spent on social media platforms. Social media can be used to increase website user engagement and attract new visitors. This can be achieved by including social sharing buttons on WordPress articles and pages.
In this article, we’ll demonstrate how simple it is to add social sharing icons and present share counts in WordPress. You can add social media share buttons at the top and bottom of the content or create a floating share bar by using one of the methods we’ll describe in this article.
Why Should You Add Social Media Share Buttons?
One of the most common online activities today is social networking. Additionally, it is this market segment that is now developing at the highest rate, which is why social media marketing has become an essential component of any company’s growth plan. Social media networks are a very effective way to communicate with more potential clients if you want to.
The most effective strategy to reach those who don’t follow your website on social media is to include social sharing buttons on your WordPress website.
Visitors to your website can share your information on their social media timelines by clicking the social media share icons. By doing this, you can enable your users’ friends and followers also to see your post and add comments, likes, and re-shares.
Adding Social Media Share Buttons
We’ll be using the Shared Counts plugin for this tutorial. It is one of the top social media plugins for WordPress currently available on the market. With the help of this plugin, you can quickly include social sharing buttons on your WooCommerce web pages and see how many people have shared them.
The best thing is that it is performance-optimized and doesn’t slow down your website’s loading speed. In contrast to other social sharing plugins, Shared Counts uses a unique caching technique to have a better influence on the speed and functionality of your website.
That being said, there are a lot more plugins out there that can help you add social media share buttons to your website.
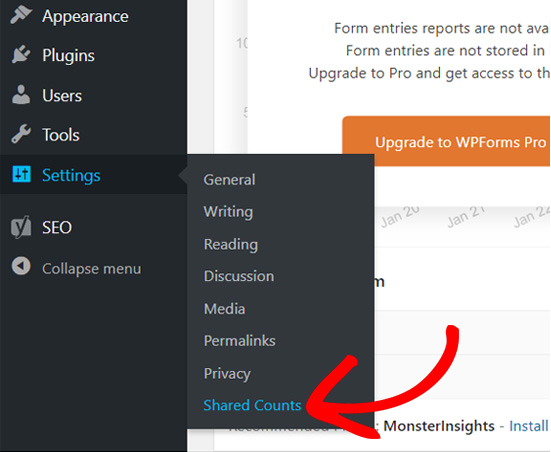
Install and Activate the Shared Counts Plugin
Installing and activating the Shared Counts plugin is the first thing you need to do. Here is a step-by-step tutorial on installing and customizing the plugin.
You must navigate to the Settings > SharedCounts menu after installing the plugin in order to modify its preferences.
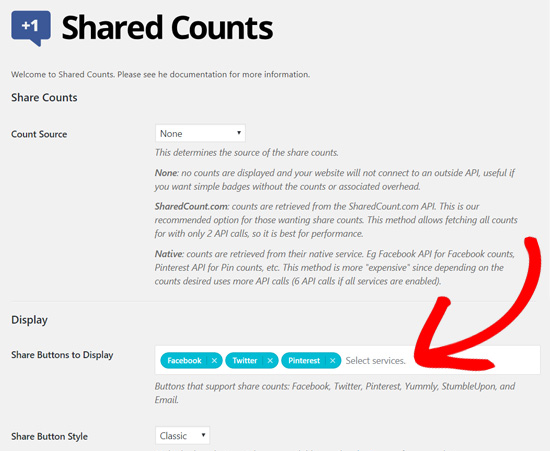
The next step is to scroll down to the “Display” section and select the share buttons you want to display on your website. Note: Facebook, Twitter, and Pinterest are the three social media icons that are automatically selected to display, and you can choose to remove, replace, or add more to them.
Select the Social Media Share Buttons and Customize Them
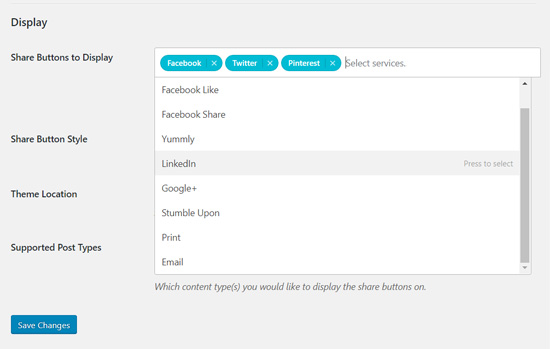
To add more social media share buttons, you can simply click the empty space next to the three selected buttons and a dropdown menu will appear with numerous options from which you can select the ones you want.
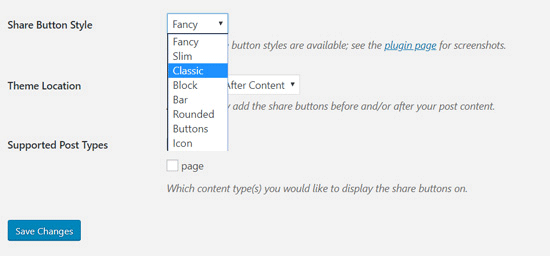
Next, you can customize the share buttons by changing the style. Once you’ve selected all the social media share buttons you want to be displayed on your website, click the “Share Button Style” option, and a dropdown menu will appear with 8 preset styles to choose from. Choose the one that goes with your website’s theme.
The theme area where you want the social sharing buttons to appear must then be chosen. Three options available on SharedCounts are: Before Content, After Content, and Before and After Content.
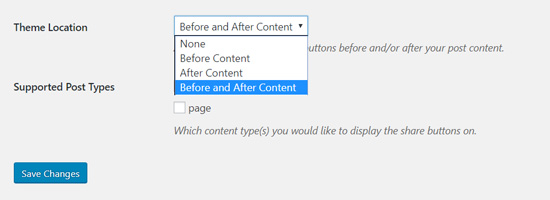
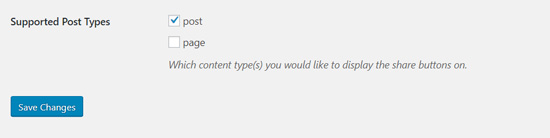
Finally, you must choose among the supported post types. By default, the option “Post” will be selected. If you want the social media share buttons to appear on your pages, then you can select the “Page” option.
Once done, click “Save Changes”
After saving all the changes, you can go to any post on your site to see the social media share buttons in action.
Adding Floating Social Media Share Buttons
Using the Shared Counts plugin, you may add social share buttons above, below, or both above and below content. As they are static, these sharing buttons are not always displayed. A floating social media share bar is a popular alternative method of displaying social sharing buttons. This is because a social media share bar floats in the same place even when a user scrolls down the web page.
A floating social share bar, as opposed to the usual sharing buttons, will be visible the entire time a user reads your content. By making them more noticeable and assisting you to increase social sharing.
Some user-experience specialists contend that because it fills in the white space, your website will seem ugly. It may be quite useful, though, if you can keep it simple and elegant.
In order to use the floating social media share buttons, you must install and activate the Sassy Social Share plugin. Since the installation and activation are fairly simple, let’s assume that you have already installed and activated the plugin.
Customize the Floating Social Media Share Button
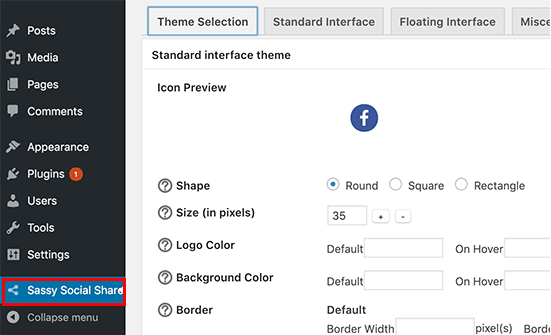
Go to your WordPress dashboard > Sassy Social Share > Theme Selection and customize the icon to your liking and the overall theme of your website.
A style for your icons must first be decided. There are rectangular, square, and rounded buttons included with the plugin. Both the floating social share bar and the typical share bar have various styling options.
Next, click the “Standard Interface” tab for further customization. The normal static social sharing buttons can be enabled or disabled from here.
It is highly recommended that you use either static or floating social sharing buttons because using both will surely be an overkill and a potential source of a poor user experience.
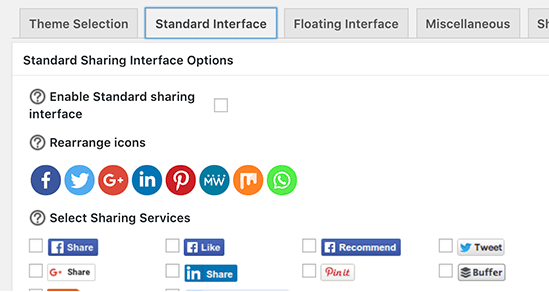
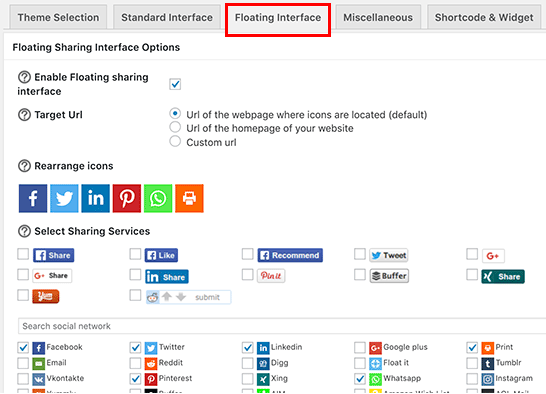
Next, select the “Floating Interface” tab and select the “Enable Floating sharing interface” checkbox. The social networking websites you want to display must then be selected after that. By just dragging and dropping, buttons may be added, removed, and rearranged.
Once you are all set, you can save the modifications by clicking the “Save Changes” button. You can finally go to your website to see floating social media share buttons in action.
Conclusion
We trust that this post was useful in teaching you the correct way to add social media share buttons to WordPress. You might also want to find out how to add social media buttons to the sidebar and WordPress menus.
If you’re having problems deciding which plugin is best for you, don’t worry. A majority of the plugins are completely free to install and really quick and simple to set up; therefore, you can test them out before deciding on a favorite one.


")
")
")