
As an eCommerce store owner, you can advertise your products on Google Shopping for better visibility and reach. Based on the relevance of search terms used by potential customers, your products will be displayed on different surfaces of Google. There are different filtering options for customers to choose products based on price, category and brand. In order to make your products available on Google Shopping, you have to follow the guidelines specified by Google. One of the important steps for Google Shopping integration with WooCommerce is maintaining a product feed with Google Merchant Center. In this article, we will discuss more about this.
Google Shopping Ads Policies overview
Adhering to Shopping Ads policies is important to ensure continued visibility for your products. Here is a quick overview of Google’s Shopping Ads policies.
Google Shopping Ads policies are broadly classified into 4 areas. These are:
Prohibited content
You won’t be able to promote certain type of content on Google. These include counterfeit goods, dangerous products, products that support dishonest behavior, offensive content, content with unsupported format, etc.
Prohibited practices
There are also several practices that are not allowed by Google. These include malicious and spammy content usage, trying to gain unfair advantage, trying to bypass the review process, etc. Irresponsible data collection, and misrepresentation of products also come under this category.
Restricted content
Google allows certain content that are legally or culturally sensitive, with some restrictions. For example, while promoting adult content or alcohol beverages, you may have to ensure that there is no violation of applicable laws in targeted locations. Other content that comes under this category are those related to trademark, copyright, gambling, healthcare and politics.
Editorial and technical
Google defines a few quality guidelines for your ads and the website. The shopping ads need to be professional and clear, and should lead to specific products, or user-friendly landing pages. For example, this policy violation includes ads that do not display the correct landing page url, or descriptions that are not clear.
How to integrate Google Shopping with WooCommerce?
We will describe the steps required to integrate Google Shopping with WooCommerce.
Sign up to Google Merchant Center
One of the first steps in the Google Shopping Ads integration with WooCommerce is signing up for a Google Merchant Center. For this, you have to follow the below-mentioned steps.
Step 1 – Provide business details
You have to provide some information about your business when you start an account with Google Merchant Center. These include the registered business address to determine the time zone, the name of the business, the website’s or store’s name, etc.
Step 2 – Determine the checkout options
You can determine the checkout process from different options. These include:
- checkout on your website after redirecting from the ad,
- on Google itself, if the option is available.
- or at your local store, after seeing the product on Google Shopping ads.
Step 3 – Link third party accounts
On Merchant Center, you can link any third party accounts that you may be using. This could be helpful if you want to include payment gateways like PayPal. You can add different platforms by accessing the settings menu of your Google Merchant Center account.
Step 4 – Configure email preferences
You can set up email preferences while starting with the Merchant Center account. If interested, you can opt in for messages from Google on updates, tips, or invitations to try out new features. Merchant Center lets you change these preferences any time you want.
Set up free listings and Buy on Google
While signing into Merchant Center account itself, you might’ve chosen a mode of checkout. We will discuss these options in more detail.
Checkout on your website
You can choose to be part of Google’s free listings. This will display your products across different properties of Google such as Search, Images, Maps, Lens, etc. The data requirements may vary according to the Google property, location, etc. Free listings are globally available and will increase your products’ visibility and help you connect with more customers. Changes that you make in your product data will reflect in the listings as well.
Checkout on Google
This is a feature available only in the US and France. In the US it is called Buy on Google, and in France it is called Shopping Actions. By directly selling on Google, you can broaden your reach and also enhance customer experience with a quick purchase option.
Local store checkout
This is a feature that Google offers for physical stores in the US. Customers will be shown listings that are available in a nearby local store. Product listings will be visible in different Google properties such as Search, Images, Shopping Tab, etc. It is a great option when you are targeting local audiences.
Verify your website
There are two essential steps to perform while setting up an account with Google Merchant Center. These are verifying and claiming your website address. In the first step, you verify your ownership over the specific website. In the second step, you create a link between the verified website address and your Google Merchant Center account.
Sometimes, you may be able to automatically verify your website, if Google already has the necessary information (for example, through Google Analytics). Or, you can manage it through your eCommerce platform. Google even allows you to verify multiple accounts.
Submit product data
Once you have set up your Google Merchant Center account, you will have to add your product data to Google Merchant Center.
Product Feeds
You can add product information to Merchant Center in the form of a list of products called feeds. For each of your products, you can assign attributes, which will help to group products in a feed.
Merchant Center also categorizes feeds into two – primary and supplemental. Primary, as the name indicates, is the main source of information for Merchant Center. If you manage to create a primary feed with all the required data, you will not have to create supplemental feeds. If your primary feed is inadequate with some data missing, you can use supplemental feeds to add it.
It is also good to know about multi-source feeds that you can build combining data in different sources such as website, an excel sheet, etc. There are also regional inventory feeds, that can override product data in specific cases where you want to apply local availability or pricing.
Product attributes
Attributes describe your product, and helps users to search and find your products. There are standardized and dynamic values that you can add for attributes. It is recommended to follow Google’s guidelines while assigning attributes to your products.
File formats for product feed
Google supports text, tab delimited and xml formats for product feeds. The simple way is to create a product feed using Google Sheets, and then download and submit it to Merchant Center.
How to create a product feed?
You can create the primary feed from the ‘Feeds’ section in your Google Merchant Center account. Start by clicking the ‘+’ button to create a new feed.

In the next screen, you can enter basic information such as Country of Sale and Language, and also choose the Google Products to display your products. Click Continue.

You can enter a name for the feed, and choose how you want to input product data. The options are:
- Google Sheets – You can submit the feed with the help of an existing Google Sheet or by using the template with auto-filled data in one row to help you understand the requirements. When using the template, please note it is generated according to the target country that you have specified.
- Scheduled fetch – In scheduled fetch, there will be a product feed file that you host on your website, and you will specify a schedule for Google Merchant Center to fetch the updates. We will explain how you can automate the product feed creation a little later in the article.
- Upload – With the Upload option, you can save the product data file in your computer and upload it to Google Merchant Center account through FTP, SFTP, Google Cloud storage, or manually.
- Content API – Using the Content API, apps can directly deliver product data to Merchant Center. For complex Merchant Center accounts, this could be an effective approach.
How to easily create and upload product feeds for WooCommerce?
If you have a WooCommerce store with diverse products and categories, you will need a solution for automating the whole process. We will demonstrate this using the ELEX WooCommerce Google Shopping Plugin (Google Product Feed) plugin.
The plugin simplifies the process of building and uploading a product feed significantly. We will describe the process in simple steps.
Install and activate the plugin
First, you need to purchase the plugin, install and activate it.
If you are not familiar with the process of installing a WordPress plugin, check our article on How to install and configure a WordPress plugin.
Enter the basic information for the feed
You can access the plugin settings from the WordPress admin panel. Under the ‘Create Feed’ tab , you will find the settings to enter the basic information for the feed. Here you can enter a name for the project, specify the country of sale, file format, refresh schedule, etc.

Map Categories
The next step is to map your product categories with Google categories. All categories from your store will be displayed with a corresponding field to enter the Google category. You can tick the checkbox next to a product category, and start typing the category name in the Google categories field, and suggestions will be displayed. From the suggestions, you can choose a suitable Google category. Click the Save & Continue button after selecting all the categories.

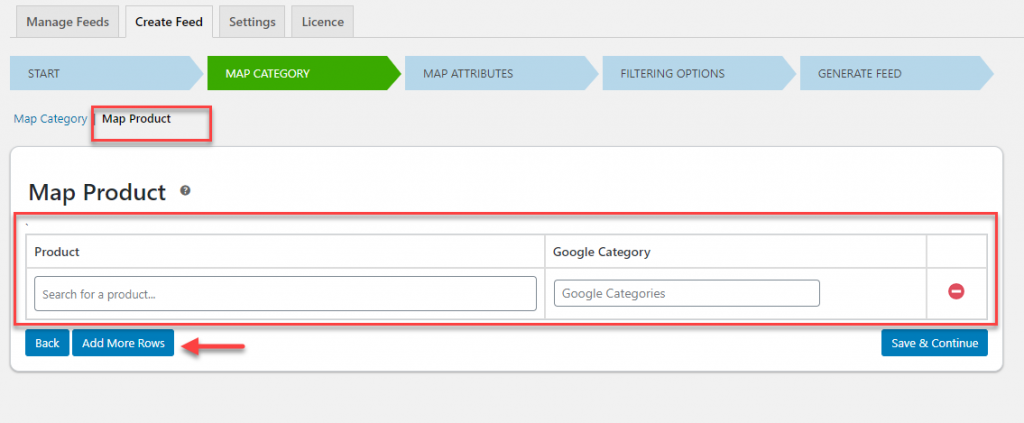
Map products
If needed, you can also map specific products with Google categories. For this, you can select the Map product option, and then choose a product from the search box, and then find a suitable Google category. By clicking the Add More Rows button, you can add further products to map with Google categories.
Map Attributes
As discussed above, attributes help to organize the feed better, and let customers search for your products easily. This process becomes easier with the plugin as it offers an automatic option to set required attributes. You can cross-check them on this page, and make changes as needed. The plugin provides you with options to append or prepend values, and also to add conditions. Also, you can add values to optional attributes with the help of the Add Field button.

Filter products
In the next step, you can filter products to be included in the feed. The filtering options are Stock quantity, Sold quantity and Featured products. Additionally, you can exclude specific products by searching for the product name.
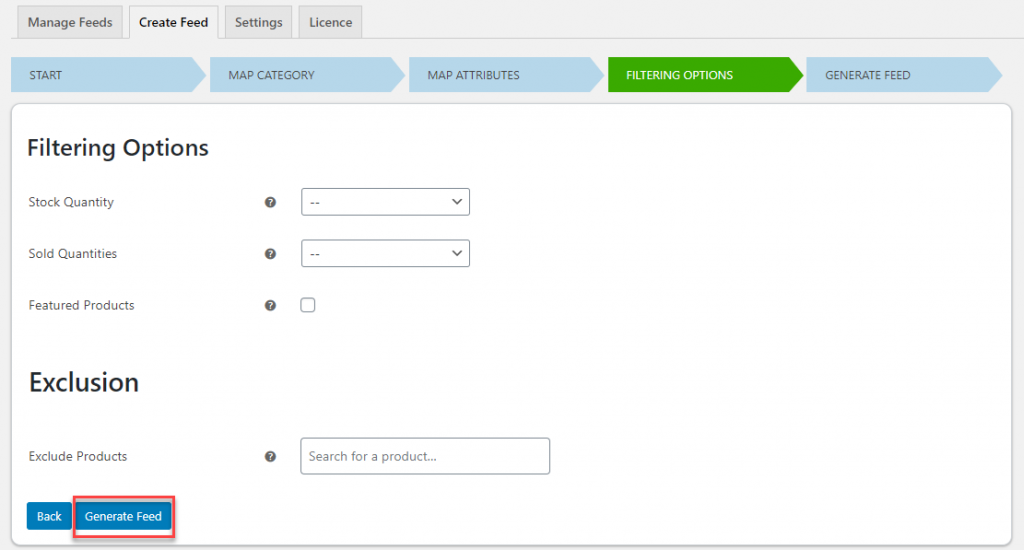
Once the filtering options are configured according to your requirements, click the Generate Feed button to create your product feed.
Generate feed
The plugin will generate the feed, and you can view it, or manage all your feeds from a dashboard.
To view the feed, click the View Feed button.
Click the Manage Feed button to view and manage all your feeds.

From the Manage Feeds section, you will get the url of the feed, which you can use to upload the feed to Google Merchant Center.

Submit the feed to Google Merchant Center
While setting up the feed in Merchant Center, you have to set the input method as scheduled fetch, and then add the feed url in the File URL field.

Please note, if you are specifying a Refresh schedule in the plugin, you need to adjust the schedule so that an updated feed is provided to Google Merchant Center every time.
You have successfully added your product information to Google Merchant Center. Now, for displaying Shopping Ads, you can connect with your Google Ads account, and place relevant bids.
We hope this article has provided you with a good understanding on the Google Shopping integration with WooCommerce. Feel free to leave us a comment if you have a query.


")
")
")