
Last updated - November 22, 2023
Creating online courses in WordPress has become incredibly convenient with the availability of various LMS plugins such as TutorLMS or LearnDash.
However, the real challenge lies in effectively promoting and selling these courses. Now, you may run paid ads, increase SEO, and run a referral affiliate program to attract potential buyers. But that’s not the end of it. You also need to find a way to optimize the conversion rate.
And to do that, today, you will learn how you can create a sales funnel for your courses in WordPress that is designed to help you boost your conversion rates and increase revenue.
By the end of this article, you will learn
- How to plan a proper course funnel journey.
- The tools required to create your course funnels.
- A step-by-step guide to crafting your course funnel.
And eventually, launch your sales funnel for online courses and start selling more.
So let’s begin.
Fundamentals of a Sales Funnel for Online Courses
Usually, creating a sales funnel involves forming a complete journey with a fix of various offers to make a buyer purchase or spend more on a single session.
In the case of a course funnel, you may have a journey of 3 to 5 steps:
- Landing page for the main course offer
This will be an initial landing page where you will promote a single course.
- Checkout page to collect the payment
You may create a custom checkout page to collect the payment for enrollment to the initial course offer. Optional: You may offer a related course as a bump offer on this page.
- Post-purchase upsell & downsell offers
Upsell or downsell offers on more courses can be made after a prospect enrolls in the initial course that you offered earlier. But if can you use them in your sales funnel will depend completely on what other courses you have left.
- Thank You page
This will be a page where you will summarize the courses the prospect enrolled in and give additional information on how to access the courses.
The core elements that will trigger sales in this funnel will be
- The landing page copy
- A good discount on the initial offer
- The order bump, upsell & downsell offers.
- Relevancy of the courses offered throughout.
1. Planning Your Online Course Funnel Journey
The first step in planning your course funnel is deciding on the initial course that you will offer.
And then, you need to decide on what other courses you want to offer to potential buyers as order bumps, upsells, or downsells.
Deciding on the Main Course to Offer
One mistake many people make is they create a complete course that covers all the topics in a certain niche. For example, let’s say you are a digital marketing expert and creating “A complete guide on Digital Marketing.”
While this will probably be a great course, it doesn’t leave you with many options to plan a proper sales funnel journey. In fact, it will just make the course more expensive or less profitable (if you charge less).
Rather, the best option would be to break it down into multiple courses.
Referring to the example, divide each part of digital marketing into separate courses, such as an SEO course, a content planning course, a course on SMM, etc. And then allow people to buy each of them separately.
This will make each of them more affordable and increase the number of potential buyers. But most importantly, you will now have enough relevant courses to combine into a proper sales funnel journey.
If you already have created them separately, then it is even better.
Now, choose the most demandable topic out of these as the initial offer because that is what you want to sell more, regardless of whether people accept your other offers or not.
Types of Courses to Offer as Order Bump or Upsell/Downsell
Next, you have to decide what you want to offer as order bumps or upsells/downsells.
Here, you may consider the following scenarios.
i. Offer a related course with lower costs as an order bump
Choose another course that the same prospects would be interested in and can be used for a related purpose. This, you may offer as an order bump on the checkout page.
For example, if your initial course offer is “Brand Promotion Tactics”, then you could offer an additional course on “Paid Ads for Lead Generation.”
Many will consider enrolling in it as well because the next step of brand promotion is lead generation, and using paid ads is just one way to generate leads, i.e., a small course with a lower cost than the main course offers.
Learn more about how you can implement order bumps in the best ways.
ii. Offer a course bundle as an upsell
The upsell offer should be either another relevant course with a higher value or a better alternative to the course that a prospect initially enrolled in.
In this case, you could offer a bundle of courses that includes the initial course as part of the package, as a post-purchase upsell offer. (Or you could prepare a separate bundle of courses that the buyer can take along with the initial course. Both will work.)
For example, if you have multiple courses on UX designing, then you could offer all the UX design courses in a single bundle as upsell at a good discount.
Many will consider taking it instead of the initial course (if it’s within their budget).
This will help you convert the ones who actually have the ability to go for more expensive courses.
iii. Suggest a higher level course
Another good approach would be to initially offer a beginner’s course and then offer a more advanced course as upsell that covers all the topics in the beginner’s course in addition to more valuable topics.
This approach will help to convert prospects who usually look for complete guides.
Finalizing Your Funnel Plan
Now that you understand the types of offers you can use, go ahead and plan your funnel journey – decide on the course, the number of offers, and the discounts you are willing to give.
As an example, let’s assume you have several digital marketing courses and will form the following funnel:
- Offer a “Social Media Marketing Course” (priced at $40) as the initial offer.
- Next, offer a course on “Content Calendar For Efficient Marketing” (priced at $20 after 20% off) as the order bump offer.
- And then, offer an “Advanced Digital Advertising Techniques” course (priced at $60 after 40% off) as upsell.
For these, we will create a 4-step funnel:
- Landing page
- Checkout page (with order bump)
- Upsell sales page
- Thank you page
Once the plan is ready, it’s time to prepare for creating this sales funnel on your website.
Preparations to Create Your Course Funnels
Since it’s WordPress, it will be quite easy to create this funnel.
You have to decide on the tools you will need to host your courses and craft a funnel journey to sell these courses easily.
In this guide, we will use the following plugins:
- TutorLMS
A simple and easy course builder in WordPress with full control over customizing the course content and student management. - WooCommerce
To sell courses created using TutorLMS, you will need to use WooCommerce, as that is where the payments will be handled. - WPFunnels
An easy-to-use sales funnel builder to create sales funnels for WooCommerce products and courses. - Elementor/Divi/Oxygen/Gutenberg (any one)
You may design the funnel pages in WPFunnels using one of these page builders. - Mail Mint
An email marketing automation tool to help automate email marketing for your sales funnel.
In the next section, we will give a quick step-by-step guide on using these tools to craft your sales funnel for online courses.
Setting up Your Online Courses to Sell Via Funnels
Before you are able to create a funnel journey, you need to set up your courses on TutorLMS and WooCommerce.
TutorLMS is quite easy to use and free. And once you have the courses created there, you then have to connect them to WooCommerce products to be able to sell them.
i. Create Your Courses on TutorLMS
Since we will be using three courses, create and design them on TutorLMS.
- Here is a guide to creating courses with TutorLMS
ii. Enable Monetization for Courses
Go to TutorLMS settings and go to the “Monetization Tab”.
Here, under “eCommerce Engine,” choose WooCommerce.

Then click on Save Changes.
iii. Create Products for Your Courses in WooCommerce
Go to WooCommerce > Products and create one product for each of your courses.
Create a new product, and on the product edit page, fill out all the necessary information as you would normally do for a typical product.
Scroll down to the “Product Details” section and mark the product as “Virtual” and “For Tutor.” And set the required price as planned.

Then publish the product.
iv. Link Your Courses to their Respective Products
Now, you have to link your courses to the products you just created.
Go to Tutor LMS > Courses.
Edit a course, and in the course settings, choose the “Course Type” as “Paid.”
Below that, under “Select Product”, choose the respective product you just created earlier for this course.

Then update the course.
Your course is now connected to the WooCommerce product and ready to be used in your sales funnel.
Create a Sales Funnel to Promote Your Online Courses Using WPFunnels
Now comes the crucial part of the whole process – creating the funnel.
For this, we will use WPFunnels & Mail Mint.
Step 1- Create the Funnel Journey for Your Course Funnel
1. Go to WPFunnels and click on “Add New Funnel”.

2. Now, choose a suitable sales funnel template. I suggest you use the “Online Course Pro” template, which will come with five steps – Landing page, Checkout, Upsell, Downsell, and Thank You.

3. Once the template is imported, it will appear on the drag-and-drop canvas. From here, remove the downsell step, as we won’t be needing it for the course funnel we planned.

Step 2 – Add the “Social Media Marketing Course” to Your Funnel Checkout
You have to assign the initial course offer to the checkout step.
1. Select the checkout step and click on the configure icon. It will bring up a settings window.
2. Here, you will find the option to add a product (on the right side). Search for the “Social Media Marketing Course” and select it. And then, click on the “Add Product” button.
3. Then click on Save Changes.

Step 3 – Set Up the Order Bump with the “Content Calendar for Efficient Marketing” Course
On the same settings window for Checkout, you will find the option to set up order bumps.
1. On top of this window, select the Order Bump tab and click on the Add Order Bump.
2. Here, first assign the order bump offer product by searching “Content Calendar for Efficient Marketing” course.
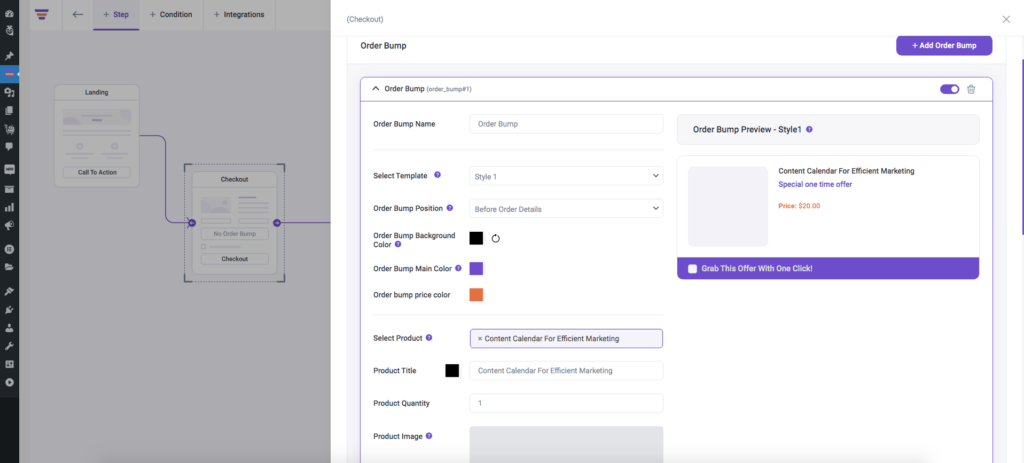
3. Customize this order bump with text and color while getting a visual preview.
4. Assign a 20% discount, which will be exclusive to this order bump offer, and reduce the price from $25 to $20 (as planned).
3. Once you are happy with it, click on Save Changes.
Step 4 – Set the “Advanced Digital Advertising Techniques” Course for Upsell
Now, close the checkout step settings window and move on to upsell.
1. Select the Upsell step and click on the configure icon to open its settings window.
2. Search and add the “Advanced Digital Advertising Techniques” course as the upsell product.
3. Next, set a 40% discount to reduce the price to $60 instead of $100.
**This discount will only reflect in this funnel and not on the entire website.

**If you are offering a better alternative as upsell, here, you will find the option to “replace” the initial offer with the upsell product when accepted.
3. Then click on Save Changes.
Step 5 – Design Your Funnel Landing Page
Now that you have assigned the products to their respective pages, it’s time to design them, starting with the landing page.
**As said earlier, in WPFunnels, you may use Elementor, Divi, Oxygen, or Gutenberg to edit & design pages. You may also use other page builders, but you won’t get any templates for them, and you have to use shortcodes for the funnel widgets.
For this guide, let’s suppose you are using Divi as the page builder.
1. Select the Landing step and click on the edit icon. It will open up the page in the edit mode of your preferred page builder, in this case, Divi.
2. As you have imported a template, you will see the page is already designed quite well. And you will be able to customize the whole page with your page builder.
3. Plus, you will be able to use two specific modules, “Next Step Button” and “WPFunnels Opt-in Form,” on the landing page. Use the “Next Step Button” instead of the “CTA” buttons. And use the “WPFunnels Opt-in” form instead of other forms to collect leads.

4. Update the copy to describe your initial course, the “Social Media Marketing Course.” Make sure you highlight the key benefits of taking this course and mention the discount you are offering (if any), in this case, none.
You may use ChatGPT to help you optimize the landing page content.
5. Once you are happy with the changes, save it and go back to the canvas.
Step 6 – Design Your Checkout Page
Since it’s a course, you have the option to simplify the checkout process.
1. Select the Checkout step and click on the Configure icon to open the Settings window. Then, go to the “Edit Fields” tab. Here, you will be able to edit the checkout form fields.
2. Exclude unnecessary fields such as the “Billing & Shipping Address” fields.
3. Now, click “Save Changes” and go back to the canvas.
4. Now, select the Checkout step again and click on the edit icon to open it with your page builder.
5. Here, the checkout form is a module from WPFunnels. You may select it and then get options to customize its design, such as border color, font, text size, etc.
6. You may also choose a better layout, such as the “2 Step Checkout” (recommended for courses) or “Express Checkout”.

7. You will also have the option to change the order bump position from the module settings. We suggest you place it right above the course order details.
8. Once the design is updated, save it and go back to the canvas.
Step 7 – Design the Upsell Offer Page
Update your Upsell page with more meaningful, persuasive content for higher conversion.
1. Select the Upsell step and click on edit.
2. Update the copy to highlight the course you are offering and the huge discount you have for now. Also, make sure to mention that it’s a one-time offer and can’t be claimed normally on the site.
Using an AI copywriter here would be a good idea as well.
3. Here, you will see there are two buttons, one for accepting the offer and one for rejecting the offer. They both are modules from WPFunnels.

4. Save the page and go back to the canvas.
Step 8 – Design the Thank You Page
Many will ignore the Thank You page but you may rather make this page more valuable.
Besides showing the order details, you may add other purposes, such as asking the buyer to follow you on social media or giving other product suggestions.

You may edit this page the same way as the rest of the pages. There you will find one module called “Order Details,” which you may use to display the order summary. And then customize the page however you want.
Step 9 – Visual Email Automation for this Funnel (Optional)
One special suggestion we have for you here is the use of WPFunnels and Mail Mint together to create advanced email automation on the visual funnel canvas.
This step is optional, but you may use it to get more chances of conversion.
When you have both WPFunnels Pro and Mail Mint Pro, then on the canvas, below each step, you will see a “+” (plus) icon. If you click on it, you will be able to choose automation actions that can be triggered.
Let’s set one specific automation for the Upsell.
1. Click on the “+” icon below the upsell step and choose “Add To List(s).”
2. Select the “Add To List(s)” action and click on edit. It will open a Settings window. Here, set the condition “If Upsell is rejected.” Then choose a list from the dropdown options below.
**You need to set the trigger condition in the settings for the first action you use under any step. From there, it will follow into the rest of the actions like a traditional automation flow.
**The lists have to be created on Mail Mint prior to creating this funnel.
3. Click on the “+” icon below the “Add to List(s)” action and choose “Delay.” Edit the delay action and set the delay to “3 Days.”
**We are creating a follow-up offer email when someone rejects the upsell offer. We do not want to annoy the buyer by making an offer too soon.
4. Click on the “+” icon below the “Delay” action and choose “Send An Email.” Edit the “Send An Email” action, and you will find the option to set up the subject line, Sent from email, and customize the email copy.

Use ChatGPT to generate the subject line and email copy for better quality.
In the email, focus on conveying the benefits that the buyer is missing and that the discount will not last long.
5. Save it.
And that’s it. You have set up your funnel along with an automation flow for the case where one rejects the Upsell offer.
**If you want, you may plan other automation for order bumps, main offer acceptance, opt-in form submissions, and downsell offers acceptance/rejection.
Once you have gone through these 9 steps, your sales funnel for online courses is ready. You may do a final check and then launch your campaign to promote this funnel.
How to Drive Traffic into Your Course Funnel?
Following are some ways you may bring relevant traffic to your funnel to start selling courses.
- Share on relevant Facebook Groups. If you are part of any Facebook community where your target audiences hang out, you may share your course funnel there (with the admin’s permission).
- Create a social community of your own to promote courses. Work on building up a social community of people who are interested in topics that you cover in your courses. If you have a good number of members there, you may share this course funnel to get a good number of instant enrollments.
- Run paid ads on Facebook, Twitter, and Youtube. You may create a promo video for your course or other banner ads and then run paid ads to bring in targeted prospects.
- Host free webinars or BootCamps. You may host a free webinar or BootCamp on a certain topic that your target audience would be interested in. At the end of the event, you may offer your courses and refer them to this funnel.
Wrapping Up
As you saw, creating a sales funnel for online courses is super easy in WordPress. As long you have the right plan and reliable tools, you can create one in no time.
The combination of WPFunnels, TutorLMS, WooCommerce, and Mail Mint, will ensure you have everything you need to craft sales funnels for online courses that will save you time and money and help to grow your revenue.
Initially, when you launch your funnel, you may step up A/B split testing sessions for the landing page for the first few days. That way, if you have multiple landing page copies in mind, you will be able to determine the better option to go for in the long run.
Once you have many enrollments, you may also go for further email campaigns to convert them into buying more courses.
At the end of the day, the main goal is to have a well-planned funnel journey that will help sell more courses with less effort. So go ahead and create your own sales funnel now.


")
")
")