
Some lightweight themes like Astra, GeneratePress, and Genesis are less likely to load CSS and scripts on the site. This significantly improves page speed by removing unused CSS and JavaScript errors from the Google PageSpeed Insights tool.
However, 99% of commercial WordPress themes pack a lot of functionality into a small package and use a lot of scripts and CSS. Whether you’re using a light or heavy theme, the plugin will still need to provide a lot of functionality. The overall speed score will be determined by each source file when using a theme and plugin combination.
In this article, we’ll show you how to optimize your WordPress page speed by removing unused CSS and JavaScript.
How to identify unused CSS and JavaScript?
You need to figure out what’s causing your sites to load unneeded resources. Several simple assumptions, such as a contact form, an online store, or review plugins, are not required on all sites. The task, however, is more difficult than you imagine.
- First, clear the caching and disable the caching plugin on your site. Now go to the Google PageSpeed Insights tool and check the speed indicator.
- To expand the messages, click Remove Unused JavaScript and Remove Unused CSS. All URLs that can be removed from the page will be displayed by Google.
- External Code – As you can see in the screenshot above, Google Adsense owns “pagad2.googlesyndication.com.” Unused CSS and JavaScript cannot be removed from third-party websites. Plugins for advertising, analytics, YouTube video embedding, and social media are used to add these scripts to your site. As a result, you should be aware that these external resources will have an impact on the speed of your page, and you will have no control over them until you want to remove them.
- Embedded CSS and scripts – these are not displayed in the PageSpeed tool. You’ll have to manually find and remove them from your website. Disable the plugin files if the plugin adds inline CSS or script. Remember that heavy themes with hundreds of lines of style.css have a lot of problems. To make the file smaller, manually remove the code from the style.css file.
As a result, if loaded as separate files, unused CSS and JavaScript can be easily uninstalled. Loading a huge style.css file or inline CSS cannot be removed unless you manually review them and remove unused codes. Alternatively, you might need to look for a light theme or plugin to solve the issue.
You can re-enable the cache plugin on your site once you’ve identified the source of the problem.
Install the Asset CleanUp plugin
If you have a lot of plugin and theme files loaded, remove them from sites where you don’t need them using the instructions below.
- Log in to your WordPress admin panel and go to “Plugins – Add New”.
- Type “Resource cleanup” in the search box and find the “Asset Cleanup: Accelerate page loading“ plugin.
- Install and activate the plugin.
- We recommend that you read the accompanying documentation after activating the plugin. This is required for the plugin to function properly.
Plugin settings
We won’t go over all of the plugin’s options in this article. If you’re using a cache plugin on your site, such as WP Rocket, make sure you’re not using any other features besides eliminating unnecessary scripts and CSS. Navigate to Asset Cleanup> Preferences> Plugin Usage Settings. You may select how to view and disable unnecessary CSS and scripts in your pages from this menu.
- Manage in the Dashboard – enable this option. This will assist you in parsing the page from the admin panel’s post editor.
- Front-end control – activate this option if you wish to parse the page from an external browser. You can turn it off if you don’t want to use it. Keep in mind that only a registered user with administrator access can perform external analysis. During the checkout process, visitors to your site will not be damaged.
- Assets List Layout – Select All Styles and Scripts> Grouped By Location from the dropdown menu (Themes, Plugins, Core & External). This will allow you to browse resource files organized by category.
- Hide the main WordPress file from the resource list? – Enable this option to prevent the major WordPress files from being messed with.
Now go to the Test Mode tab and select Enable Test Mode from the drop-down menu. This will allow you to double-check if the site is down after deactivating scripts and CSS before releasing it to the public.
Click “Update All Settings” at the bottom to apply the changes.
Remove unused CSS and JavaScript
You can parse the page from the editor or the front-end, depending on the settings.
- Disable scripts and CSS in the editor – Go to the post editor by editing any existing post. Scroll down to see the Asset CleanUp plugin’s meta fields. Examine all of the CSS and JavaScript loaded on this page and disable any that you don’t require.
- Disable Frontend Scripts and CSS – If the “Control in the Frontend” option is enabled, open any message in the browser interface. Remember to use a different browser tab to access your WordPress admin panel. Similar meta values can be found at the bottom of the page, which deactivate resources loaded on the page.
All of the CSS and JavaScript files loaded on the page are arranged according to your settings in both cases.
View the specifics of the files loaded by your plugins and themes by opening each group. You have numerous alternatives for each CSS and JS file, as illustrated in the image below.
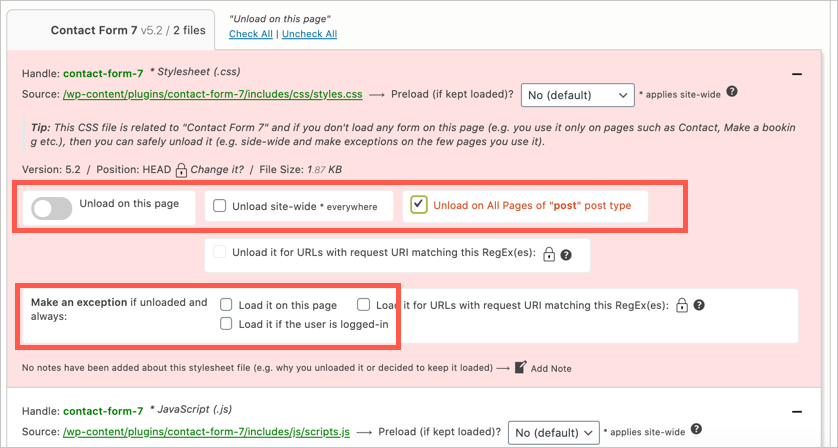
- Upload the resource to the page.
- Disable the file throughout the entire site.
- Disable for all messages (it will continue to load on pages and custom message types).
- Other features, such as RegEx support, are only accessible in the pro edition of the plugin.
After you’ve disabled the files, you’ll need to update your message on the site for the changes to take effect.
View and remove disconnected files in test mode
- Go to Asset Cleanup> Bulk Changes.
- Click the Posts, Pages, and Custom Post Types tab and select Post from the drop-down list.
- You can see all of your site’s disabled files here.
- To re-enable the file upload, choose the Remove Bulk Rule checkbox and then click the Apply Changes button at the bottom.
- You may also adjust the type of file uploads and edit any messages in the message editor.
Check your website and, if everything looks good, return to the settings page and turn off Test Mode. All users who visit your site will be able to see the changes. Similarly, you can alter custom post types, pages, and product pages to disable CSS and JS files. To see if any errors have been removed, use the Google PageSpeed Insights tool.
Conclusion
As previously stated, the plugin will only assist you in preventing plugins and themes from loading CSS and JS files. Third-party codes should be avoided, and unneeded codes should be removed from the primary style.css file. To avoid losing your modifications when updating your theme, we recommend creating a template to update your stylesheet.


")
")
")
Another interesting plugin for image optimization: https://wordpress.org/plugins/optipic/ Its automatic convert image to Webp (for webp-supported browsers) and compressed/optimized png/jpeg (for webp-unsupported browsers).