")
Last updated - February 13, 2024
Looking for ways to customize your Shop page? You’ve arrived at the correct location. The Shop page is one of the most significant pages in your store since it is where you present your items. As a result, it should have a visually appealing and user-friendly design.
The Shop page is a component of your WooCommerce store that is created by default upon installing and activating WooCommerce. In this tutorial, you’ll discover ways to personalize the WooCommerce Shop page.
Why Should You Customize Your WooCommerce Shop Page?
According to WooCommerce, a store page is “a placeholder for a post type archive for items.” Simply said, it’s the page on which you present your items, and it’s critical to your company’s success. Let’s take a look at why you should personalize the WooCommerce Shop page before we get into how you can do it.
Consider going into a store to make a purchase. What factors influence your buying experience and satisfaction? The way the items are organized and how easy it is to find what you’re looking for are two of the most crucial factors.
The Internet has made the globe a more connected place. Physical storefronts have given way to internet retailers. By the year 2040, it is predicted that 95 percent of all purchases would be made online.
People prefer to purchase online since it is more convenient and faster (or at least it should be). As a result, how you organize your items on your WooCommerce store page and how you present them to your clients might make a significant impact. To do this, you can create a high-quality store page with beautiful and informative videos in which each product will be presented, and which can be created using a free video editor. Not only in terms of conversions and money, but also in terms of your store’s reputation.
Content Table
- Creating a WooCommerce Shop Page
- Customizing the WooCommerce Shop Page with ELEX WooCommerce Catalog Mode, Wholesale & Role Based Pricing
- Designing a WooCommerce Shop Page with Gutenberg Blocks
- Designing a WooCommerce Shop Page using Shortcode
- Changing the ‘Shop’ page into your Homepage
- Customizing the Shop page with Storefront
- Customizing the Shop Page of Your WooCommerce Store
- Storefront Powerpack
- Storefront Child themes
- Setting up the website homepage with featured products using a Storefront Template
- Customizing the WooCommerce shop page using Elementor
Creating a WooCommerce Shop Page
When you install WooCommerce, it provides important eCommerce pages for you, such as Shop, Cart, Checkout, My Account, and Privacy Policy. Each of these pages has a certain purpose on your website.
The checkout page, for instance, offers payment choices, the cart page displays things added to the basket, and the store page displays all of your products. As a result, when you add products to your website, they are instantly moved to the ‘Shop’ page.
While this is useful, you may also make a custom page as your store page. Follow these steps to accomplish it:
- Hover over WooCommerce in your dashboard and select ‘Settings.’
- Stay on the ‘General’ sub-tab after switching to the ‘Products’ tab.
- The first option gives you the ability to designate your Shop page.
- The drop-down menu allows you to select a page.

You may also change the functionality of your cart and add a placeholder picture. The ‘Add to cart behavior’ area contains two options just below the ‘Shop’ page settings. If you want your customers to be routed to the cart page when they add an item to the cart, enable the ‘Redirect to the cart page after successful addition’ option. If you wish to offer the ‘Add to Cart’ option to shop archive pages, keep the ‘Enable AJAX add to cart buttons on archives’ option enabled.

Customizing a WooCommerce Shop Page with ELEX WooCommerce Catalog Mode, Wholesale & Role Based Pricing
It is simple and easy to alter the WooCommerce buttons using the ELEX WooCommerce Catalog Mode, Wholesale & Role Based Pricing by ELEXtensions plugin.
Below is a step-by-step guide for each of the three choices the plugin offers to allow you to edit the WooCommerce buttons.
Catalog Mode
You can edit the WooCommerce Add to Cart buttons using the Catalog Mode by following the below-mentioned procedures.
Navigate to WooCommerce Dashboard > ELEX WooCommerce Catalog Mode, Wholesale & Role Based Pricing > Settings > Catalog Mode
By selecting the appropriate page [Shop Page / Product Page] as to which you would like the changes to appear and clicking the Enable box next to the Remove Add to Cart option, you may choose to remove the Add to Cart button from the Catalog Mode page.

Your custom text can be added in its place after the Add to Cart button has been removed.
In order to accomplish this, add the custom text—in this case, “Enquire”—in the text box located next to the Placeholder Content options, as seen below.
Once again, the entire page that you have chosen will display this update.
You can enable the custom text to redirect to a website of your choice after removing the Add to Cart button and replacing it with custom text.
Go to the Catalog Mode page, put the website address into the text field next to the Change Button URL option, and then save the adjustments.

Similar to other customization choices, your choice will be reflected across all of the products on the Product or Shop page.
Role-based Settings
In contrast to the catalog mode, the role-based settings allow you to specify how the Add to Cart button is customized based on the various user roles.
Navigate to WooCommerce Dashboard > ELEX WooCommerce Catalog Mode, Wholesale & Role Based Pricing > Settings > Role-based Pricing
Selecting the appropriate user role from the selection list next to the Remove Add to Cart option will allow you to decide whether to remove the Add to Cart button for that particular type of user.

You can select the page on which you do not want the Add to Cart button to appear for particular users, just like with Catalog Mode. The options are Shop Page, Product Page, or both as indicated below.

You can insert custom text as in Catalog Mode to replace the Add to Cart button after you have removed it for specific users based on their user roles by inserting the text in the text box provided for the Placeholder Content option.

Next, based on user responsibilities and for a particular page of your choice, you may also modify the Add to Cart button. Not the font, color, font size, etc., but the wording of the Add to Cart button can be changed.

This plugin makes it simple to redirect people to your website or a third-party website based on their roles. Then, put the URL in the text box provided in the Change Button URL option, after selecting the user role in the Customize Add to Cart option, and save the changes.

Product-based Settings
The Add to Cart button can be modified and removed in this configuration depending on the selected products. For instance, you can alter the Add to Cart button of a single product if that product is unavailable, has a limited supply, or has its price subject to change.
Navigate to WooCommerce Dashboard > ELEX WooCommerce Catalog Mode, Wholesale & Role Based Pricing > Products
By choosing the product from the list, you can configure the Add to Cart button on this page just like you can with the other two options mentioned above.
The alteration you made will only be visible for that particular product after you save the changes.

Designing a WooCommerce Shop Page with Gutenberg Blocks
Instead of the conventional WordPress editor, the WordPress 5.0 version introduces the Gutenberg Editor. This is a page customizer that allows you to use a variety of blocks to customize your pages. You can rapidly set together your Shop page using WooCommerce and the Block Editor. Now let’s go through how to create a Shop page in the Block Editor with those goods step by step. The WooCommerce plugin adds additional blocks to the WordPress Gutenberg Editor.
Step 1: Create the Shop Page
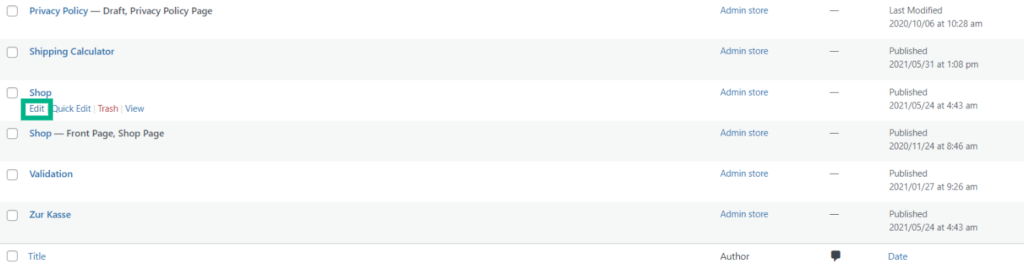
As discussed above, when you install WooCommerce, it creates a Shop page for you. Pages > Shop is where you’ll find it. You’ll be directed to the WordPress Gutenberg Block Editor if you click the edit link beneath the Shop page name.
Step 2: Create a Layout with the Block Editor
Now that the page is up and running on your WordPress site, it’s time to fill it with content! This is the point at which your page begins to take shape.
When looking for Blocks in the Block Editor, keep in mind that WooCommerce blocks have their own area! These can be used to display various shop-related content categories. Simply pick one and place it on your design. These Blocks are essential for creating a professional Shop page using WooCommerce and Gutenberg. You can keep adding the sedated blocks below each other depending on the amount of content you want to add to your Shop page. For example, you can take the ‘featured products’ block and drag it to the top of the page as seen below.

Once you place the block, it asks you to select the featured product from your created products. Let’s select ‘Cap’ for this example.
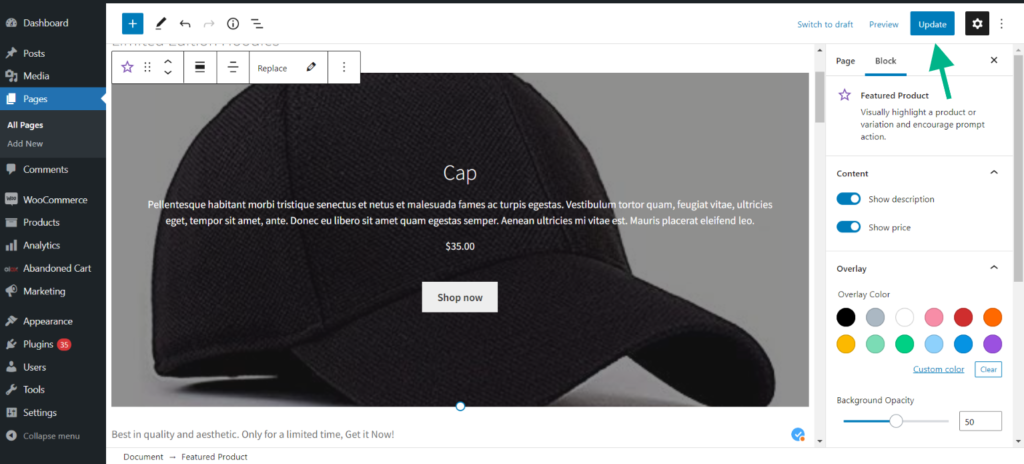
Here is how the Shop page looks after we added the ‘featured image’ block.

Step 3: Personalize Your Design
It’s time to modify each Block now that you’ve put up the structure of your Shop page with Gutenberg Blocks. Certain settings may need to be changed depending on how you want your Shop page to function. This segment may be rushed through, or you can take your time and really explore everything each Block has to offer!
Explore the Block settings that display on the right-hand section by clicking on each Block you created. Use the “Preview” button in the upper right-hand corner of the page if you’re not sure how the final outcome of a configuration will look.

Here is a preview of my test ‘shop’ page

Step 4: Check Your Work and Add the Finishing Touches
Now it’s time to save and test the shop to ensure it’s up and running. Select the “Publish” button in the top right-hand corner of the screen to save your work. Don’t worry, your site visitors won’t be able to see the page till later. Add “/shop” after the URL in the front-end of your website. Your store should now be visible in your browser.
Examine the Website and test the filter and sort tools along with product links to see if they function properly. This is to ensure that the items are shown accurately.
Now that we have understood how to use the Gutenberg Blocks customizer, let’s move on to shortcodes.
Designing a WooCommerce Shop Page using Shortcodes
A shortcode is a tiny piece of code that performs a specific purpose on your website and is represented by brackets like [ ]. It may be placed almost anywhere on your website, article, or other material, and it will add a certain function to it. You may utilize shortcodes to display galleries, products, and other content.
The shortcode for adding products to your Shop page is one of the most important ones. The shortcode is in the format of the word encased in brackets, for example [products]. You can add variations to the shortcode in WordPress versions above 3.2 such as [featured_products], [recent_products]. To get an in-depth understanding of shortcodes, check out the ‘A complete guide to WooCommerce shortcodes’ article.
If you use the WordPress 5.0 and above version with the Gutenberg Block Editor, then you can just drag and drop a shortcode block anywhere you need and enter a shortcode in it.


Below, you can see how the [best_selling_products] shortcode appears on the Website’s frontend.

Changing the ‘Shop’ page into your Homepage
You’ve created a WooCommerce store page, which is a location on your website where customers can explore and purchase things. However, your homepage has not yet been switched to the store page. This implies that when someone searches for your website’s name, they’ll end up on your homepage. They’ll have to utilize the navigation menu to get to the products page from there.
A psychological characteristic known as “decision avoidance,” which is the inclination of individuals to avoid making a decision that takes too long, adds to the pressure.
Decision avoidance on a homepage entails “bouncing” by quitting the page or pressing the back button. To avoid this, the first objective of your homepage should be to persuade potential consumers to stay by making navigation simple and showcasing items on the home page, or in other words, making the homepage appealing to potential customers.
Shopping on the internet should never be inconvenient. Set your store page as your homepage to make your shopper’s life simpler. Here’s how to do it:
- Hover over ‘Settings’ in your WordPress dashboard and choose ‘Reading.’
- Switch to ‘A static page’ instead of ‘Your newest posts’ in the homepage display settings.
- Select your ‘Shop’ page that you wish to be featured as your homepage from the drop-down menu next to ‘Homepage.’

The URL slug (for example, www.wooshop.com/shop) for your store page will vanish after this step, causing the ‘.com’ or’.in’ version of your website link will lead you straight to the Shop page.
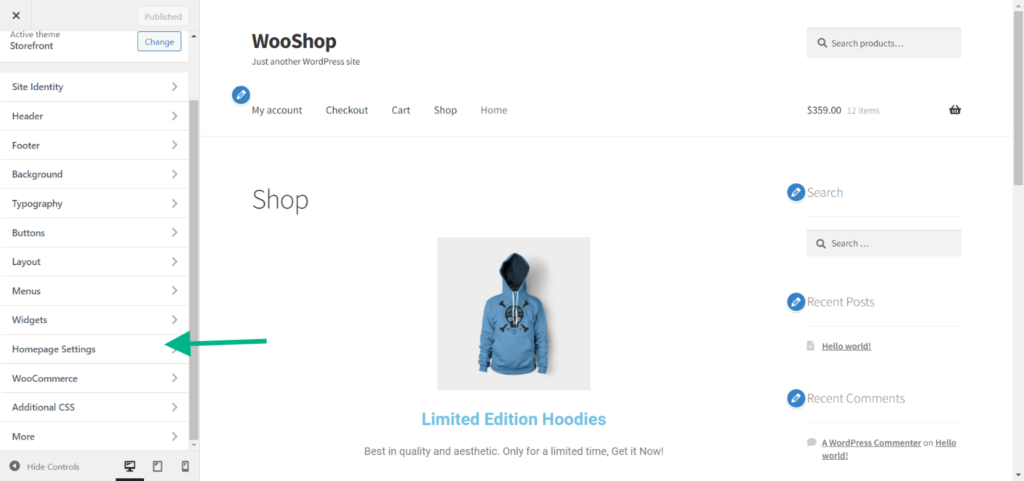
You can also achieve the same by going to Appearance > Customize > Homepage Settings. Below, you can see a visual example of the same.

Customizing the shop page with Storefront
Choosing a theme, whether you’re new to WooCommerce or just want a change, may be tough. After all, there are hundreds of thousands to pick from. WooCommerce Storefront is by far the most popular of all the themes available today, owing to the fact that it was built by the WooCommerce developers themselves. You’ll learn more about Storefront and why it’s still one of the finest solutions available.
The WordPress dashboard is the quickest way to install Storefront.
- To add a new theme, go to Appearance > Themes > Add New.
- In the search box, type ‘storefront’ and press enter.
- Hover your mouse over the screenshot of the Storefront.
- Select the ‘Install’ option.
- Activate the theme in the same way you would any other WordPress theme.
You can start setting up your store with Storefront by going to the WordPress Dashboard > Appearance > Storefront. Once you click ‘Let’s go’, a guided tour starts on how to use Storefront in detail. If you wish to skip the tour, we can help you out by giving a gist of how it can be done.

After installing and activating the WooCommerce Storefront theme, you’ll be prompted to install and activate WooCommerce. Once you have completed the installation and activation of both, we can continue to customize your Shop page.

The Storefront theme by itself does not add much of a customization capability to your Shop page. It does the basic work of changing the layout of the Shop page (or any specific page) along with adding the ability to customize certain aspects such as the product catalog as shown in the next section.
Customizing the Shop Page of Your WooCommerce Store
Apart from these useful blocks, WooCommerce also adds an extra layer of adjustments to the store page via the ‘Appearance’ option in WordPress. You may control the number of goods on the store page, the size of picture thumbnails, and more with these adjustments.
Take the following steps:
- In your dashboard, hover over ‘Appearance’ and select ‘Customize.’

- From the list of customizable website elements, choose ‘WooCommerce.’ Then select ‘Product Catalog’ from the drop-down menu.

- Select whether you want your store page to display items, categories, or both from the first drop-down menu.
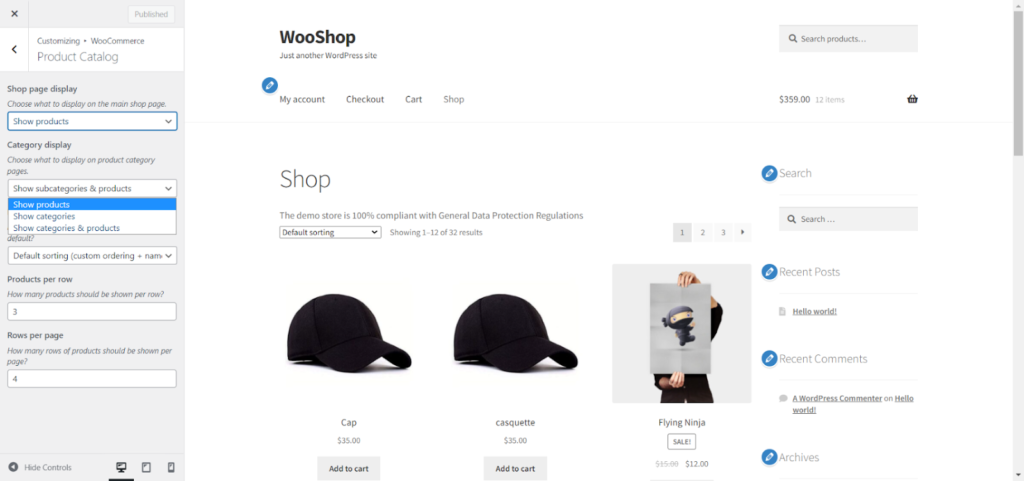
- Select how you want your goods on the store page to be sorted using the third drop-down menu: by name, popularity, rating, or price.
- The ‘products per row’ and ‘rows per page’ options allow you to specify the number of goods per row and rows per page for your store page. These two choices combine to allow you to increase or decrease the amount of goods shown in your catalog.
- Return to the previous page and choose ‘Product Images.’
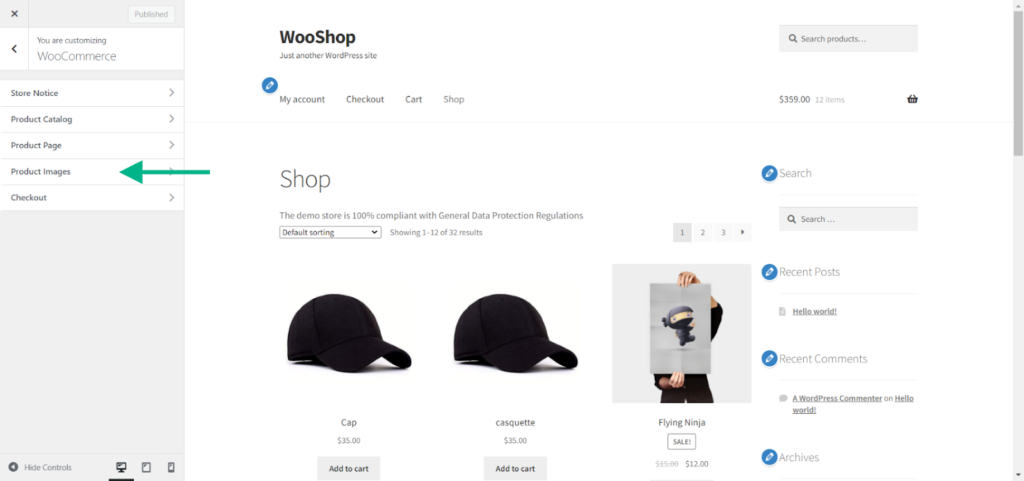
- You may change the size and aspect ratio of your product thumbnails in this section.
To gain the most out of Storefront and get into further customization of the Shop page, you can utilize the Storefront Powerpack extension or one of the many available child themes. Let’s have a brief look at each of the add-on bundles.
Storefront Powerpack
The Storefront Powerpack plugin provides you creative control over your Storefront theme’s aesthetic and layout settings. To install the Powerpack extension, follow these steps:
- From your WooCommerce account, download the Storefront Powerpack.zip file.
- Go to WordPress Admin > Plugins > Add New and upload the plugin file you downloaded using Choose File.
- Install and activate the extension.
Storefront Powerpack combines with the WordPress Customizer. This creates a new menu called Powerpack right above the default menus.
- Select Appearance > Customize from the drop-down menu.
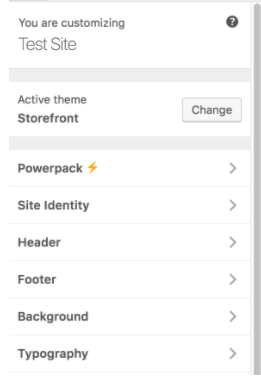
- When you choose Powerpack, a new menu will appear.

We will give you a brief of what each of the above drop-downs accomplish:
- Designer – It allows you to click on any section in the page and customize the design of the element including font type, color, size, style, etc.
- Layout – You may adjust the page width and employ a content frame in the layout settings.
- Checkout – Allows you to customize the positioning and layout of the checkout menu.
- Header – You may use the Header Customizer to toggle and rearrange the page header menu components.
- Footer – On devices with smaller displays, you can activate or hide the footer bar.
- Homepage – These options only apply to pages that use the homepage template.
- Product details – You may modify the layout and adjust any part of the product page using the settings.
- Messages – The background/text colors used in WooCommerce informational messages may be customized using settings.
- Shop – Settings allow you to personalize and manage features on your Shop page.
The Storefront Powerpack extension, as you can see above, adds an extra level of features to the regular Storefront theme and helps personalize each of the default pages created by WooCommerce to match your brand identity. The Storefront Powerpack extension costs $59 and is worth every penny as it is an integral component to design the perfect Shop page.

Storefront Child themes
A child theme is a layer that sits on top of the parent theme and allows you to make changes without having to start from scratch. There are two main reasons why children’s themes are used. Storefront offers 14 child themes to customize your store above and beyond the default layout. Checkout 14 Best WooCommerce Storefront Child Themes (with Video) for a thorough explanation on what each of the child themes brings to the table.
You can also create child themes from scratch to suit specific needs. Go through this in-depth guide on How to Create WooCommerce Storefront Child Theme.
You can download a child theme by going to your WooCommerce account > Theme Store and downloading the theme you desire. Once you have downloaded the folder, you can install it by uploading the zip file of your child theme folder to your site by accessing the WordPress Dashboard > Appearance > Themes > Add New section.

Once you have completed customizing up your Shop page, click Publish. If you want to add ‘featured’, or the ‘latest products’ to your homepage via Storefront, check the next section.
Setting up the website homepage with featured products using a Storefront Template
Storefront adds two more page designs – Homepage and Full width – in addition to the normal WooCommerce pages. The Homepage design is an excellent approach to showcase your items, since it provides customers with an overview of your products and product categories as soon as they enter your store.
As soon as customers arrive at your website, it provides them with an overview of your new and featured items and product categories. Follow these steps to create a Homepage and apply the homepage template to that page.
- Step 1: Go to WordPress Dashboard > Pages and make a new page called ‘Home’.
- Step 2: Add some material that you’d like your visitors to see on a homepage, like background images and text.
- Step 3: Once you publish the page, go to ‘Quick Edit’ under the page you just created.
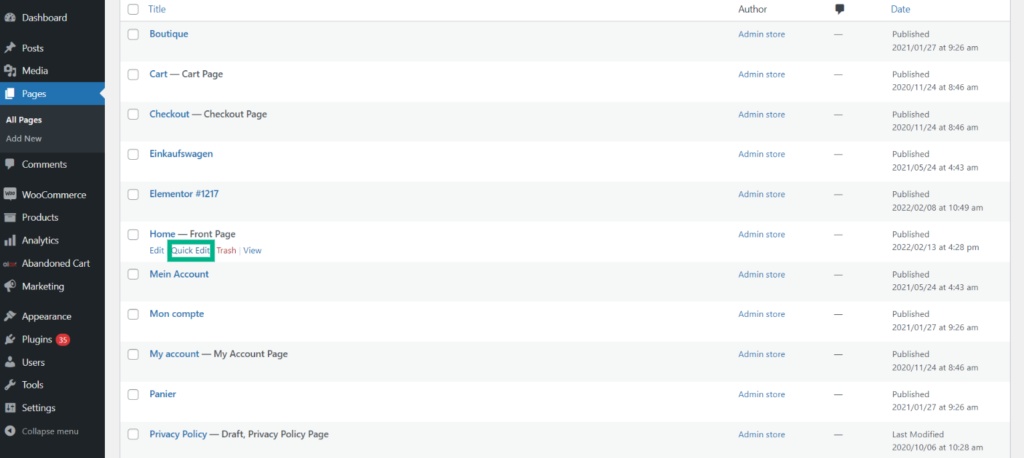
- Step 4: Click on ‘Parent’ and select ‘Main page’ from the drop-down.
- Step 5: Select “Homepage” from the “Template” drop-down menu.

When you set the ‘Homepage’ template to a specific page, it will automatically display the most recent and highlighted products.

Customizing the WooCommerce shop page using Elementor
Elementor is one of the best block builders, in regard to features and ease of use. It lets you create, tweak, and furnish any page on your website. If that isn’t enough, you can also design custom menus and take use of a large range of useful add-ons and themes. With WooCommerce with Elementor, you can create professional-looking Shop and Business pages for a fraction of the cost and time.
To gain the most out of it we recommend you to get the pro version of Elementor as it provides important tools needed to build a professional looking Shop page. To use Elementor to make modifications to the WooCommerce Shop page, you must first build a product archive. You may do so by going to Templates > Add New and selecting Product Archive as the type. You can start with an empty page or pick a block from the supplied templates.


Furthermore, you have a few WooCommerce and archive-specific widgets that may help with Shop page customization in addition to the standard Elementor page elements:
- Archive Title
- Archive Products
- Archive Description
- Products
- WooCommerce Breadcrumbs
- Custom Add to Cart
- WooCommerce Pages
- Product Categories
- Menu Cart


Make any adjustments you want, but the most crucial step is when you click Publish. You’ll need to choose where this product archive will appear on your site from the display choices that appear.
Keep in mind that you’ll need Elementor Pro to develop a product archive and Shop page for your WooCommerce store, as it provides the necessary blocks for a Shop page, that you will not have access to with the free version.
Elementor Kits
You also have the option to create and customize your ecommerce store to reflect your brand with a template kit. Create a conversion-focused website with complete control over everything from the color scheme to the content.
Navigate to the WordPress Panel > Templates > Kit library to access the Kit library. You may then select the one that best meets your requirements. Kits can be entirely customized once they’ve been imported.


To use the kit, click the Apply Kit button on the top right-hand side of the page.

Choose the material that you want to import. You may keep everything toggled or merely import portions of the package. Once you’ve finished, go to the bottom of your screen and click the green Next button.
Your request will now be processed by the importer. This page should not be closed or refreshed until it is finished. If your website already includes Theme Builder templates, you’ll be prompted to select which ones you’d like to override. Unselected templates will still be imported, but they will not be displayed.
You’ll receive a comprehensive list of all imported material after the import is finished. You may now go back to your dashboard and look at your content and customize it as you normally would, using the Elementor block builder. Below is an example of a shop page made using an Elementor Kit.

Elementor Pro comes with a plethora of useful functions, including:
- There are more than 60 premium widgets and 300 pro page designs to choose from.
- WooCommerce integration is complete, including a WooCommerce builder and WooCommerce widgets.
- Custom pop-up generators to improve your website’s lead generation
- There are over ten full website demos/templates to pick from.
If you’re thinking about purchasing Elementor Pro, we strongly advise you to do so. Pricing for Elementor pro is $49 annually for a single site.

Checkout Complete Elementor Page Builder Tutorial (with Video) for an in-detail understanding of how to use Elementor to design your WooCommerce Store page.
Customize WooCommerce Shop Page with ShopEngine
A freemium WooCommerce builder, ShopEngine is designed to enhance the features of WooCommerce. It boasts rich features, necessary to build your WooCommerce store. With ShopEngine, you can build and customize all the WooCommerce pages including the shop page.

How to Customize WooCommerce Shop Page with ShopEngine
In order to customize a WooCommerce shop page with ShopEngine, you need to follow certain steps. Let’s check them out.
Create a Shop Page Template:
At first, you need to create a shop page template and for that, click ShopEngine on the left sidebar. After that, select Builder Template from the drop-down menu.
ShopEngine>Builder Template
Click on the “Add New” button thereafter and a template bar will show up immediately with the following elements:
- Name: Type a name for your shop page template
- Type: Select the template type. Here, you have to select “Shop” as you are customizing shop page template
- Set default: Enable the toggle if you want to use the default design
- Sample designs: From this section, you can select the default sample design for your shop page and edit it as necessary. Otherwise, you can choose a sample design that you can edit from scratch.
Customize your WooCommerce shop page template with ShopEngine:
Once you are done with creating your shop page template, it’s time to customize or edit it. To customize it, click on the archive title and customize the following options as per your needs:
- HTML tag: Choose the tag you want to use for the archive title.
- Alignment: Select alignment for your archive title from here.
- Color: Pick the right color for your archive title.
- Typography: Edit the typography for your archive title. You can modify family, font size, line height, weight, transform from here.
Next, customize the archive page widget that is the product per page filter. You can customize the following parameters for your product per page filter:
- Lists: Type the number of your pages on the shop page.
- Typography: Pick the typography for your product per page filter.
- Spacing: Customize the spacing among numbers.
- Alignment: Select alignment for your product per page filter.
- Color: Select your desired color for your widget.
- Active color: You can pick a different color for your active page.
It’s time to edit the layout for your archive products now:
- Layout settings: Enable or disable layout settings for archive products.
- Products per row: Select the number of products to be shown on each row.
- Rows per page: Choose the number of rows to be displayed on each page.
Apart from these parameters, there are plenty of other options through which you can customize a WooCommerce shop page with ShopEngine.
Conclusion
Overall, the store page’s design and how you present your items may have a significant influence on your conversions. The shop page in WooCommerce is pre-built, and while there are some choices to change its look, they’re restricted.
Using one or all of the above approaches mentioned in this post to customize it will help you stand out from the crowd. Furthermore, it will better represent your company and demonstrate professionalism to your consumers.


")
")
")