
Last updated - March 17, 2022
You can manage different users on your WordPress site with the help of user roles. When you install WooCommerce, there are additional roles created that will help you provide access to customers and backend users in the appropriate manner. You can refer to our article on WooCommerce user roles to get a basic understanding of different roles. This article will be focusing on the possibilities of using WordPress and WooCommerce Roles and Capabilities for the better management of your website or eCommerce store.
A quick recap of WordPress and WooCommerce user roles
Before we get into the use cases of WordPress and WooCommerce user roles, here is a quick look at the available roles and their capabilities.
WordPress user roles
These are the default user roles that you will be able to use when you create users on your site
Administrator
When you create a new WordPress site, initial login credentials will be created for the site owner. The user role that is assigned to the site owner will be the Administrator role. Quite understandably, this user will have complete access to all aspects of the site including content management as well as site administration. The administrator will be able to create new users and assign them different roles according to the specific requirements of the site. For example, on a content-rich website, there will be different users to manage the content side as well as other users who will manage the backend aspects of the site. So the administrator will be the one determining how other users will access the site.
Major capabilities of the Administrator role:
- Has access to all administrative aspects of the site.
- Delete the site.
- Manage plugins and themes.
- Update WordPress core, plugins and themes.
- Create and manage users.
- Edit, publish and delete all posts and pages.
- Moderate comments.
- Manage Reusable Blocks of Gutenberg.
Editor
As the name suggests, the Editor role is for someone who will be managing the publishing aspects of the site. In addition to the capability to publish their own posts and pages, the user with the Editor role will be also able to upload files, manage comments, etc. However, this role won’t have the capability to manage backend activities of the site such as managing plugins or themes.
- Major capabilities of Editor
- Edit, publish and delete posts and pages.
- Manage Reusable Blocks of Gutenberg.
- Moderate comments.
- Upload files.
Author
A user with the Author role in a WordPress site will be someone who will be independent to create and publish content on their own. However, unlike the Editor role, they will not be able to edit or publish content by other users. The major capabilities are:
- Edit, publish and delete own posts and pages.
- Manage own Reusable Blocks of Gutenberg.
- Upload files.
Contributor
The Contributor role is for someone who can create content on the site, but won’t be able to publish it. They also won’t be able to upload files. All they can do is to create a post, and save it as draft, for the Editor to approve it and publish the piece. For a WordPress site that publishes content from different sources can assign this to their guest writers. So the capabilities are:
- Edit and delete own posts.
- Read Reusable Blocks
Subscriber
The Subscriber role is the default user role that will be assigned to a new website user. They only have the capability to read the content on the site’s frontend, and to manage their own profile on the site. The capabilities are:
- Read content
- Manage own profile.
Super Admin
The above user roles we have discussed is with regard to a single site WordPress installation. However, in a multi-site WordPress network, the role with all capabilities is called Super Admin. There could be individual site administrators for each separate site in the network. So the Super Admin will have additional capabilities relevant to a multisite network as follows:
- Create and delete sites
- Manage network and sites in the network.
- Manage network users, plugins and themes.
- Create, setup, manage and upgrade network.
WooCommerce user roles
In addition to the default roles of WordPress, WooCommerce adds two more user roles. These will be relevant more in terms of users in an online store, rather than a simple website. Let’s look at these roles and their additional capabilities:
Customer
This is the default role that is assigned to a customer when they register on a WooCommerce store. It is a basic role with not a lot of capabilities. Customers can manage their account information, and also view order details. So the capabilities are:
- Manage own account information.
- View order details.
Shop Manager
If the Customer role is equivalent to WordPress Subscriber role, you can say the Shop Manager role is more like the Editor role. The Shop Manager role will be able to manage all the administrative aspects of the store. A user with the Shop Manager role will be able to create and edit products on the store, and also view WooCommerce Reports. Here are the major additional capabilities of the Shop Manager role:
- Create and edit products.
- Manage store settings.
- View WooCommerce Reports.
It should be noted that the additional capabilities of the Shop Manager role will be automatically assigned to the WordPress Administrator role as well, when WooCommerce is installed.
Different use cases for WordPress and WooCommerce user roles
Now we will discuss some of the different use cases that could be applied to WordPress and WooCommerce user roles to create different business models.
Create content restrictions
One of the major applications of WordPress user roles is content restriction. You can make use of WordPress user roles so that certain content on your site will be available only to users with certain roles. How will you achieve this on your WordPress. We will demonstrate content restriction on WordPress using a plugin called Profile Builder.
Once you install and activate this plugin, you can easily restrict content on your site using user roles.
You can access the settings from the WordPress admin panel by going to Profile Builder > Content Restriction.
Here you need to manage the following aspects:
- First, you can enable content restriction by selecting ‘Yes’ from the dropdown.
- Then choose whether you want to display a message or redirect them to another page when customers try to access a restricted piece of content.
- If you choose Redirect, you need to specify the url in the next field.
- To customize the message for logged out users, you can simply edit the content in the next field which has a text editor.
- You will also find an option to show a custom message when logged in users are restricted from viewing a piece of content based on their user role.
- The last option on this page is to show a preview of the restricted content to users who are not allowed to view it in entirety. You can choose to not show a preview, show only a limited number of words from the content, or show till the ‘more’ tag.

Now, how will you specify which user roles are allowed to view a specific piece of content? These settings are available in the individual posts or pages itself. Open a Post or Page Editor, and you will see a section ‘Profile Builder Content Restriction’. Here, select the respective radio buttons for the user roles which you want to make that content available. For the rest of the users, the custom message will be shown, or they will be redirected to the specified url, based on the general restriction settings. However, the plugin also offers an option to override the General restriction settings for individual posts or pages.

You can use this plugin to create custom user roles as well.
For this, in the General settings, you need to select ‘Yes’ for the Roles Editor Activated field.
Once this is activated, you can access Users > Roles Editor from the admin panel, and create new roles.
Configure tiered pricing for wholesale stores
If you are building a wholesale online store, offering different pricing to customers will be an important aspect of your store. Instead of maintaining multiple websites with different pricing, you can easily create tiered pricing on your store, which will be visible to customers based on their user role. For example, you may have categorized three types of customers based on their bulk requirements of a product. For example, you may want to offer a product in these pricing tiers.
- Customer – $25
- Retailer Small – $20
- Retailer Medium – $15
- Retailer Large – $10
You can use the ELEX WooCommerce Role Based Pricing plugin to set this up on your WooCommerce store.
The prerequisites for this plugin is only that you should have installed WooCommerce in your WordPress site.
Let’s see how you can manage this.
Install and activate the plugin. Access the settings from WooCommerce > Settings > Role-based pricing.
Under Manage User Role, you can create new user roles.
For this example, we will create three user roles as described above.

Now, we will access the Role-based settings and select these user roles to be made available for ‘Individual product adjustment’.
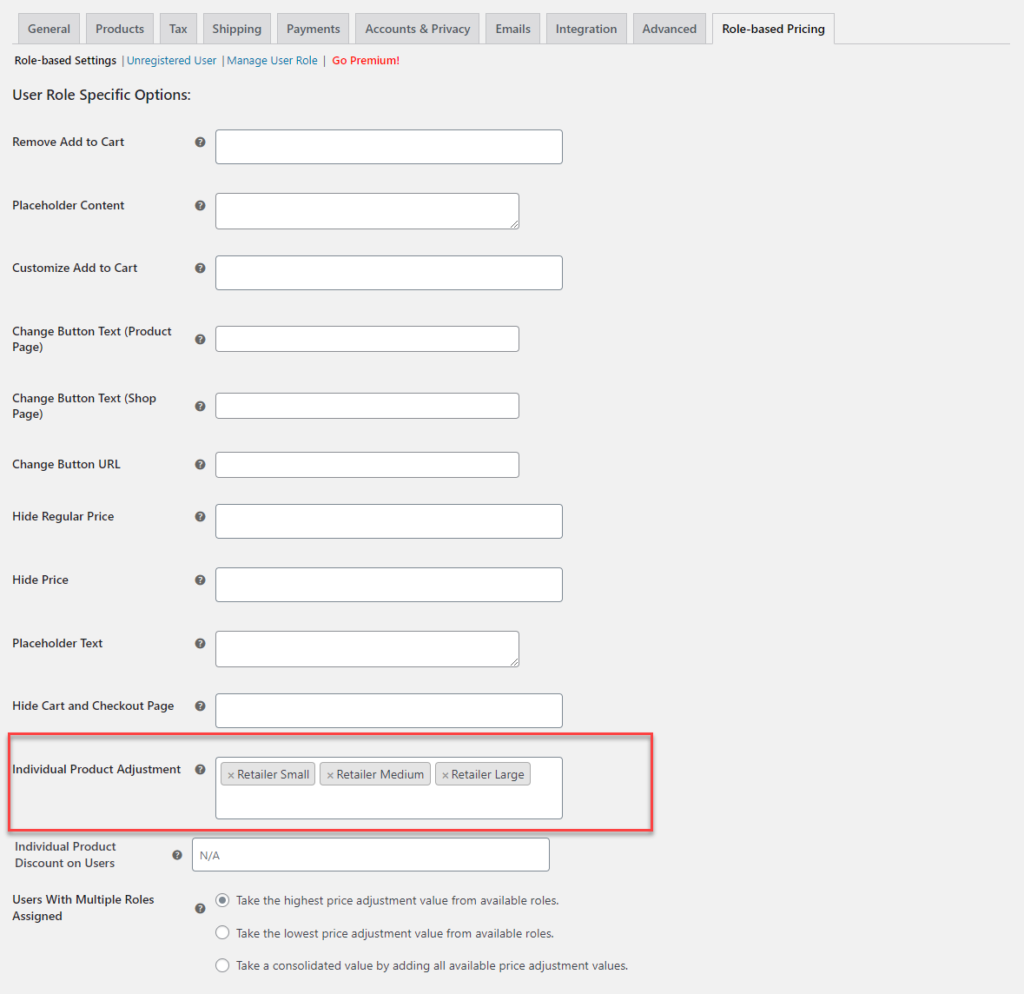
Save the settings, and open the product for which you want to offer tiered pricing. Scroll down to Product Data Metabox. In the General section, you will see the price for the general customer (WooCommerce Customer Role) and fields to enter prices for the custom rules you have created. Here you can enter the price, and save the product settings.

Now the price for the specific role will be displayed when users with these roles log in to your site.
This plugin offers a lot of customization options on your WooCommerce store based on user roles. Please check the product page of ELEX WooCommerce Role Based Pricing plugin for more details.
Set up unique discounts based on user roles
Another important application of user roles in a WooCommerce store is when you set up personalized discounts. You can use the ELEX Role-based pricing plugin to set up simple role-based discounts and markups specific to product categories. However, if you want to set up advanced product based or quantity based discounts, you can use the ELEX Dynamic Pricing and Discounts plugin. This plugin also lets you apply discounts specific to user roles.
Here’s how you can do it.
Install and activate the plugin.
Access the plugin settings from WooCommerce > Dynamic Pricing and create a new discount rule.

You can use this plugin to create different complex discount rules. While creating a discount, you can access the Allowed Roles and Date section, and specify the user roles for which it will be applicable.

Check the product page of ELEX WooCommerce Dynamic Pricing and Discounts to understand all its features.
Create content access levels
You can create an elaborate membership system on your website using the Members – Membership & User Role Editor Plugin.
This plugin helps you create diverse user roles and customize the capabilities of each as per your site strategy.

Once you have created all the necessary roles in your site, you can use the plugin to restrict access to specific content by showing a custom message.
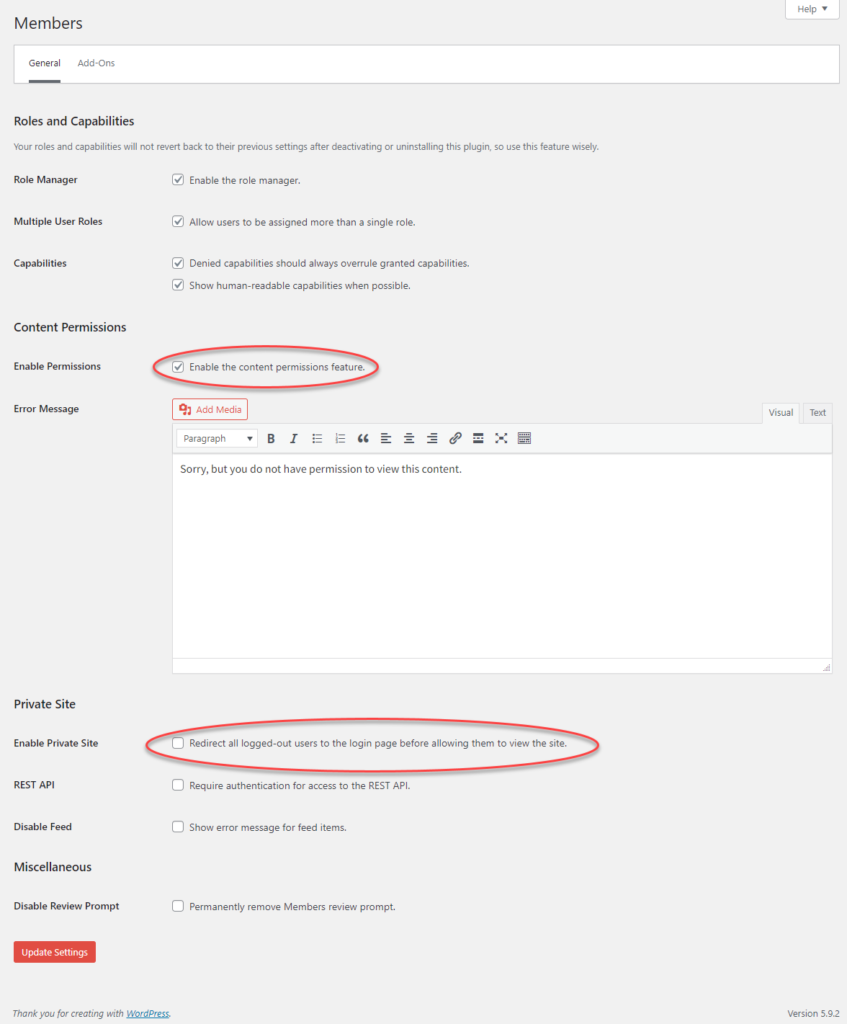
This plugin also offers shortcodes, which you can wrap around restricted content. This way only users with the specified roles will be able to view those content.
Control access to store management
If you are running an online store on your WordPress website using WooCommerce, you might need to control how different team members in your store will be managing your store. There will be team members who will be focusing only on the store aspects of the site, then there will be users who are handling the marketing side of things. You will also have technical experts who will be maintaining your site’s plugins and updates. For each of these different users, you can create different user roles and assign custom capabilities. The plugins that will help you with these will be User Role Editor or Members.
Customize information available on the My Account page
For a WooCommerce store, the My Account page is an important touch point. Your customers will be able to manage their profile and view their order history here. With user roles, you will be able to customize the information on these pages. For example, you can use the Customize My Account for WooCommerce plugin to create specific My Account endpoints and assign them to specific user roles.

Automatically assign a user role to users during registration
When you are managing an online business model, it is important to find a way to automate the process of assigning different user roles. The ProfilePress plugin will help you manage just that.
You can use this plugin to create login and registration forms that will assign a user role at the time of registration itself.
It is quite easy to manage this using this plugin. First, install and activate the plugin. From the admin dashboard, go to Profile Press > Forms & Profiles. Create a new form or edit an existing form.
In the form edit page, you will find available standard fields on the right side of the screen. Simply drag and drop the ‘Select role’ option to the form area.

Now, make sure the login page is accessible on the site’s frontend. You can manage this by going to Appearance > Menus. Find the Login page link from the ProfilePress Links section, and add it to the main menu.

Now when the registration form is displayed on the frontend, users will have an option to choose a user role as well. The store admin will be able to review this from the backend as well.

We hope this article has provided you with a good understanding on how you can use WordPress and WooCommerce roles and capabilities for better site management. Feel free to leave us a comment if you have any queries.


")
")
")