
Last updated - May 13, 2022
Transferring WooCommerce data from one website to another could be a lot to handle when there are hundreds or thousands of them.
Import-export plugins are developed to address these issues and are indeed very effective in reducing your workload to a great extent.
A major issue you will encounter while using these plugins is that most of them only support a single post type. This means you will have to go for separate plugins for different WooCommerce data types such as orders, products, coupons, subscriptions, etc.
If any of you are looking for a solution to this, the article might be of help to you. This article is a detailed review of the Import-Export Suite plugin.
Check out this video to understand how you can use this plugin to export and import WooCommerce product images:
What is the Import Export Suite for WooCommerce?
The Import-Export Suite plugin is a bundle of five individual modules each of which is responsible for carrying out the import and export of different WooCommerce components such as products, product reviews & ratings, orders, coupons, subscriptions, users, and customers.
Other than purchasing and handling these plugins one-by-one, you get them wrapped in a bundle so you can use it as a single plugin. It eliminates the need for adding multiple plugins to your store for the import and export of different WooCommerce data types.
Import Export Suite – Overview
Here is an overview of how this plugin is helpful in terms of the five following factors.
Ease of Use
The plugin comes with an intuitive user interface. With every import/export tasks you will be displayed the total number of steps and your real time progress. You can also easily move back and forth at each steps and make necessary changes to the settings.
Value for money
This plugin is available at $129 for a single site. Given it supports six different WooCommerce data types it would be a huge money saver if you use most of its features in your store.
Flexibility
Although it’s a bundle of five plugins, you have the option to activate only the ones you need and leave the rest in the deactivated mode.
Customer Support
The customer support team is quick to respond. You can contact them by creating support tickets. Phone, Facebook, or Twitter support is currently unavailable for this plugin.
Effectiveness
The plugin is capable of quickly importing and exporting thousands of WooCommerce data with the help of batch and scheduled import export features.
How to Set up the Import Export Suite
Import Export Suite comes with a different set up than the regular plugins. It’s explained in the following paragraphs.
As the plugin comes in the premium version, you first need to purchase it and manually install it in your WooCommerce site. For that, you can upload the Zip file of the plugin to your WooCommerce site.

Click Install Now and Activate the plugin.
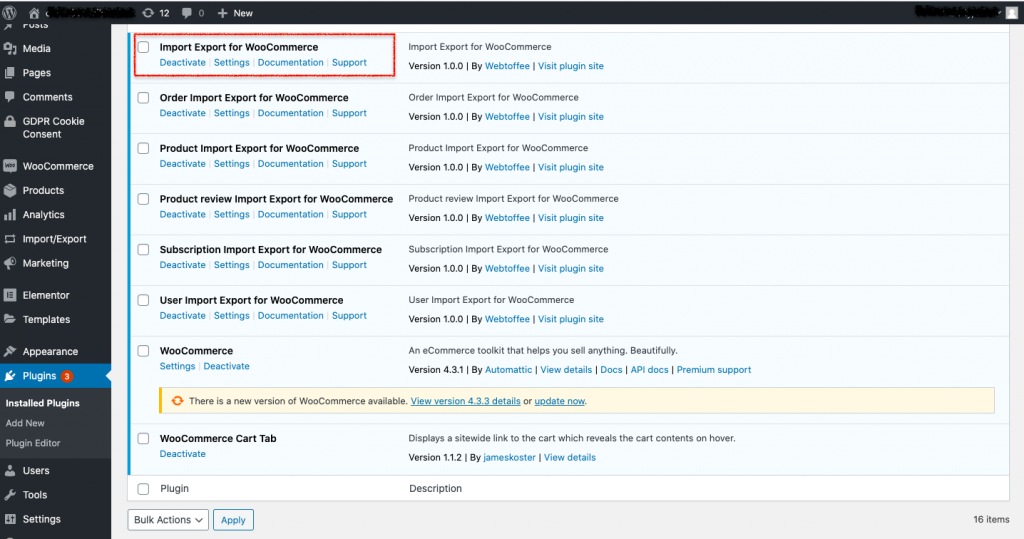
Now in the plugins page of your site, 5 additional plugins would be activated along with the Import-Export suite as shown in the above screenshot. It is because the plugin comes in a bundle.
If you don’t need all the plugins in the bundle, you can Deactivate the ones you don’t need and keep the rest in the active mode. But, you will have to keep the main plugin, Import Export Suite, active.
Here I am going to leave all of them in the active mode to give you a better understanding of the functioning of the plugin.
Now that you are done with the installation set up, let’s find out what all we can do with the plugin. For this let’s click on the Import/Export tab on the WordPress dashboard.

Import Export Suite Dashboard
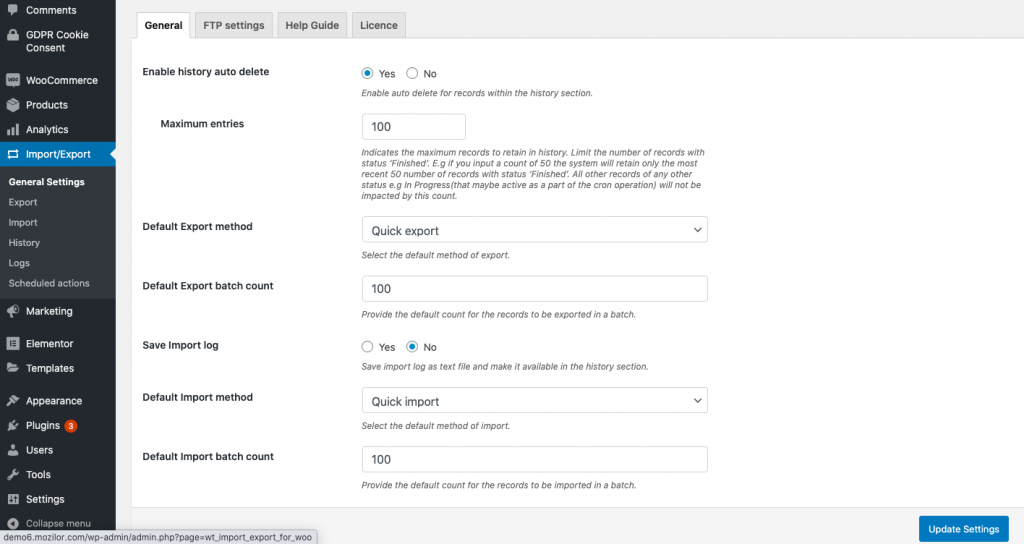
Here is a screenshot of the import-export suite plugin General Settings. On top, you can see four tabs General, FTP settings (for adding new FTP profiles), help guide (documentation and support), and license (for activating the plugin license). On the left, there are different tabs for export, import, history, logs, and scheduled actions.
Let’s explore how each of these functions in the following sections. At first, let’s see what the general settings contain.
General Settings
This is where you configure the default settings that are common for all the sub-plugins. It includes the default export and import method, batch count (to enable export or import in batches), etc.
Here I have configured the export and import method as “Quick” and the batch count as 100. It’s just the default settings, and you can always change them on the individual export or import configuration page of the plugin.
Export
Now, let’s see how to export the different WooCommerce data (products, reviews, orders, subscriptions, coupons, and customers) from your store using the plugin.
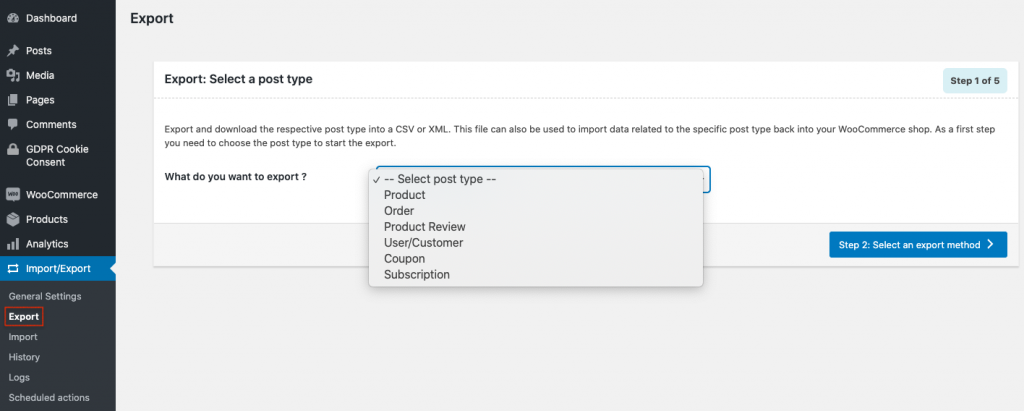
Here you can choose what type of data you want to export from the drop-down.
It should be noted that if you don’t activate the corresponding plugin for each data type, it won’t be shown in the list.
For example, if you haven’t activated the product import-export module, you will not be able to select the product data type for export.
Once you choose the data that needs to be exported, you can proceed to the next step of choosing the export method.
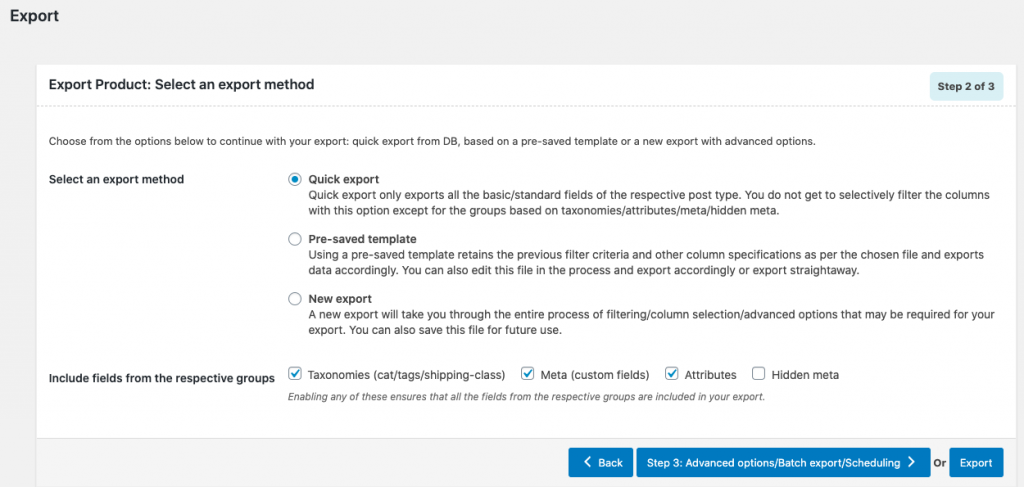
Since we have already set the default export method as Quick export in the general settings page, it will be pre-selected for it.
With Quick export, you will only be exporting the basic fields of the chosen data type. You will not be able to selectively filter the columns except for the groups based on taxonomies/attributes/meta/hidden meta. But it’s a great option if you need to export data quickly.
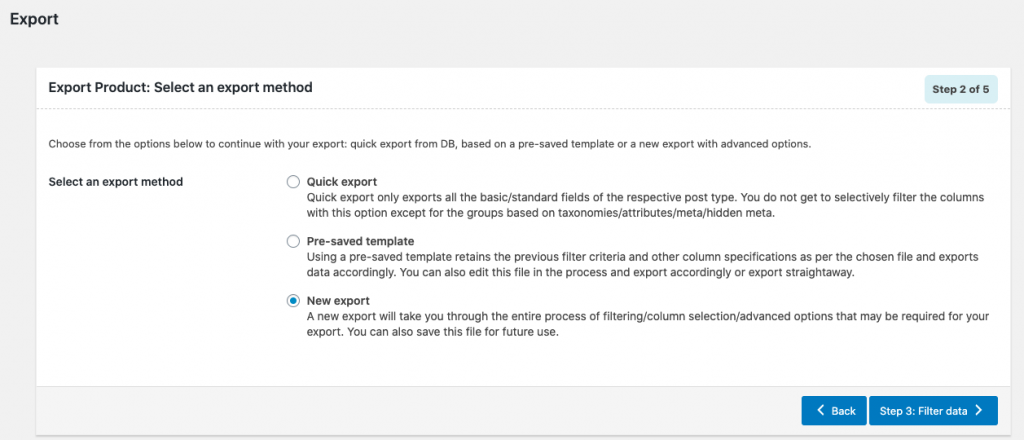
If you decide that you don’t want to proceed with the quick export, you can choose either the Pre-saved template method or New export
In the Pre-saved template method, you will be using the previous filter criteria and other column specifications as per the chosen file and export data accordingly. But if you are using the plugin for the first time you won’t be able to use this method as there won’t be any pre-saved templates available.
It’s also a quick way for export and you are allowed to make changes to the template before exporting.
The New export method will take you through the entire process of filtering/column selection/advanced options as per your export requirement. It is the longest export method and is mostly chosen by anyone using the plugin for the first time. You can save the configured template for future use (as a pre-saved template).
While choosing each of the methods you will be shown the number of steps you will be required to complete the entire export process at the top right corner of the page. You can also see the remaining steps as you progress with the export.
If needed, it is also easy to go back to the previous step and edit the settings that you have already configured since you don’t save any of the settings until all the steps are finished.
Import
Now, let’s see how the import process works. Following is a screenshot of the import window.
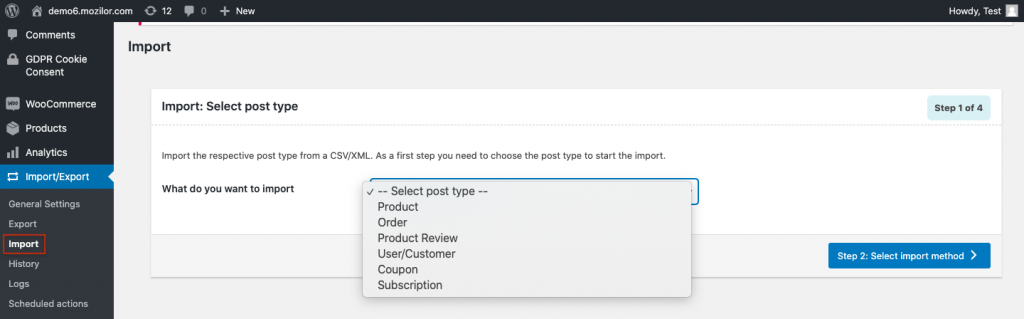
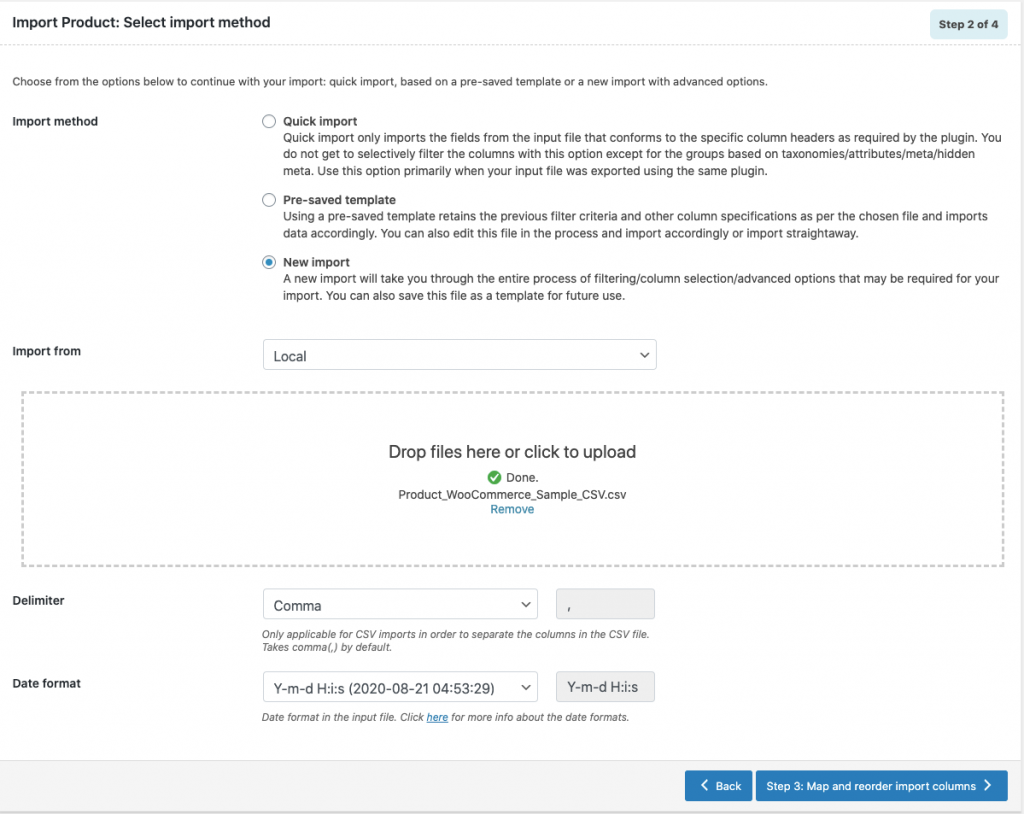
Like export, you can start by choosing a post type. Then choose an import method from the three options; Quick import, Pre-saved template, or New import.
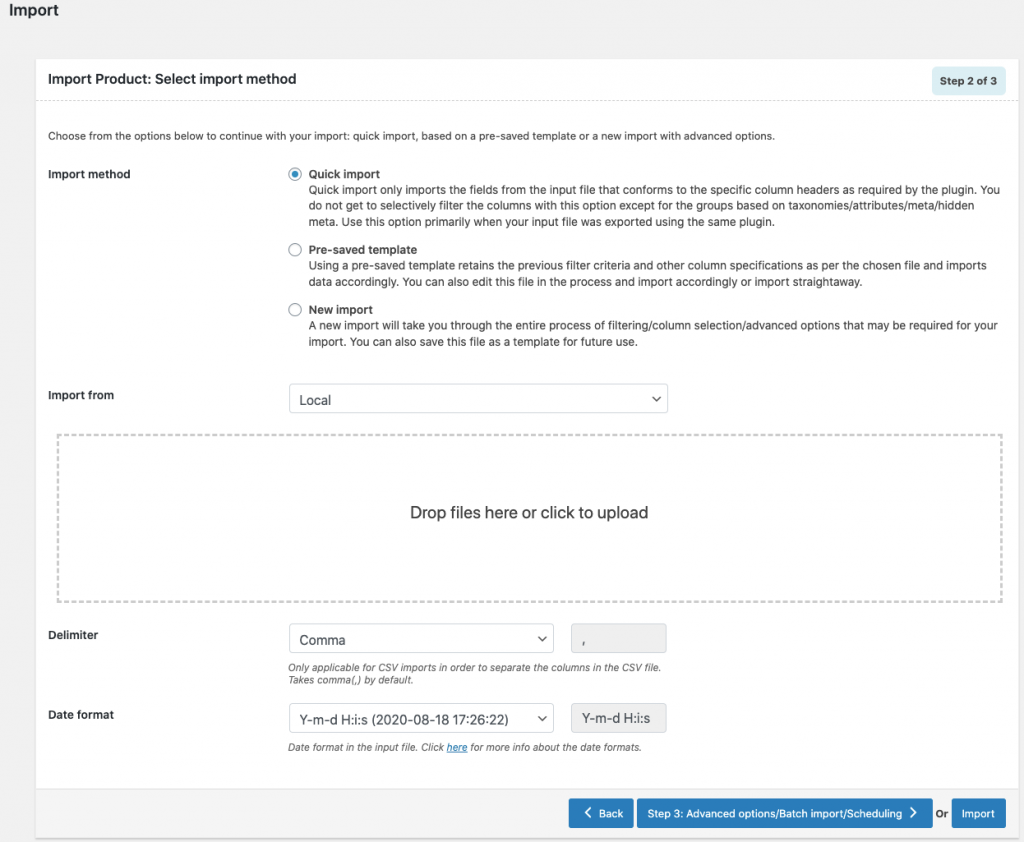
The plugin allows you to import files from three different sources. You can import either from your local computer, URL, or via FTP. For URL import you can enter the URL of the import file and for FTP import you can either choose from the previously added FTP profiles or add a new FTP profile by entering the relevant FTP credentials.
You can also choose a delimiter or date format before finally proceeding with the import or advanced import options.
Import Export History
In the import-export history section, you will be able to view the list of all the import and export carried out by the plugin with its detailed log (containing action type, post type, starting date, time, and status) and the option to delete or re-run the task.
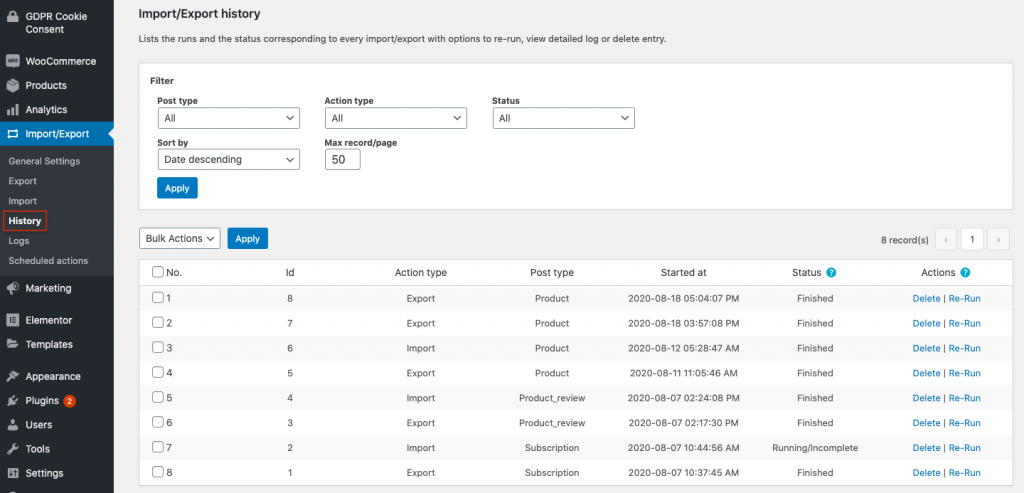
You have the option to filter the records according to the action type, post type, status, or on the date in which the action took place.
Logs
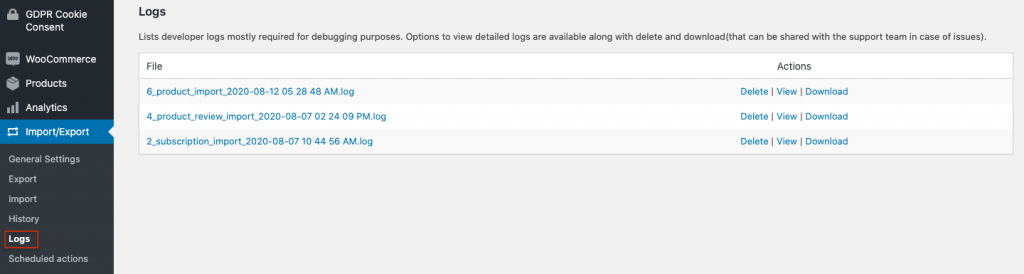
It lists the developer logs mostly required for debugging purposes. Here you have the option to either view, delete, or download (which can be shared with the support team in case of issues). the logs.
Scheduled Actions
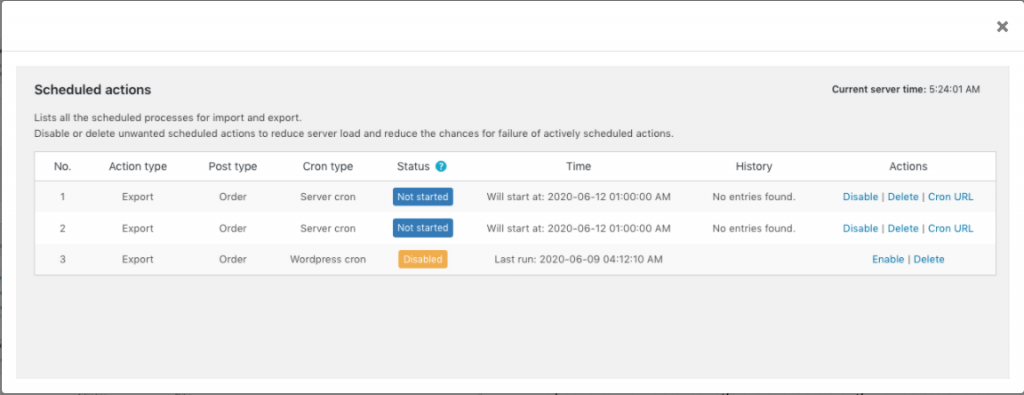
If you have scheduled the import or export of any WooCommerce data, it would be listed here. You can disable or delete unwanted scheduled actions to reduce the server load and the chances of failure for actively scheduled actions.
Now to get a better picture of the plugin lets see how to configure the plugin to import and export WooCommerce products.
Let’s start with the export of WooCommerce products.
Export of WooCommerce Products
The below steps will explain the export of WooCommerce products.
As mentioned earlier navigate to the export window of the plugin.
Step 1 – Choose ‘Product’ as the post type.

You can choose it from the drop-down.
Now proceed to the next step by clicking the blue button.
Step 2 – Choose an export method
Here I am going to go with ‘New Export’ as you will get to see the entire export involving advanced filters and other options.
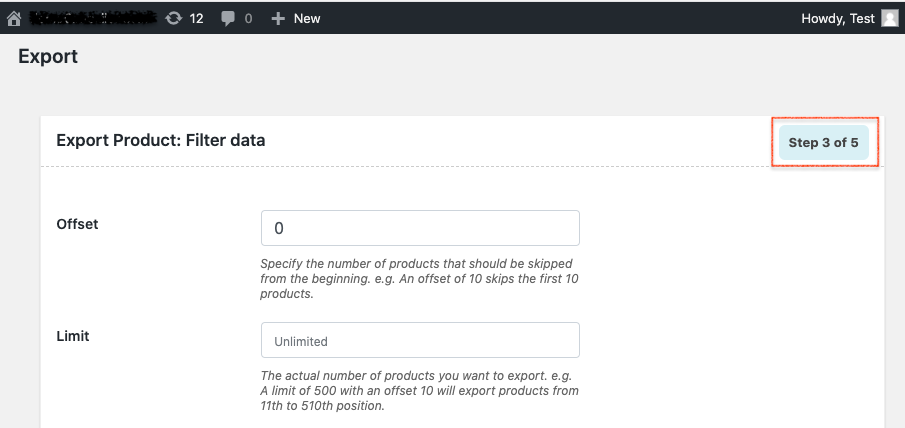
Step 3 – Filter product data to be exported
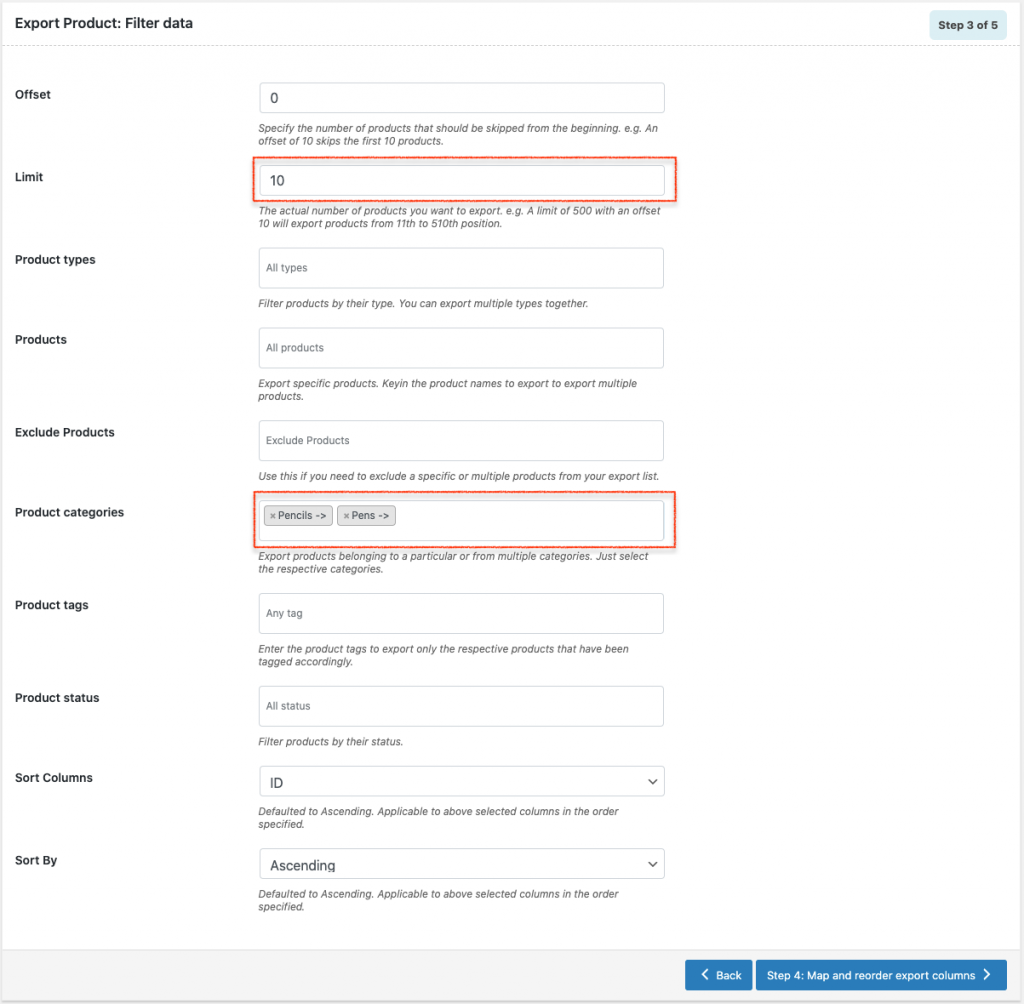
Here you can filter the product data by the number of products to be exported (limit), the number of products to be skipped from the beginning (offset), the product types to be exported, products to be included and excluded (based on their names), product categories, tags, and status to be exported.
You can also choose how you wish to sort the export columns. There are five options to choose from; ID, post title, product type, post date, and post modified.
In this particular export, I have configured the limit to be ‘10’ (which implies that at max only 10 products will be exported from your store), and selected two categories for export thus products belonging to only those categories will be exported.
Step 4 – Map and reorder of export columns
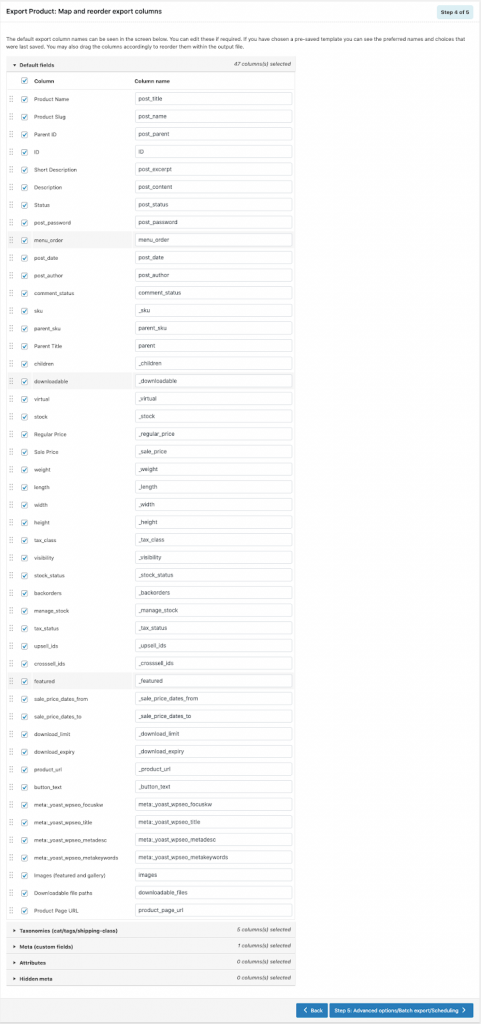
The above screen displays default export column names. If required, you can edit these by dragging the columns back and forth.
Step 5 – Advanced options/Batch export/Scheduling
This is the final step in the export process. Here you can configure certain advanced options like exporting images as a separate zip file and enabling batch export/schedule if you need it.
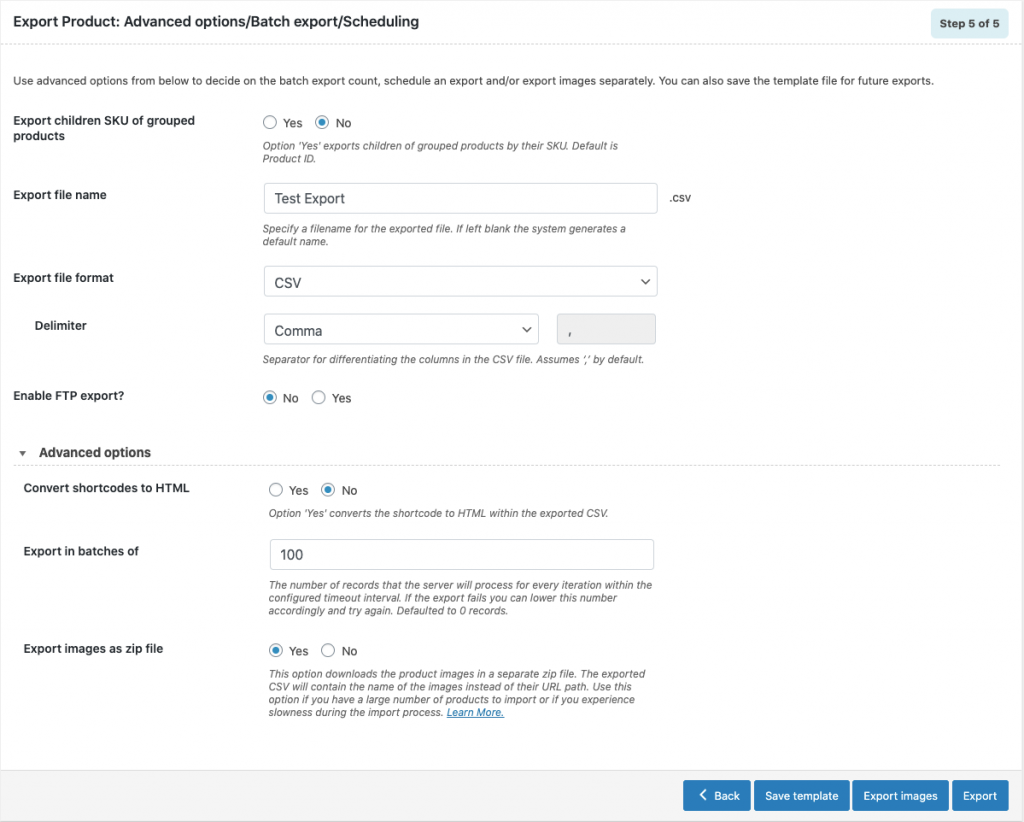
You can enter a name for the export file here. But if you left it empty the plugin will generate a default name. Next, you can choose either CSV or XML as the export format and choose a delimiter from the given options (Comma is chosen by default).
Up next, you can choose to either enable or disable FTP export. It will be disabled by default but on enabling it the window will expand to include the following configurations.
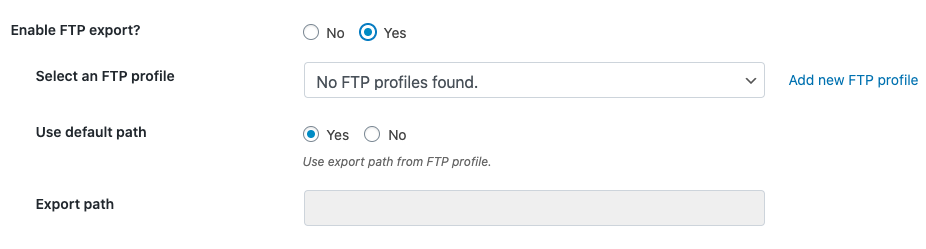
Now you can fill in the relevant details such as FTP profile and export path, etc. (It should be noted that you need to enable FTP export for enabling the scheduled export of data.)
In the advanced options sections, you can choose ‘Yes’ or ‘No’ to convert the shortcode to HTML within the exported CSV, enter the number of records that should be processed in one batch (during batch export), choose whether or no to export images as a separate zip.
Now when you are done with the configurations, you can proceed to the Save template if you wish to use similar configurations for future exports. Click Export Images to avail images in a zip file. Or go straight to hit the Export button to have the product data exported as per your requirements.
Following is a screenshot of the exported CSV file (partial screenshot to fit the window). Here you can find that products are exported exactly as configured. Only the products belonging to the filtered category are included in the exported CSV.

Import of WooCommerce Products
Here are the complete steps that are required to import products into your store using the Import Export suite plugin.
Step 1 – Choose the post type for import
As we are exporting products, choose Products from the drop-down list.
Step 2 – Choose an import method
New export is chosen as the import method and Local is selected as the import file source.
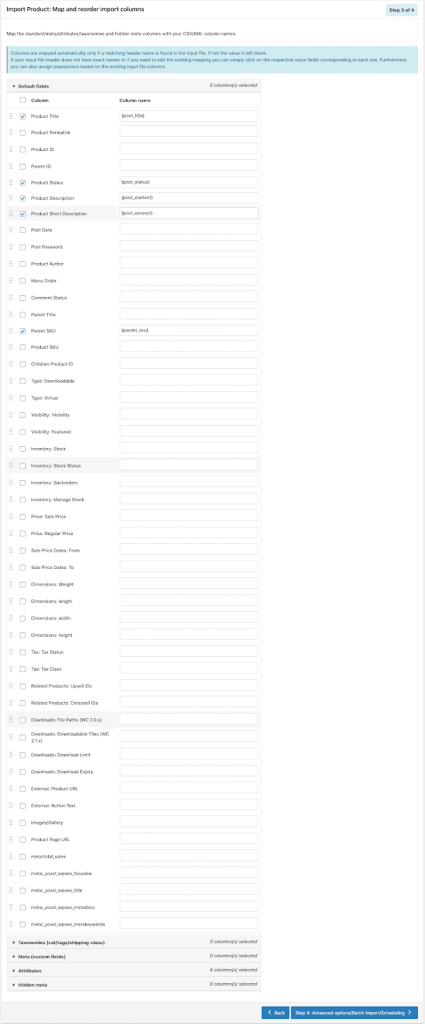
Step 3 – Map and reorder import columns
The automatic column mapping will only take place if a matching header name is found in the input file. For editing the existing mapping you can simply click on the respective value fields corresponding to each row.
Step 4 – Advanced options/Batch Import/Scheduling
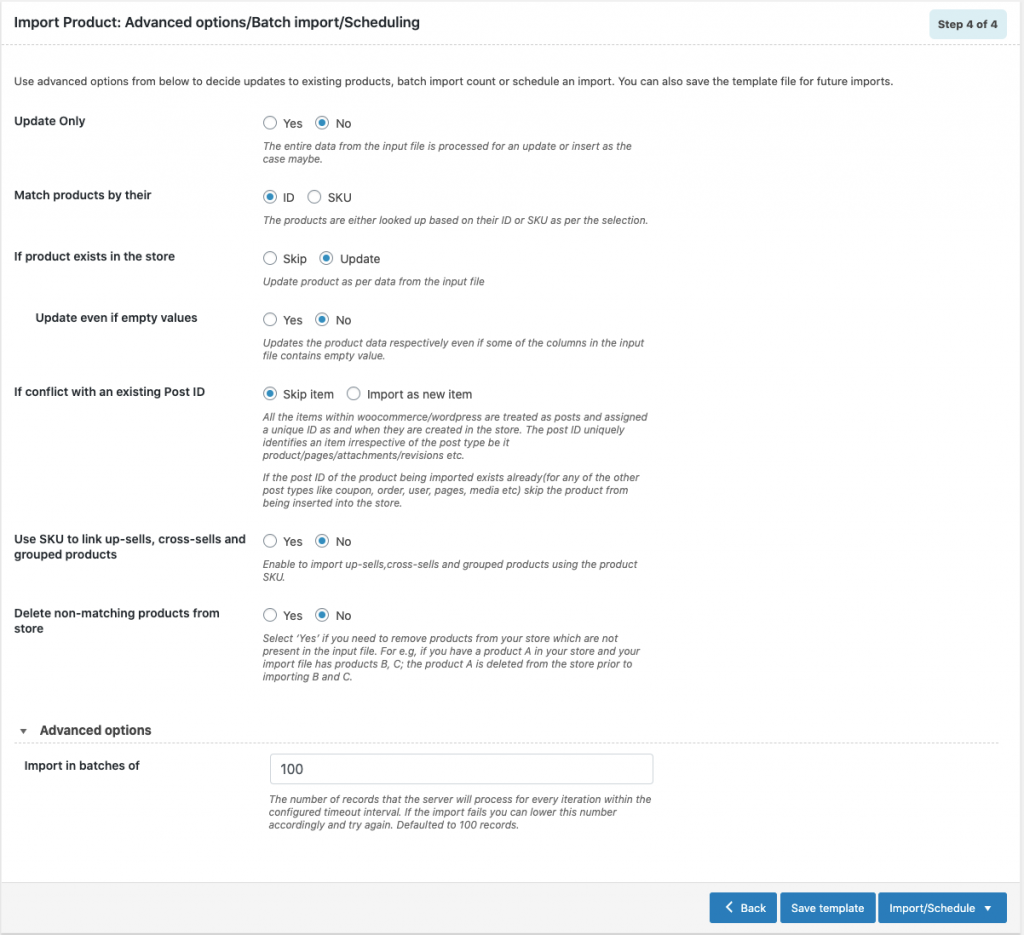
Here you can configure whether the input file is processed only for an update or not, decide products are matched by their ID or SKU, whether to skip or update when existing products are found in the uploaded CSV, how to handle when an importing item has a conflict with an existing post ID, etc.
Finally, by entering the batch import count you can save the template for future uses. Then you can choose to Import straight away or Schedule the import for another time.
Once the import is complete you will be shown the status or you can check the import logs to find it. If it failed for any reason, you can re-run the import from the log window itself.
Conclusion
The Import-Export Suit is a huge plugin with lots of features which makes it a perfect choice for running large stores that have a lot of data to process. But being an affordable and flexible plugin, even medium and small businesses can make use of this plugin to scale their business.


")
")
")